GUIDE VERSION
coachyu_visual_content_course_v4.7_2021_1020
Table of Contents
Designer / Analyst Cheat Sheet
Facebook Insights, Set up a Schedule, and Post Content
Facebook Instant Articles Checklist
How to Setup Facebook Instant Articles
How to Create a Facebook Infographics
Case Study: Envision Experience
4 Components of One-Minute Videos
Visual Content Course | page 1
Welcome!
A message from the CEO of CoachYu, Dennis Yu.
Text alone and long-form copy doesn’t cut it anymore. You need images and videos to grab attention and drive conversions. Together, we’ll go through the 6 forms of visual content, step-by-step in this guide:
● Memes
● One Minute Videos
● Instant Articles
● Infographics
● Lead Ads
● Video Conversion Ads
Build your content into sequences and implement a content production process to really harness the power of visual content, especially video. We’ll touch on how to use your Topic Wheel and Content Library in this course, too.
Visual Content Course | page 2
Designer / Analyst Cheat Sheet
Memes
Set up a Google Drive folder.
Set up a quoted document.
Create quote boost audiences.
Create initial bulk content.
Boost content.
Report results.
Organize base quote cards.
Structure evergreen campaigns.
Create template designs that work well.
Repeat steps 5-10.
Facebook Instant Articles
Add your team.
Get the Pages Manager App.
Install 3 Wordpress plugins.
Claim your URL.
Create style templates.
Create articles.
Explore audience network options.
One Minute Videos
Find your video subject.
Find / shoot a still video.
Edit in Photoshop to create a continuous loop of video.
Export to a GIF File.
Visual Content Course | page 3

6 Types of Visual Content
The 6 types of visual content fit into the ACC funnel
Visual Content Course | page 4
How to Create Memes
Memes are combinations of stock photos with stock quotes, often using famous images with famous quotes. Some people call these quote cards.
If you use your images and your quotes, you’ll not likely drive high consideration; not high enough to be in the top 1% of News Feed items, but what is necessary to get sub-penny interactions.
Why would you use someone else’s image with someone else’s quote? Good question.
At the top of the funnel, you’re trying to drive a first touch and are usually building a brand from no base of awareness. So using something familiar that your audience agrees with, and is part of your brand values, drive a light first touch to show you have aligned values.
You should use memes sparingly, mainly to drive a few posts that get high consideration and then invite people to become your fans. When you have a new page that only has a handful of fans, your audience’s default assumption is to distrust.
Also, make sure that you’re targeting the audience that will actually engage and convert with you further down the funnel. We’ve seen many brands forget this step and drive thousands of super cheap garbage likes, then complain.
If you’re already targeting the right people—not everyone in the United States or anyone that loves cats (unless you sell cat products)—the meme strategy is a good way to build a warm remarketing audience for more product specific content.
Remember that a meme is just one step in the funnel—one of many tactics you’ll employ in your sequences. So don’t spend more than 10% of your budget here—at the higher end when launching a brand and much less for maintenance.
1. How to Create Memes
1a. Edit the stock image.
1b. Match the feel of the image with the quote.
1c. Use a type that is visually appealing.
1a. Edit the Stock Image
Visual Content Course | page 5


Memes are primarily made from basic stock images and can be improved through color correction, cropping, and other editing.
In this example, the original was much too dark. By upping the brightness and contrast, color was brought back into the photo.
The original image (on the left), and the meme we designed with it (right).
There are a few good apps that make this work simple such as Canva (desktop) and WordSwag (mobile).
1b. Match the Feel of the Image with the Quote Choose an image that fits the quote, so the picture compliments the text and doesn’t distract from the main message of the meme. Here, the image represents a person’s life, a vast unexplored area (the plain), and the ambiguity of a person’s future (the cloudy sky).The image adds to the quote which refers to a revelation a person might experience in their life about the day they were born, and the present day.
Visual Content Course | page 6


Visual Content Course | page 7


This connection isn’t obvious to the average Joe, but that is the point. The image should serve the same purpose an ambient soundtrack would serve in a romantic movie. It sets the tone and helps get the point across to the viewer.
1c. Make Sure the Type is Visually Appealing The most important aspect of text in a meme is legibility.
Things that can create illegibility:
● Text is too small.
● Light text against a light meme or dark on dark.
● Blurriness (not a high enough resolution).
● Color clash of text with meme.
Visual Content Course | page 8


Visual Content Course | page 9
This quote is perfectly legible. It sits flush right, to contrast the taller girl on the left, and it doesn’t run into the sun. Both the quote and author’s typeface nicely bounce off each other, giving the viewer a much needed ease of reading, and even an appreciation for the simplicity of the image or beauty of the quote.
2. 20% Text Rule on Facebook
What Was the 20% Text Rule?
Until recently (read: very recently), Facebook had a rule stating that text couldn’t make up more than 20% of the image of your Facebook Ad. This was a strict rule, and they would reject ads because of it. They even had a grid tool where you could see exactly how much of the image your text took up, to save you the trouble of having it rejected multiple times.
I received a warning about text in my ad image.
What can I do?
If you received a warning about text in your ad’s image on facebook, your ad image likely includes more than 20% text (including logos and slogans). To keep ads as high quality and engaging as possible, our general Advertising Policies state that ads may not include more than 20% text in the image.
Before you edit and resubmit your ad, we recommend reviewing Facebook’s 20%
text policy and/or checking your ad with the grid tool. Keep in mind if your ad is a boosted post, you’ll have to delete and repost it to be boosted.
These were Facebook’s old guidelines and strict 20% text rule.
While most businesses didn’t seem to mind it, aside from the annoyance of having to edit an already-created image, some had more of a struggle with it. Some businesses would feature images of a product that had text on the actual product (like a shirt or coffee mug with text on it), and some had a hard time showcasing their product and still meeting the 20% text image overlay rule. They’ll likely be happy with the new changes..
What’s Changed
Facebook just made changes to the 20% rule, without even alerting advertisers. The grid tool (which I admittedly really loved because it was so helpful) is now gone—you can’t use it even if you wanted to. Instead, we’ve got a more vague guideline about recommended text overlay, which is, unfortunately, a little more complicated.
Visual Content Course | page 10

The help page that explains it all seems to be available only to a small number of users.
Thanks to an article on Search Inuence by Michelle Boyd, we were able to see what it looks like.
Now, instead of having a “yes or no,” your ad’s image will t into one of four different classifications ranking the amount of text overlay. These are:
● Ok
● Low (which is actually higher than Ok)
● Medium
● High
Images with text classification OK have minimal text—think a company logo and not much else.
Images that have been classified as low might have a slightly restricted reach.
Visual Content Course | page 11


As you could imagine, images with medium text have a limited reach, and images with high levels of text might not even be displayed.
An example of images with too much text that likely won’t even be displayed.
Keep in mind, all of the following counts as text on your image:
● Numbers
● Text-based logos, regardless of alignment or size
● Watermarks, even if they’re mandatory to use Fortunately, there are exceptions to the rule. These are the exceptions, and these examples of text do not count against you:
● Infographics
● Book and album covers
Visual Content Course | page 12
● Product images, when the entire product can be seen
● Posters for movies, music festivals, sporting events, and comedy shows
● Legal Text
● App screenshots
● Cartoon and comic strips
● Text-based business calligraphy
What It Means for Us
To me, there’s a distinct advantage and a distinct disadvantage with the new rule.
The good: Facebook advertisers and businesses are technically not limited (or at least not as limited) to the text on their images anymore. You could always have less text, but now you can add just a bit more if it’s needed. There’s wiggle room, and any time you have more freedom over your images, the happier you’ll be, and the more options you have when creating, which is always good.
The bad: While there’s seemingly more wiggle room with the rule’s update, the rule itself is a little vague. Though you can technically add more text than before, it may not do you much good, as your reach could be limited (and in extreme cases, not even be displayed altogether). Facebook also still seems to prioritize text with almost no text.
While the official and strict 20% rule has been dropped, giving us more freedom, Facebook is still prioritizing images with less text, and may punish those with too much text.” So we’ve got a change, but ultimately not a huge one, which should oer comfort to those who get tired trying to keep up with all the new Facebook updates. - Ad espresso Visual Content Course | page 13
Organizing Quotes
Create a Google document for all the quotes that you have.
BOLD = USED
ITALIC + BOLD = USED TWICE
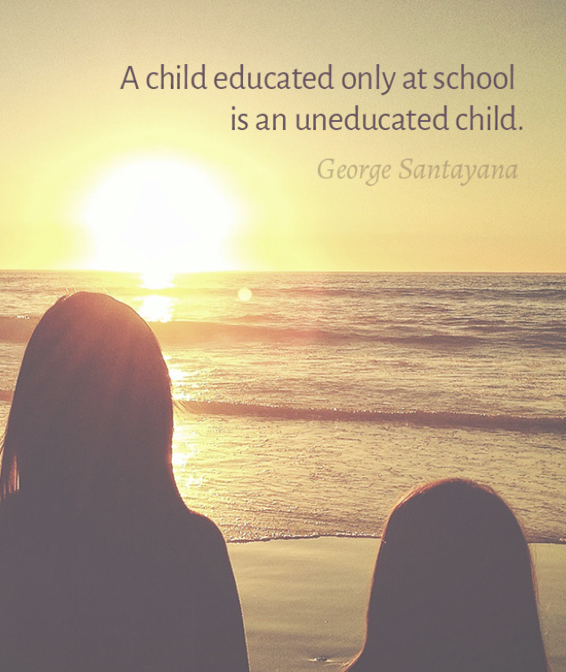
ORANGE = Test Again (make sure to add a date for when to test) EVERGREEN = Add into base - Good for remakes on templated version RED = Quote Doesn’t resonate with audience (This takes multiple test cycles) Education is not the filling of a pail, but the lighting of a re. - W.B. Yeats Education is not the learning of facts but the training of the mind to think. - Albert Einstein
Inteligence plus character - that is the goal of true education. - Dr. Martin Luther King, JR.
Children must be taught how to think, not what to think. - Margaret Mead An investment in knowledge always pays the best interest. - Benjamin Franklin Education is the movement from darkness to light. - Allan Bloom The whole purpose of education is to turn mirrors into windows. - Sydney J.
Harris
A child without education is like a bird without wings. - Tibetan proverb The beautiful thing about learning is that no one can take it away from you. - B.B.
King
Education is the most powerful weapon we can use to change the world. -
Nelson Mandela
Education is not preparation for life. Education is life itself. - John Dewey Education is our passport for the future, for tomorrow belongs to the people who prepare for it today. - Malcolm X
Visual Content Course | page 14
The principle goal of education is to create men and women who are capable of doing new things, not simply
Have at least 20 pages worth of quotes before you start designing images. This allows you to do some bulk designing, then worry about finding more quotes later.
We like to use ve labels with this document.
Bold = Used once
Italic + Bold = Used twice
Orange = Test Again//Add date for next test. Set up a reminder.
Green = Quality Quote. Perfect for remakes on templates.
Red = Quote doesn’t resonate. This takes multiple testing cycles.
After using all 20 pages worth of quotes twice, you will need a fresh batch of new quotes. If not, you can start going back to recreate what you have already used again.
The majority of the time, people do not realize they have already used a certain quote.
Making a document like this helps keep track of what has been used, along with when it can be used again. Using a calendar to determine when to take certain actions is beneficial as well. Trying to remember all of this would be very difficult. We like to be intentional about every detail, to squeeze as much juice out of the content as possible.
Visual Content Course | page 15

Utilizing Personal Invites
Personal invites have shown to be a more effective way to grow your brand on Facebook.
When you’re on the Facebook fan page that you want to invite all your friends to, you hit
“suggest to friends” under your profile picture and select the friends you want to invite. A personal invite with a personal message will give more meaning than to run like ads.
Visual Content Course | page 16


Upload Content
We will name our rst category Envision Testing. This will be a base start to initially find what works and what doesn’t. Later we will rename this category ‘Envision Base’ when there are enough memes to be run evergreen.
Visual Content Course | page 17
Upload Content
● Select the page you want to post to.
● Choose the category to house the content.
● Upload the content with a description.
Visual Content Course | page 18

Facebook Insights, Set up a Schedule, and Post Content
Facebook Insights
Before you schedule content to be posted, determine the best time to post content with Facebook insights.
According to results, the best time to post on this page would be between 2:00pm -
8:00pm.
Set up a Schedule
Go to the “Schedule” tab to select when you want content to be posted.
Visual Content Course | page 19

Post Content!
Tip: Make sure to have enough content, so you don’t repost too early.
Visual Content Course | page 20
Boosting
For a full course on how we amplify our content, go to our Facebook for a Dollar Day
Testing Memes
Find what resonates best with your audience with testing. Spend a few dollars a day to boost posts to see results instantly.
Insights
Look at certain aspects of memes to determine why they are performing well / poorly.
Visual Content Course | page 21
A-B Testing
A basic A-B testing cycle can be done to gure out what your audience might like, then broken down further to what they are seeming to like, and then turned into something they love.
When you analyze your brand, here are things to take into account:
● Who are your competitors?
● What are they posting and gure out the why.
● What makes their audience tick?
Their audience is similar to yours, so this gives us an idea of where to start. We are looking for their highest engaging content on Image posts. This will usually give you a base style to test.
If you do not know or do not have a competitor, start from square one of what you think your audience might like. Majority of the time, you are already close/similar to your audience and you just don’t know it.
Since we want something that the audience will engage with and will use our amplification process to test, this is the majority of what we have to look at for memes.
A-B tests take some time, because we do not want to irritate our audience by posting the same quote more than once every couple weeks. We break it into a 3 week cycle, which gives us enough time to test multiple styles with our audience such as textures, pictures, or typography.
We can take a Branded approach.
Color Pallet with Branding.
All other test variables apply (mainly font with color pallet).
Visual Content Course | page 22


Simple or Busy
This process usually takes longer to set in with your audience than the other testing.
Visual Content Course | page 23
Create Repeatable Excellence!
This is one of the most important aspects when utilizing memes for your brand.
Repeatable excellence will allow you to continually build a strong brand, which provides value to your audience and is cost effective.
We define excellence by Cost Per Engagement. If CPE is $0303 or below, we move those pieces of content to a base folder. The base folder is used for reposts, so we can determine whether or not that piece of content can continue to perform at a high level.
Make sure you target the correct audience, otherwise your performance on posts will not matter.
If a piece of content is $0.01 CPE, template the design, then we are able to change the quote, image, and keep a consistent composition. This also generates very similar results which reduces the amount of time we spend on design.
For Envision, we have been able to template 8 different designs. Through the use of these templates, we are able to generate a consistent CPE of $0.03 and below, and sometimes we even see results such as $0.005 on a few of the memes.
When you start creating design templates, you can start to rule out the design factor for results more. This will allow you to determine what type of quotes (messages) resonate better with your audience. This will create stronger content!
Visual Content Course | page 24
Facebook Instant Articles Checklist
This will cover what actions you need to take to connect your website to your Facebook Page for Instant Articles. If you don’t know what Facebook Instant Articles are, you can learn more about them here.
Introduction
Facebook Instant Articles are a new Facebook publishing tool for accelerated mobile articles.
The time to load a Facebook article is made faster by using the Facebook app which powers images and videos on Facebook. The articles automatically load from the user’s news feed.
Instant Articles are 10x faster than the standard mobile web articles, which are your mobile friendly articles on your website. This allows you to retain your audience 70%
more on your articles which means no more high bounce rates!
Add your Team
If you are using Business Manager, you probably already have people added in to your team for your page.
Get the Pages Manager App
The pages manager app allows you to preview your Instant Articles imported from your site, as well as check in on your page insights and posts easily.
Wordpress Plugins
You’ll need to install 3 Wordpress Plugins:
● Facebook Instant Articles & Google AMP Pages by PageFrog
There are two ways you can go about installing these plugins: 1. Upload via the Control Panel
If you click on the hyperlinks for those plugins above, you will get an option to download them. Once you click on download, it will download a zip file.
Visual Content Course | page 25
When you download the zip file, you will need to go to your Wordpress site dashboard.
Click Plugins > Add New > Upload Plugin. From there, upload the .zip file so that you can install the plugin.
Install Plugin, and activate it.
2. Download
Go to your Wordpress dashboard, then click on Plugins > Add New > Use the Search to find the plugin you want to add. Click install now and make sure to activate the plugin.
Now that you have the plugins installed on your WordPress site, we need to make sure everything is filled out and working.
Let’s start with Facebook Instant Articles & Google AMP Pages by PageFrog plugin.
If you activated this plugin, you should see an option on the side that says Mobile Formats. When you click that, it will take you to this page.
Then you will want to click ‘Begin Setup’ next to Facebook Instant Articles.
When you click on ‘Begin Setup’, this will pop up.
You will want to scroll all the way to step 5, skipping steps 1-4. This will give you the RSS Feed for your website. Make sure to save this for later!
3.Set up Instant Articles for WP.
When you have the plugin installed, the first thing it asks you for is an App-ID and App-Secret.
Set your App up if you haven’t already done so. When you have created your App, make sure to click on the App so that you can access it.
Once you have it on the App Dashboard, you will want to click on Settings.
When you are in Settings, you will have access to see your App-ID and App-Secret.
Make sure to copy these over to your site where they are asked for, as shown previously. You will also want to ‘Add Platform’. Make sure it is set up for a website, and then place your website URL. Don’t forget to Save Changes.
Visual Content Course | page 26
Once you enter in your App-ID and App-Secret, your page should look like this. Make sure to click ‘Login with Facebook’.
Next, choose the page you wish to post your Instant Articles on.
4. Install Header and Footer.
Once you have installed this plugin, you can begin to claim your URL.
Claim your URL
When you try to claim your URL, you are given a line of code that you need to enter into your site. Copy that code. Go to your site, so this can be entered in. Since Header and Footer is already installed, all we have to do is go to that plugin. Go to Settings > Header and Footer. Copy the code like in the picture. You can now claim your URL.
Visual Content Course | page 27


How to Setup Facebook Instant Articles
1. Go to the official Facebook Instant Articles page and sign up.
2. Log in if necessary and select the Facebook Page you want to enable Instant Articles for.
3. Click Continue to be taken to the Facebook Instant Articles configuration page.
4. Scroll to the claim your URL section and copy the meta tag from the dark box. You will need to pass this within the <head> section of your website.
Visual Content Course | page 28


Your developer may be able to assist with this and if you are on WordPress you can use the Header and Footer plugin to make things easier.
5. Once you have add the code snippet to your websites head section, input your domain name to the Facebook configuration page without the www. (or you can use subdomain if you use one for your blog) and click to Claim URL (If it doesn’t work at first you may need to clear or temporarily disable any blocking caching or Firewall systems).
6. The next step is to add your RSS feeds, these are usually provided by your CMS and if you are on WordPress you can use a plugin such as PageFrog to generate RSS feeds specifically catered towards the Facebook Instant Articles technical specifications.
Visual Content Course | page 29


7. Once you’ve clicked Save, Facebook should fetch your latest articles from your website however in some cases you may need to manually click the refresh button to pull in your articles.
Visual Content Course | page 30


8. Next you can configure the way that your pages will look when loaded via Instant Articles. This is slightly more restrictive than your standard website (to enable those fast loading pages). To begin the wizard, click on the default style to open the editor.
9. You can now upload your logo and select some basic designs settings such as fonts and colors. When you are happy with your selection click Save.
10. At this stage, your articles are almost ready for review. Scroll to the top of the configuration page to the review section where you will see if Facebook has detected any recommendations before submission.
Note: In the attached screenshot you can see there were not enough articles even though the linked site contains many more. This is because Facebook collects them from your RSS feed so you must ensure that your feed delivers at least the 10 latest articles.
Visual Content Course | page 31


11. If there are any style warnings, you may need to click into some of the individual articles by clicking the “Production link in the sidebar and then the edit pencil button on any articles that have a warning sign next to them.
The errors you need to work on will be highlighted.
Visual Content Course | page 32


12. Once all errors, if any, have been resolved you can then click Publish to submit for review. This process currently ranges from 3-5 days on average; although it has been known to take both longer and shorter for an approval to come through. Note that if you fail, it will take another 3-5 days, so try to ensure you have everything perfect the first time around.
13. Keep checking back by visiting the Publishing Tools section of your Facebook page on the Configuration page of the Instant Articles section.
When your Instant Articles review is complete, click on the Production link in the sidebar and select all posts you want published via Instant Articles and click Publish under the Actions menu.
Visual Content Course | page 33
How to Create a Facebook Infographics
Refine your Infographic Strategy
1. Decide on the goal behind the Infographic. Know if you are trying to build awareness of something like a new product launch or drive deeper engagement before conversion (engagement lift).
2. Take stock of your content assets. An Infographic strings together multiple pieces of content, video, GIF, images, text, CTAs. Find out if you have the assets or resources required to create an Infographic.
3. The target audiences. Who are you targeting and at what stage of the conversion funnel are they? You need this information to decide what kind of a message you need to convey to achieve your goals.
Sketch the Layout
1. Now that you understand the strategy (GCT), decide and draw out how you want the Infographic to look like on a piece of paper. Bear in mind your content or resource constraints. You can string together any of these 5 types of content (button, carousel, photo, text block, and video).
2. Role-play. Put yourself in the shoes of your target audience. Would you be convinced or impressed if you saw the Infographic that you have just sketched? If not, make amendments.
Create an Infographic Draft
1. Go to Facebook Business Manager and select your Facebook Page.
2. Once you are on the Facebook Page Timeline, click on “Publishing Tools” (the last tab).
3. Click on “Infographic” on the left menu.
4. Click on “+ Create” and a popup should appear.
5. Name your Infographic. Add “- v1.0” as a suffix.
6. Select a theme. This will be the default background color for all text and button components.
7. Click on “+ Component” at the top left corner to add any content component.
8. To delete any component, click on “...”, followed by “Delete” on the dropdown menu.
9. Once you are done, click on “Save” on the top right corner.
10. To see what your Infographic looks like, click on “Preview”. To share it with any page admins (such as the client), click on “Share”.
Visual Content Course | page 34

Specifications
Header
Design Requirements
● Image size: 66 pixels (maximum height) x 882 pixels (maximum width)
● File type: transparent .png
● Headers remain pinned at the top of the screen. If you don’t want this behavior, you can instead use an image or text element instead of a header Photo
1.Normal
Visual Content Course | page 35


2.Tilt
Visual Content Course | page 36

Specifications
Design Requirements
● Image ratio: Images use the full width of the screen by default
● Image size: A full width image is 1,080 pixels, but you can use wider images if you select the t to height (tilt to pan) display option. A full height image is 1,920
pixels high, but you can use a taller image if you select the t to width (tap to expand) display option.
● File type: .png, .jpg Up to 20 photos can be used in a Infographic Text Block
Design Requirements
● 500 characters max
● Font size: 6 point up to 72 point
● Font color: #rrggbb
● Font style: Bold, italic or underlined (must be applied to the entire text block, not individual words)
● Font alignment: Left, center or right
● Options: Serif or Sans SerifButtonDesign
Button
Visual Content Course | page 37


Design Requirements
● Height: 48 pixels with 48 pixels of padding above and below
● Text: 30 characters max
● Options: Serif or Sans Serif
Carousel
Design Requirements
● Image ratio: Images can be full or partial height, but all images should be the same size
● Image Size: 1,080 pixels (maximum width) x 1,920 pixels (maximum height)
● File type: .png or .jpg
● 10 images per carousel max
Video
Design Requirements
● Video: Minimum resolution of 720p
Visual Content Course | page 38

● Orientation: Portrait orientation is recommended, and it’s also recommended that you not make videos fullscreen. Note: Landscape orientation videos will automatically resize themselves to play in portrait. This causes them to shrink and have black bars on either side
● Length: You can have multiple videos in your Infographic, but their collective run time can’t exceed 2 minutes
● Format: .mp4 or .mov
● Thumbnail: This will be the rst frame of the video Infographic Examples
Product Set
Design Requirements
● Advertisers must have uploaded a product catalog
● The unified pixel needs to be set up correctly, since infographic dynamically displays the best performing products. Currently, advertisers cannot choose the ordering of how items appear.
● Up to 40 products can be displayed
Visual Content Course | page 39

● Get full details here:
https://developers.facebook.com/docs/marketing-api/dynamic-product-ads/produ
Infographic Examples
Visual Content Course | page 40
Visual Content Course | page 41

Visual Content Course | page 42

Visual Content Course | page 43

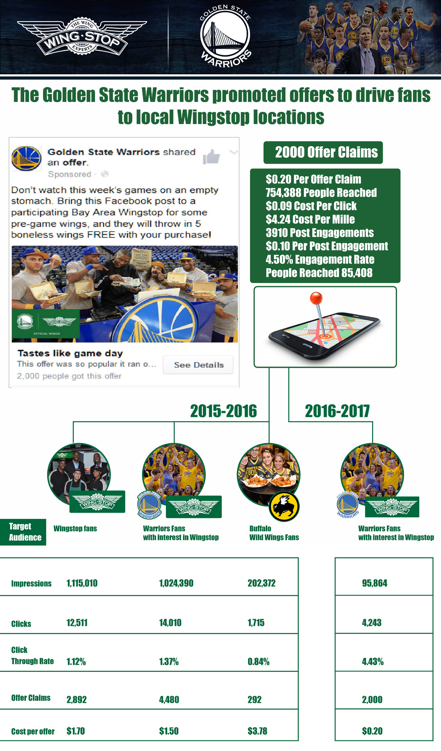
Case Study: Envision Experience
Increase Students’ and Their Parents’ Desire To Attend A Program The educational institution retargeted people who have either watched a video, have liked their page, attended one of their previous programs, and visited their website to drive enrollment applications.
Between April 10 2016 and May 31 2016, Envision spent $13,644.12 to test Infographic against conventional link ads. Overall, Infographic drove 30 enrollment applications at $454.80 each, 35% below the cost per lead (CPL) target of $700. In the same period, conventional link ads drove 197 enrollment applications at $305.75 each, 33% cheaper than Infographic and 56% below the $700 CPL target. Results varied across programs.
The differences between an infographic and a conventional link ad in terms of step-by-step conversion rates are summarized below.
Visual Content Course | page 44
Key Takeaways
Here are some takeaways from our tests:
● Using an Infographic does not impact conversion rates as much as using program pages as the landing page (adding an intermediate step), rather than sending them directly to a signup form.
● Infographic fared better in a few sections: more attempts to sign up (8.1% vs 3.6%) and higher completion rate (21.7% vs 18.8%).
● Conventional link ads cost less to serve ($5.77 vs $10.98) due to higher clickthrough rates which send positive signals to Facebook, thereby lowering ad delivery cost.
● Main problem with Infographic lies in getting people to click through to both the ad and the Infographic (since clicking on a link is a 2-step process).
● “Many faces” Infographic idea was implemented in the second half of the Infographic tests and performed relatively better than the initial Infographic.
Limitation of test results:
● Significantly different amount spent on Infographic and conventional link ads mean that given the law of diminishing returns, conventional link ads may indeed be better than Infographic if we had spent the same amount.
Visual Content Course | page 45


4 Components of One-Minute Videos
Include these four elements into your one-minute videos for increased engagement
Hook
Ignite pain/pleasure
Describe solution
Call to action
Assignment - Create one-minute video. Upload it to your Facebook page and copy the link into a Word document to upload.
Visual Content Course | page 46


Standards of Excellence
Read the chart and watch the video below about the Standards of Excellence Assignment - Compare three of your videos against the Standards of Excellence.
Visual Content Course | page 47

3 Components to a WHY Video
Learn more at blitzmetrics.com/WHY.
Visual Content Course | page 48

Automation
Initially, we will create a category for testing. Once we start to see a correlation with what works and what doesn’t, we will create another category that will host all the working content.
Eventually, some memes will become viral and reach millions of people. Take the posts that are performing above the rest, create their own category (Viral Category) and schedule for posting so that you can continue to have a viral effect to grow your page overtime.
Ideally, we like to schedule viral memes to post every 2 weeks or so, so we don’t repeat content. Soon you will have enough viral content to get at least one of them out per day or every other day.
Facebook’s algorithm tries to work against this, because they want something new and fresh all the time. Here is how to get around that: save all the content posted and simply change the file name every time you repost (the initial file names need to be relevant to the quote in use, so it comes up on a search as well).
How to Get Started
Setup your plumbing and assemble your Goals, Content Plan, and Targeting. For more information see the Social Amplification Engine.
Creating Content
Have a license for what you are using (regarding the font and image). Sites to use are
FontSquirrel (fonts)and Unsplash (HD images) since all the content is free to use.
There are tons of software that can be used to create images, such as Photoshop (what we use), Canva.com, Adobe Post, and Gimp.
Any of these can be used to implement what you see in this course. The easiest and most useful platform to start out with would most likely be Canva.com, because of the free training and easy platform. Canva is comparable to Photoshop, so don’t feel like you need Photoshop specifically to be successful.
Visual Content Course | page 49

Escap you limit podcas
Here you’ll find the best podcast
for streaming success stories of fitness
industry influencers and other
entrepreneurs. Whether you’re an old
school gym owner, an exercise expert
yourself or don’t know your CrossFit from
your core workout, we can all learn from
these leaders by listening to their
insightful stories and answers to interview questions posed by Matthew Januszek,
co-founder of Escape Fitness.
Visual Content Course | page 50

Visual Content Course | page 51

Visual Content Course | page 52

Reads:
10
Pages:
42
Published:
Apr 2024
"Universal Principles" is a thought-provoking guide by Ogu Babafemi Okechukwu that delves into timeless truths transcending cultural boundaries. Through relat...
Formats: PDF, Epub, Kindle, TXT
Reads:
14
Pages:
59
Published:
Jan 2024
Everything You Ever Wanted To Know About Infinite Banking
Formats: PDF, Epub, Kindle, TXT

Reads:
4
Pages:
61
Published:
Jan 2024
By 2030, it is anticipated that the Japan Radiotherapy Market will reach a value of $711 Mn from $430 Mn in 2022, growing at a CAGR of 6.5% during 2022-30. Th...
Formats: PDF, Epub, Kindle, TXT

Reads:
4
Pages:
27
Published:
Oct 2023
The global breast cancer therapeutics market is poised for substantial expansion, forecasted to increase from $18.2 Bn in 2022 to an impressive $48.0 Bn by 20...
Formats: PDF, Epub, Kindle, TXT


