}
}
259
Working with Images
2. Next create the helpers/make_captcha_helper.php helper file and add the following code to it:
<?php if (! defined('BASEPATH')) exit('No direct script
access allowed');
function make_captcha() {
$CI =& get_instance();
$CI->load->helper('captcha');
$vals = array(
'img_path' => '/file/path/to/image/captcha/',
'img_url' => 'http://url/to/image/captcha/',
'font_path' => './system/fonts/texb.ttf',
'img_width' => '150',
'img_height' => 30,
'expiration' => 7200
);
$cap = create_captcha($vals);
$data = array(
'captcha_time' => $cap['time'],
'ip_address' => $CI->input->ip_address(),
'word' => $cap['word']
);
$query = $CI->db->insert_string('captcha', $data);
$CI->db->query($query);
return $cap['image'];
}
img_path and img_url are two interesting settings
here. img_path should be the path to the image folder
on the file system, and img_url should be the path of
your image as it would be displayed in a web browser.
CodeIgniter uses img_url to build a HTML img tag, and it
is this that is sent to the post_form as $data['img'].
3. Create the models/captcha_model.php model file and add the following code to it:
<?php if (! defined('BASEPATH')) exit('No direct script
access allowed');
class Captcha_model extends CI_Model {
function __construct() {
parent::__construct();
260
Chapter 10
}
public function delete_expired($expiration) {
$this->db->where('captcha_time < ',$expiration);
$this->db->delete('captcha');
}
public function does_exist($data) {
$this->db->where('word', $data['captcha']);
$this->db->where(
'ip_address', $data['ip_address']);
$this->db->where(
'captcha_time > ', $data['expiration']);
$query = $this->db->get('captcha');
return $query->num_rows();
}
}
4. Then create the comments/post_form.php view file and add the following code to it:
<?php echo form_open() ; ?>
<?php echo validation_errors() ; ?>
<?php if (isset($errors)) { echo $errors ; } ?>
<br />
Name <input type = "text" name = "name" size = "5"
value = "<?php echo set_value('name') ; ?>"/><br /> Email <input type = "text" name = "email" size = "5"
value = "<?php echo set_value('email') ; ?>"/><br /> Message <br />
<textarea name = "message" rows = "4" cols = "20" />
<?php echo set_value('message') ; ?></textarea><br /> Please enter the string you see below
<input type = "text" name = "captcha" value = "" />
<br />
<?php echo $img ; ?>
<br />
<input type = "submit" value = "Submit" />
<?php echo form_close() ; ?>
261
Working with Images
How it works...
The comments controller loads public function index(), which sets the validation environment for when or if the user submits the form. As $this->form_validation-
>run() will equal FALSE (as the form hasn't been submitted yet), the make_captcha_helper function, make_captcha(), is called, sending it's returned values to the comments/post_
form view, as shown in the following code snippet:
if ($this->form_validation->run() == FALSE) {
$data['img'] = make_captcha();
$this->load->view('comments/post_form', $data);
} else {
... etc
The make_captcha_helper function, make_captcha(), will grab the main CodeIgniter object, as shown in the following code snippet:
$CI = & get_instance();
$CI->load->helper('captcha');
It defines the values necessary to build the CAPTCHA image, as shown in the following code snippet:
$vals = array(
'img_path' => '/file/path/to/image/',
'img_url' => 'http://url/to/image/',
'font_path' => './system/fonts/texb.ttf',
'img_width' => '150',
'img_height' => 30,
'expiration' => 7200
);
These values are stored in the $data array, which is passed to the CodeIgniter helper, captcha, which returns to us the $cap array. $cap is passed to the database function, insert_string(), so the CAPTCHA information can be saved to the database, as shown in the following code snippet:
$cap = create_captcha($vals);
$data = array(
'captcha_time' => $cap['time'],
'ip_address' => $CI->input->ip_address(),
'word' => $cap['word']
);
$query = $CI->db->insert_string('captcha', $data);
262
Chapter 10
We'll use this row in the database for comparison with the data entered by the user when they submit the form.
Finally, the make_captcha helper returns an HTML img tag string to our comments controller. This is saved in the $data array and passed to the post_form view file.
The user is then shown the HTML form, with name, e-mail, comments inputs, as well as an image of the CAPTCHA and a textbox in which to type the CAPTCHA string they see. The user then completes the form, carefully entering their data along with the string from the CAPTCHA image, and clicks on the Submit button.
Assuming validation is passed (there were no form errors), the comments controller will then begin to compare the CAPTCHA string inputted by the user to the one in the database created by the make_captcha helper.
It starts this process by first cleaning the database of old CAPTCHA rows (in this example, old is anything older than two hours); it does this by defining the current time (as a unix time stamp) minus two hours (or 7200 seconds), this is set as the $expiration time, as shown in the following code snippet:
$expiration = time() - 7200;
$this->Captcha_model->delete_expired($expiration);
The Captcha_model function, delete_expired(), is called, passing the expiration to it.
This model function will delete rows in the database whose captcha_time is less than the expiration time, as shown in the following code snippet:
public function delete_expired($expiration) {
$this->db->where('captcha_time < ',$expiration);
$this->db->delete('captcha');
}
Once old CAPTCHAS are removed from the database, a $data array is created and populated with the user's CAPTCHA input, their IP address, and again, the $expiration time (the one we made to remove old rows). This $data array is passed to the Captcha_model function, does_exist(). This model function will check whether the CAPTCHA string entered by the user exists in the database, and if so, is valid (that is, less than two hours old and matching the provided IP address). The model function returns the number of rows found, as shown in the following code snippet
public function does_exist($data) {
$this->db->where('word', $data['captcha']);
$this->db->where('ip_address', $data['ip_address']);
$this->db->where('captcha_time > ', $data['expiration']); $query = $this->db->get('captcha');
return $query->num_rows();
}
263
Working with Images
If zero rows exist, then $data['errors'] is given an error message. make_captcha() is called again, a new CAPTCHA image is generated and sent to the post_form view, and the error message is displayed to the user above the new CAPTCHA image. The system then waits for the user to fill in the form again and have another go.
However, if the result wasn't zero, then the CAPTCHA string entered by the user was correct, so we display a quick message to them and echo out their input. In reality, you can do what you like here, such as process their message and save it to a blog feed, or redirect them to another area on the site, whatever you wish.
264
11
SEO, Caching,
and Logging
In this chapter, you will learn:
f
Using SEO-friendly URLs in CodeIgniter
f
Using CodeIgniter caching
f
Logging errors with CodeIgniter
f
Benchmarking your application
Introduction
In this chapter, we'll be taking a look at various caching recipes, which can be used with CodeIgniter. We'll be using the CodeIgniter caching functionality to help us store a data feed and database results--although the data feed and database results are really only there as a means to show you how to get data into CodeIgniter, so it can cache it--the data input can be anything you wish. We'll also look at ways to implement SEO-friendly URLs using CodeIgniter routing.
Using SEO-friendly URLs in CodeIgniter
At some point, you might want to alter how CodeIgniter handles the routing of URLs to controllers. By default, CodeIgniter splits a URL into several different parts. You obviously have the domain section of the URL (www.domain.com), but after that there are (usually, but not always) up to three more items, each separated by a forward slash. The first item is the controller, the second is the function (or method, if you want) in the controller, and the third is a parameter that you will pass to the function in the controller.
SEO, Caching, and Logging
So, a standard URL in CodeIgniter might look like www.domain.com/users/edit/1.
So, user number 1 is being edited using the edit function in the users controller--that seems simple enough and I'm sure you're familiar with it.
However, there may be times when you wish this to change. It is possible to alter what is displayed in the URL in the web browser's address bar to show something different from controller/function/data. It is possible to set up a rule in the config/routes.php file, which will map a URL to a controller, but hide this from the address bar; for example, you may have a controller named bulletin, which you wish to be displayed as news in the URL.
How to do it...
We're going to create one file and amend another file, by performing the following steps: 1. Create the /path/to/codeigniter/application/controllers/shop.php file and add the following code to it:
<?php if ( ! defined('BASEPATH')) exit('No direct script
access allowed');
class Shop extends CI_Controller {
function __construct() {
parent::__construct();
}
public function index() {
echo 'Controller: ' . __CLASS__ . ',
Method: ' . __FUNCTION__;
}
public function product() {
echo 'Controller: ' . __CLASS__ . ',
Method: ' . __FUNCTION__;
echo '<br />';
echo 'Product ID: ' . $this->uri->segment(2);
}
public function all() {
echo 'Controller: ' . __CLASS__ . ',
Method: ' . __FUNCTION__;
}
}
266
Chapter 11
2. Open the /path/to/codeigniter/config/routes.php file in your editor and amend accordingly (the changes are highlighted):
$route['default_controller'] = "default_controller";
$route['404_override'] = '';
$route['item/(:any)'] = "shop/product";
$route['item'] = "shop/all";
How it works...
Take a look at the following lines in the config/routes.php file:
$route['item/(:any)'] = "shop/product";
$route['item'] = "shop/all";
Now, think of them as being made up of a left and a right, in that before the = sign is left and anything after the = sign is right; the left maps to the right and the value in the left will be mapped to the value in the right.
In the preceding example, any URL whose controller name begins with item will be mapped to the shop controller. Let's look at each rule in turn:
By typing the name of the route into your browser (for example, http://www.your_web_
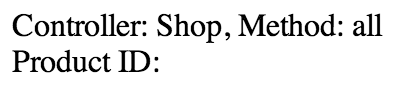
site_name.com/item), the item command will cause CodeIgniter to call the shop controller, and within that controller the public function all() method. Because we defined it in the routes file, you will see this in your browser by typing item into the URL. CodeIgniter maps the requested URL to the path defined in the route rule, and (in our example) calls the shop controller, which using __CLASS__ and __FUNCTION__ will write the following output to the browser:
Now, take a look at the URL in the browser address bar, it will still display the item, but the text on the screen says it's the shop controller that is being called. We have now mapped the URL
to a controller and the user is none the wiser.
267
SEO, Caching, and Logging
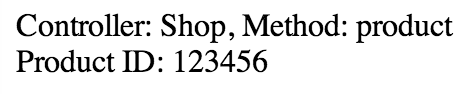
Now, let's look at the other route rule--:any. By typing the name of the route into your browser (for example, http://www.your_web_site_name.com/item/123456), the item/123456 command will cause CodeIgniter to call the shop controller and public function product() because we defined it in the routes file. In public function product(), we echo out not only the __CLASS__ and __FUNCTION__
names, but also the second segment of the URI:
$this->uri->segment(2);
Which, in this case, is the ID of the product (12356), so you will see the following screenshot in the browser:
The key to this route is the (:any) flag in the route mapping rule; (:any) tells CodeIgniter that the second segment in the URI, whatever it is, should map to the product function of the shop controller. As we're the ones building the code, we will know that the second URI segment in the URL is a product ID, which we can use to query the database for the details of that product.
Using CodeIgniter caching
You can use CodeIgniter caching to cache (or temporarily store) practically anything. As an example of caching with CodeIgniter, we're going to cache an RSS feed. We could, of course, cache anything we wanted; however, caching an RSS feed is a good place to start. Working with RSS is quite simple and the recipe can easily be converted to cache feeds from other sources, such as a call to Twitter, for example.
How to do it...
We're going to create the /path/to/codeigniter/application/controllers/
rss_cache.php file.
1. Create the preceding file and add the following code to it:
<?php if ( ! defined('BASEPATH')) exit('No direct script
access allowed');
class Rss_cache extends CI_Controller {
function __construct() {
parent::__construct();
$this->load->helper('url');
268
Chapter 11
$this->load->helper('xml');
$this->load->driver('cache', array(
'adapter' => 'apc'));
}
public function index() {
$raw_feed = '<?xml version = "1.0"
encoding = "ISO-8859-1" ?>
<rss version="2.0">
<channel>
<title>RSS Feed</title>
<link>http://www.domain.com</link>
<description>General Description</description>
<item>
<title>RSS Item 1 Title</title>
<link>http://www.domain1.com/link1</link>
<description>Description of First Item
</description>
</item>
<item>
<title>RSS Item 2 Title</title>
<link>http://www.domain2.com/link2</link>
<description>Description of Second Item
</description>
</item>
<item>
<title>RSS Item 3 Title</title>
<link>http://www.domain3.com/link3</link>
<description>Description of Third Item
</description>
</item>
</channel>
</rss>';
$feed = new SimpleXmlElement($raw_feed);
if (!$cached_feed = $this->cache->get('rss')) {
foreach ($feed->channel->item as $item) {
$cached_feed . = $item->title . '<br />' .
$item->description . '<br /><br />';
}
$this->cache->save('rss', $cached_feed, 7);
}
echo $this->cache->get('rss');
}
public function clear_cache() {
269
SEO, Caching, and Logging
$this->cache->clean();
redirect('rss_cache');
}
}
?>
How it works...
First, let's look at the constructor. We're loading one helper and one driver, as shown in the following code snippet:
function __construct() {
parent::__construct();
$this->load->helper('url');
$this->load->driver('cache', array('adapter' => 'apc'));
}
To use APC, you'll need to ensure that APC is installed on the environment you're working on. If not, you'll need to install it. To do this, visit http://
www.php.net/manual/en/apc.setup.php for more details.
The URL helper is there as we're using the redirect() function and the cache driver is there to provide support to help us cache out data, in this case it's helping us cache data from the RSS feed--however, it really can be anything.
public function index() first defines the $rss_feed variable with the hardcoded RSS
feed; this is for illustration purposes really. In reality, you will fetch the feed using: $raw_feed =
file_get_contents('http://www.domain.com/rss_feed_url');
However, it is convenient to hardcode it for this recipe, as by hard coding you will see the structure of the feed and know what it should "look" like The feed has a simple structure containing only three items. The $raw_feed variable is passed to the PHP SimpleXMLElement class, which returns an object ($feed) for us to work with.
270
Chapter 11
We then use CodeIgniter to check if there exists in cache an item named rss; if not, we'll loop through the $feed object, pulling out the title and description for each item in the RSS feed, and concatenate to a string, which is named $cached_feed.
if (!$cached_feed = $this->cache->get('rss')) {
foreach ($feed->channel->item as $item) {
$cached_feed .= $item->title . '<br />' .
$item->description . '<br /><br />';
}
$this->cache->save('rss', $cached_feed, 30);
}
The $cached_feed string is saved to the cache with the name rss for a period of 30 seconds (for more on caching durations, refer to the following code): $this->cache->save('rss', $cached_feed, 30);
Once all items in the RSS feed have been processed, we'll echo out the cache item rss, as shown in the following code snippet:
echo $this->cache->get('rss');
You should get something similar to the following output in your browser: RSS Item 1 Title
Description of First Item
RSS Item 2 Title
Description of Second Item
RSS Item 3 Title
Description of Third Item
Why 30 seconds? Because it'll be a good length of time for you to go to your browser, run the script, see the preceding output, and quickly dash back to the code in your text editor to change something in the feed (such as the title element of the third item to Gigantic Elephants). Click on Save, and go back to the browser to refresh, which after 30 seconds (30 seconds since you first ran rss_cache) should give you the following output: RSS Item 1 Title
Description of First Item
RSS Item 2 Title
Description of Second Item
Gigantic Elephants
Description of Third Item
271
SEO, Caching, and Logging
Should 30 seconds be too long for you to wait, you can always manually clear the cache by running public function clear_cache(), which will call the CodeIgniter $this-
>cache->clean() function and redirect us back to the rss_cache controller where the whole process will begin again.
Alternatively, you can decrease the length of time a cache stays valid from 30 seconds to, say, 10 seconds (but in reality, you'll want it to be a length of time that you feel is right for your server or data).
So now, you can see how to store data in the cache, it doesn't have to be XML or an RSS feed, it really could be data from any source: a database query (although CodeIgniter has specific database caching methods for that), a feed from a social link (such as a Twitter feed, or from Instagram), or even financial data such as the value of the FTSE fetched every 5 minutes (or however long you set it).
Problems you may encounter
If you're developing on a MAC using MAMP, the chances are the the default caching method is XCache. CodeIgniter doesn't have a driver to work with XCache and you'll either need to write your own driver (go on be brave), or (as I did) change your caching engine to APC.
APC (Alternative PHP Caching) is a caching
service, which in this case is provided by MAMP.
You'll need to tell MAMP to use APC rather than XCache. To do this, open your MAMP control panel and click on Preferences, then click on the PHP tab. You should now see a section named PHP extensions. In that section should be a drop-down list (this is probably set to XCache); choose APC from this list, and click on the OK button. MAMP will restart, and after this you should be good to go.
Logging errors with CodeIgniter
Logging errors which occur within your CodeIgniter application doesn't have to be limited to looking at the PHP or Apache logs; you can enable CodeIgniter to handle and log errors and other behaviors and events at certain points in your code using CodeIgniter's logging functionality. This facility can be particularly useful (if you set it up correctly) to track a user's journey and progress through the system and should something go wrong with whatever they're doing, you can look in the logs and trace what they did and when, and get a better idea of what (if at all) went wrong and hopefully think about how to prevent it from occurring again.
In this recipe, we're going to look at using the logging functionality within CodeIgniter and to track if something goes wrong with an operation.
272
Chapter 11
Getting ready
We'll need to set the log reporting level in the config file so that CodeIgniter knows which level of logging messages to report on. The log's folder should also have write access, so perform the following steps:
1. Open the /path/to/codeigniter/application/config/config.php file and find the following line:
$config['log_threshold'] = 0;
You can change the value of the log_threshold config array element to one of the five states, as shown in the following table:
State
Usage
Description
0
-
CodeIgniter will not
log anything.
1
log_message('error', CodeIgniter will log
'Some Text')
error messages.
2
log_message('debug', CodeIgniter will log
'Some Text')
debugging messages.
3
log_message('info',
CodeIgniter will log
'Some Text');
information messages.
4
All of the above
CodeIgniter will
log everything.
For our recipe, I have set the value to 4 as I want to log any error messages or information messages that CodeIgniter might generate for me.
2. Look for the line:
$config['log_path'] = '/path/to/log/folder/';.
Ensure that /path/to/log/folder/ is set correctly in $config[' log_path']
and that the folder specified has write permissions (otherwise, CodeIgniter cannot write a log file to that folder).
273
SEO, Caching, and Logging
How to do it...
We're going to use (as it was convenient) the Using CodeIgniter caching recipe, mentioned earlier in this chapter, and alter it in such a way as to apply CodeIgniter logging. In this recipe, we've changed its name to cache_log.php (to keep it separate from rss_cache.php).
So, if you haven't already done so (don't forget to change the name, highlighted in the following code):
1. Create the /path/to/codeigniter/application/controllers/cache_log.
php file and add the following code to it (the changes are highlighted):
<?php if ( ! defined('BASEPATH')) exit('No direct script
access allowed');
class Cache_log extends CI_Controller {
function __construct() {
parent::__construct();
$thi