Web Coding Workflow
Now that you know about (and have already downloaded and installed, right?) your basic web coding tools, you need to learn the steps to making good code happen.
Coding Workflow
Coding workflow is different than your overall web project workflow, although you will exercise the same self-disciplined, organized, and time management muscles. The following steps are very useful for keeping track of your code, files, drafts, resources, etc.
• Develop your own clean, efficient workflow for your actual code files. For in- stance, in your code, you should chunk areas together that make something happen, and give visual breaks in the code between these areas.
• Use clear, frequent, and obvious commenting in your code. Assume someone who knows nothing about your project may review or maintain your code, and excel- lent commenting will help them know (and you remember) why you coded certain things a certain way.
• Backing up. Your client never ever cares that your dog ate the pen drive, the lap- top fell off the top of your car, or that your server crashed. Need I say more? Just back up your work in more than one place.
Assets Workflow
Part of web coding includes handling your website assets, such as images, style sheets, javascript files, snips of borrowed code, your template, etc.
• Streamlined graphics are key. All graphics used should be the final, web-ready jpgs, pngs, and gifs for the web. You should also try to size the saved image as close to the style you expect to use it in the web page, rather than grabbing a 5x5 inch image and using code to shrink it visually to 2x2 in.
• In creating graphics, save a layered master file in your image editor that you can adjust later, then save a copy of the layer you need for the web as a web-ready image file.
• When you graduate to using cascading style sheets, make a backup copy before you make significant changes or start experimenting.
• When you create a template page for your website, save it in a subfolder called template so that you do not accidentally overwrite it in the your main web pages directory. When you need to use the template, open it, and save a copy under whatever name you need to give it.
Extra hint: I like to create reusable items I can plug into my projects - snippets, comments, code, outlines, etc. If you make it work, find a way to save and reuse! Just add them to your templates folder during the project, then make a copy of that folder and save it in your web authoring resources directory for later use.
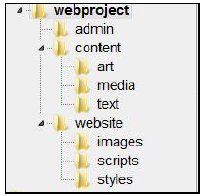
File Directory Structure
A directory structure is the way an operating system's file system and its files are stored. Files are typically displayed in a hierarchical tree structure in your computer's file directory program and in the FTP left and right panes. For web projects,
• Use a single file directory for your full web project.
• Create subfolders as needed for the elements of your overall project, such as for administrative files, raw images, instructions, website, etc.
• For your coding of the website, create its own subdirectory in the project directory.
• Create separate folders inside your website directory for different assets of your site. It's tempting to put all your html, css, image, and notes files in the same directory, but DON'T! Always have a separate folder, in your website coding directory, for images, styles (css), scripts, includes, and content you are keeping notes on.
Create a simple and sustainable set of directories, folders and files so the website can interlink both files and media without “losing” track of where the linked files actually are.
File Naming Protocol
Files need a definite naming protocol in web authoring. This is partly because the browsers only recognize certain file extensions, partly because code doesn't work right with certain file names, and because consistent file naming helps you and your client keep the many web project files organized.
File Directory
HTML files
The normal filename extension for files containing HTML is .html. A common abbreviation of this is .html, which originated because some early operating systems and file systems, such as DOS and FAT, limited file extensions to three letters. Stick with .html be- cause it is most familiar to visitors, but whichever extension you choose, be consistent.
Other coding languages have different file extensions, but for HTML/XHTML coding we are concerned only with .html.
CSS Files
CSS (Cascading Style Sheet) files use the.css extension.
Text Files
You may choose to keep text-only notes to yourself, or use a text file to store snippets of code. The extension for this file type is .txt.
Image Files
Image files use the extensions of the format they are saved for the Web in: .jpg, .gif, .png.
File Names
• Due to the evolution of coding and other programming and scripting languages, the specification for naming your files is to use all small letters – no capital letters.
• Also, the extension part of the file name needs to be all small letters.
• Whenever possible (hopefully always), use single word names or two words together. Try to avoid hyphens and underscores in the name, since those are more difficult for a visitor to recognize and/or memorize, should they wish to do so.
• Keep your file names fairly short, but also consider the main keywords and sections of your site as file names. For instance, the About Us page should be named about.html. An image of a red rose should be redrose.gif, not image283.gif.
• Check your spelling! Misspelled file names can drive you crazy after you check, and recheck, and check again your code for the reason why the image or file is not showing in the browser.
Web Coding Steps
Using the Text Editor
Text editors are pretty easy to use, and this is where you will do your hand coding. Just open your text editor of choice, and:
• For a new web page, create a new document and SAVE it as an .html file immediately before starting to work on it.
• The .html extension will activate any code coloring the editor offers that you'll need to see to help you find errors.
• Make sure to save the file in the web project directory where you plan all the HTML files to go.
• Show Word Wrap, so your long lines of code will wrap on your screen.
• Show Line Numbers, so that when you compare validation problems to your code you can match lines.
• Find out which command you need to activate to view work you have done in a browser.
To start your basic web page,
• Begin code in a saved file in the open window.
• Make sure you have open and closing html tags for every page - <html> </html>.
• Make sure you have open and closing head tags for every page, after the opening html tag - <head> </head>.
• Make sure you have an open and closing title tag inside your head section – <title>Page Name </title>.
• Make sure you have open and closing body tags for every page - after the closing head tag and before the closing html tag - <body> </body>.
• Make sure you have placed some content to view inside your body tags, such as a open/closing header, open/closing paragraph, etc.
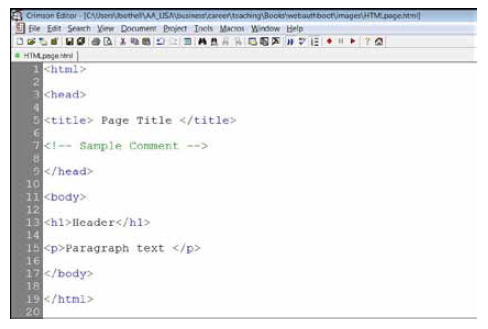
Text Editor Page
Reviewing Your Code Output
You will need to check your code output frequently to make sure you are getting the results you want.
• Use the text editor's View in Browser option to see your web page in your computer's default browser.
• If your text editor does not have that command, open your web browser, and under File use the Open File option to locate and open your .html file.
• When you make code changes, return to the browser view of the page and refresh it to see the code changes. F5 is the refresh hot key.
• Tip: Keep the same browser window open, rather than repeatedly opening new versions every time you make a code change you want to review.
Validating Your Code
After you have completed coding a page to your satisfaction, you need to run it through the W3C Markup Validation Service (W3C Validator). This helps you standardize your code so that your web page is compliant with the standards used by various browsers – so that your pages will look and work right.
W3C Validator
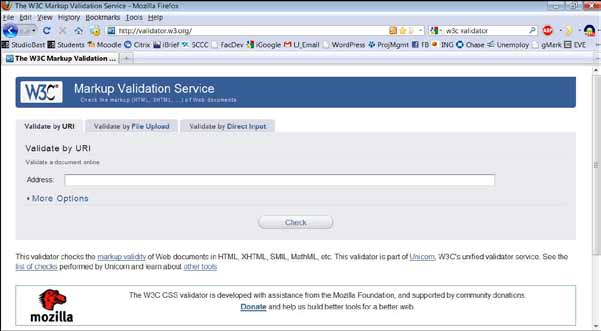
To use the W3C Validator:
• Open your web browser and go to http://validator.w3.org/.
• Choose the ‘Validate by Direct' Input tab.
• Copy your full web page code from your text editor and paste it inside the input space provided on the W3C validator page.
• Click the ‘Check' button below the input space (you may need to scroll down the Validator page to see it).
The W3C Validator will check your code and provide a new pages, with the results.
• A red bar that reads “Errors found while checking this document as HTML or XHTML (whatever version)!” means that your code has errors, and that you need to scroll down the page to see them.
• A green bar that reads “This document was successfully checked as HTML or XHTML (whatever version)!” means that your code has validated. You are authorized to add the W3C icon on your web page if you wish.
The W3C Validator results can be very hard to decipher for newcomers and experts alike, so the W3C maintains a list of error messages and their interpretation: http://validator. w3.org/docs/errors.html
If you get a bunch of error messages, refer to Axiom #4.
Axiom #4: Don't Panic!
Common validation errors include:
• Doctype: A doctype declaration is mandatory for most current markup languages and without one it is impossible to reliably validate a document. One should place a doctype declaration as the very first thing in an HTML document and be sure to use the correct one for the coding being done.
• No Character Encoding Found: An HTML document should be served along with its character encoding. You can choose from a number of encodings, though “iso-8859-1” (Western Europe and North America) and “utf-8” (Universal, and more commonly used in recent documents) are common encodings if you are not sure which to choose.
• Flash or embedded media does not validate: Many Flash authoring tools recommend, or enforce, the usage of the <embed> element to include flash animations or applications in Web pages. <embed> is not part of any standardized version of HTML, and this practice produces invalid markup.
• The validator complains about “&” or other symbols in code: You will need to replace the & and other complaint symbols with the HTML character code that stands for it. For instance, & = &
For other common errors, be sure to check the http://www.htmlhelp.com/tools/validator/
problems.html and the http://validator.w3.org/docs/help.html#faq-doctype pages.
QuickLook
Errors vs. Warnings
Validation warnings must be corrected before the web page code is considered valid to HTML standards. However, you may get the full validation and still have warnings. Why?
W3C Validator notes and warnings highlight missing or conflicting information which caused the validator to perform some guesswork prior to validation, or other code affecting the output below the warning item. If the guess or fallback is incorrect, it could make validation results entirely incoherent. It is highly recommended to check these potential issues, and, if necessary, fix them and re-validate the document.
Uploading Your Page
The File Transfer Protocol (FTP) program will allow you to upload your files from your local computer to the Web host you choose. Each FTP program has interface differences, but here is the gist of the process:
• Open the FTP program.
• Input your web host, username, and password that you received or set up with the Web host you chose. Example: Host = mydomain.com, Username= mylogin, Password = mypassword.
• You can likely ignore the Port unless your web host informed you to choose a specific one.
• Choose the connect option (button or on the toolbar of the FTP program).
An FTP Interface
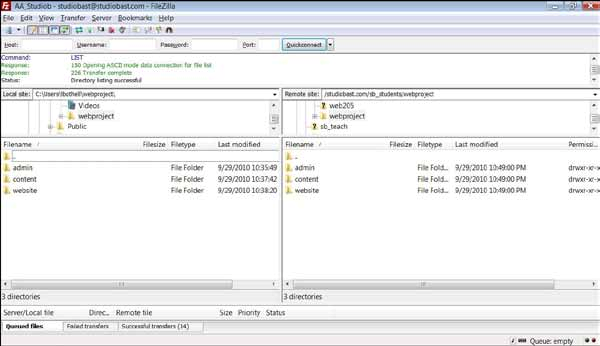
The FTP program will then try to connect with the Web host computer, and when it does so, your local computer directories will appear in the left pane, and the remote computer directories you will transfer to will appear in the right pane.
• Choose the specific file folder you want to transfer files from on your local left side, and open the corresponding folder on your remote right side.
• Left and right pane folder views must be exactly the same on each side before you transfer files.
• On your left page (local), choose the file you want to transfer and right-click on it. The context menu should give you the choice to upload the file. You can also just drag the file from the local pane to the same space in the remote pane.
• Always remember to transfer any associated images subfolder with the images inside over to the web host computer. Same with any other subdirectories you use in your web project.
• Remember, file names should ALWAYS be all small text - no capital letters.
To test your recent uploads, Open your web browser, type the address of your website, and when your page loads, be sure to refresh (F5) to load your newest changes.
If you have problems getting an FTP connection, you might have active/passive mode issues. FTP can be run in active or passive mode, which determines how the data connection is established. In active mode, the client sends the server the IP address and port number on which the client will listen and the server initiates the TCP connection. In situations where the client is behind a firewall and unable to accept incoming TCP connections, passive mode may be used, where the client sends a PASV command to the server and receives an IP address and port number in return, which the client uses to open the data connection to the server. You can try:
• Checking the Internet Explorer FTP setting: Most PCs come with Internet Explorer (IE) as the default browser, and IE defaults to passive FTP. If you are having connection problems with your FTP program, check the Tools/Internet Options/ Advanced, Browsing segment, and uncheck Use Passive FTP.
• Increase the FTP Timeout default: An FTP program may have a default timeout set to 30 seconds, and occasionally the web host computer needs a little more time. If you are having timeout issues, check this setting in your FTP program and set it to 150 (seconds).
• Create an active profile for your website in your FTP program: An FTP program should let you set a reusable website profile, Open the program's Site Manager tool, and create a site with your web host name, login, and password. Then, in the Site Manager's Transfer Settings area, make sure to choose “Active”.