Chapter 4
Combat Yoga Fitness is designed specifically for stress reduction. It avoids many of the esoteric and difficult poses found in other yoga styles. Hence, this system is easy-to-follow and simple to execute, even in conflict areas where security is tight.
In commencing a program like this, it is assumed that you‟re reasonably fit and can participate in such a program, since it will involve stretching and require basic flexibility.
It is important to remember that this program is for deep relaxation. As such, it is non-competitive in its scope. The purpose is not to drive yourself to the point where you‟re overstretching and injuring yourself. Hence, you‟re not expected to go deeply into the poses at first, since flexibility comes with time and is a gradual process. With practice, you‟ll be able to go a little deeper into the poses, which is your body‟s way of saying, it‟s okay.
Always listen to what your body is telling you. You should NOT feel pain when performing any of the warm ups or poses in this program! If you do feel pain, then you‟re either overstretching or have an underlying injury, in which case, the stretch may be exacerbating it. If so, then you need to stop and reassess your situation.
Being in tune with how you feel and aware of what you‟re doing is a vital part of the healing process. So take it easy on yourself and let everything flow naturally. We all have different ability and flexibility levels. Learning to respect your limitations will help you benefit the most from this program.
36


Combat Yoga Fitness was designed to be short and can be performed in 30
minutes, inclusive of the warm up phase. It starts with warm ups, followed by the pose flows and ending with savasana (the modified resting pose) or the heart meditation pose.
It was also designed to be performed in rugged settings, since not everyone has access to an elegant yoga studio with all the amenities. Troops serving in conflict areas may not have access to exercise mats. In those instances, they should soften the ground underneath them with their boots, remove debris and place a poncho or tarp over the exercise area. Maintaining situational awareness will remain a priority under those conditions.
The central point is that this program is adaptable and based on what you can do and where you can do it. It is understandable that when a person is under enormous stress or is experiencing anxiety that they may not be able to execute the entire program sequence. In that case, utilize the poses that work best for you, until another time.
It is, however, important to stay with the program in order to reap its full benefits.
Many people suffering from stress related disorders find themselves isolated from others, including family and friends. Because of that, I encourage you to find a buddy to practice with or try and connect with other like minded people facing similar circumstances. It will go a long way in your stress reduction and in forging new friendships.
Our next step is linking the breath with movement. At first it will feel awkward, that is, coordinating your breath with the pose flows, but it‟s important that you practice this technique until you get it right.
It is the linking of breath with movement which provides the vehicle for meditation and the relaxation response. You will derive enormous benefit from coordinating your breath with your movement.
37


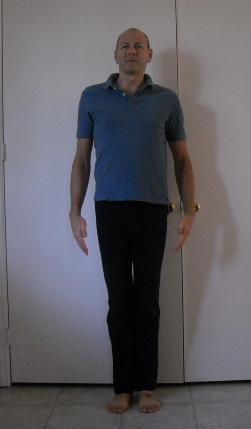

We will begin with Mountain pose. Standing tall, with both arms to the side, inhale and bring your palms upwards over your head. On the exhale, let them float back down to the sides. You will repeat this process six times, (inhaling) palms over the head, and (exhaling) palms back down to side.
38


Next is the is the “Dynamic Squat”. Starting in Mountain pose with your hands by your side, turn your palms outwards as you raise your arms up, while squatting down at the same time in one smooth action.
Try not to squat too low and keep your butt above your knee line, which will alleviate over straining the knees (see illustration below). The feet should be close together and the head looks straight ahead, while keeping the back flat. The hands should be kept shoulder‟s width apart (or wider).
39


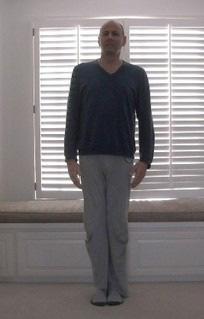
Now exhale as you lower the hands back to the sides and move back into Mountain pose, standing tall. Your focus should be one smooth flowing dynamic motion.
Key points: you will do six rounds of breath, inhaling through the nose as you raise your arms up (while squatting down), and exhaling as you lower your arms (while moving back into Mountain pose).
40


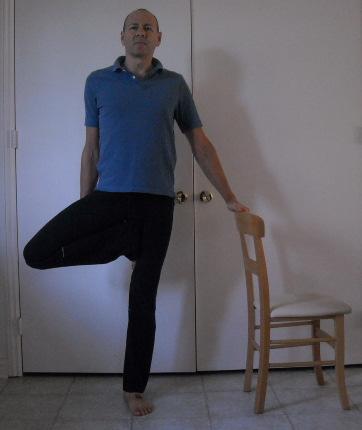
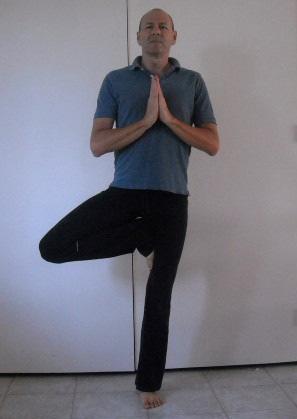
Next is the “Tree” pose. Standing in Mountain pose, place your left hand on a chair, then position your right heel into side of the thigh near the groin area. Try balancing on your left leg and removing the hand from the chair.
Don‟t worry if you lose your balance, since balancing on one leg takes time.
With practice, you won‟t require the assistance of the chair and will move to the next stage of the pose, below. Practice both sides (left and right).
41


People suffering from stress and anxiety often have difficulty with balance and dizziness, especially if they are taking medication, such as, tranquilizers and anti-depressants. Hence, the Tree pose is an excellent posture that restores equilibrium while also grounding the emotions.
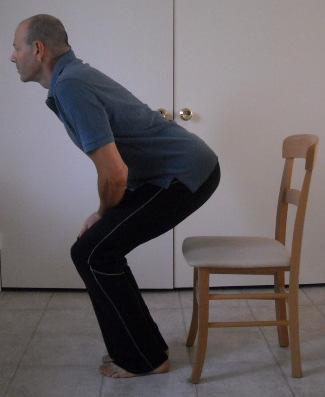
If you experience dizziness on standing up, the next sequence will help alleviate it. From a sitting position, instead of standing straight up, stand in a squatting position with your back angled and forearms resting on your front thighs.
The head remains up looking straight ahead. Remain in this position for 3-5
seconds before standing up fully. It works well for hypotension.
42


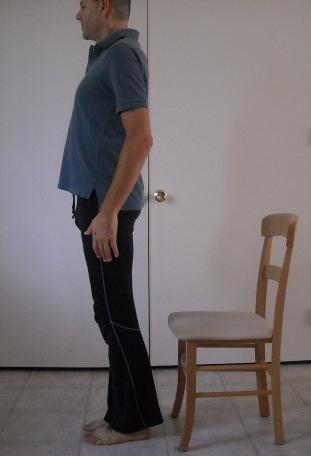
The following illustrations represent the full sequence of standing up 43


Next is the modified “Side Angle” pose. It‟s a little tricky, but is an excellent asana to help develop focus and concentration. Standing in Mountain pose, step your right foot back and turn it out at a 45 degree angle. Align the left front heel with the arch of your right foot. The front foot points forward.
Now bend forward with the left leg so that the knee is directly above the ankle of the left foot. Lay your left elbow on your thigh with the palm of the hand pointing upwards. Raise your right hand up to the ceiling.
If your left knee travels over your left foot, you will put stress on the knee.
So, try to keep the knee directly above the ankle.
44


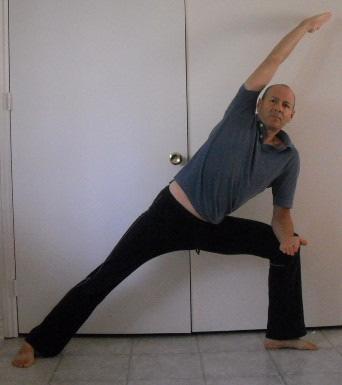
When you become accustomed to the first stage of the Side Angle pose, you‟ll be ready for the next stage in the illustration below. Note the clean diagonal line of energy of the arm and leg.
The Side Angle pose is always performed on both sides. To develop your power of concentration, you can focus your gaze on the thumb of either hand or the front toe. It‟s called a drishti point. Do six rounds of breath for this pose (in-breath and out-breath being the equivalent of one round).
Try to keep you butt from swinging out and pay special attention to aligning the rear foot‟s arch with the heel of the front foot.
45


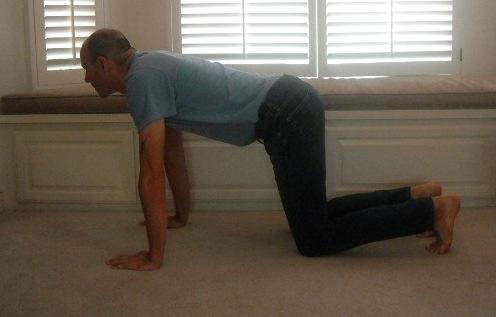

Our next pose is “Downward Dog”. Being an inverted pose it may pose problems for those on medication, which is why we‟ll approach it dynamically, that is, linking the breath with movement.
Crouch down on your hands and knees. Shoulders are above the hands and feet are slightly apart. With your toes curled up and pressing towards the ground, inhale as you pivot your body upwards, as per the illustrations below. Then, exhale as you collapse back on to your hands and knees.
Keep your back flat and heels an inch or two off the ground. Knees can be slightly bent if you have lower back issues or sciatica. Do six rounds of breath, always breathing through the nose.
46


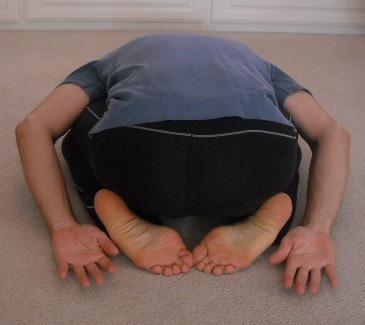
While still on your hands and knees, you‟ll now move into a counterpose called: “Child‟s” pose. Sitting back on your heels, open your legs so your knees are shoulder width apart.
Inhale through the nose, then exhale as you fold forward keeping your head up. Your shoulders should fold right over your knees. Bring your hands gently around the sides of your feet. Do six rounds of breath.
47


Stage 2 of the Child‟s pose is with the arms fully extended outwards. Middle fingers are pointing straight ahead.
You should never go into or come out of a pose abruptly. Always approach it gently and slowly, to avoid unnecessary injury.
How deeply you should go into a pose should be based on the following: Your minimum stretch pertains to feeling an initial effect as you move into in a pose.
Your maximum stretch pertains to feeling pain as you exceed your range of motion in a pose.
Finding a balance between your minimum and maximum stretch is ideally what you will strive for in your practice, in order to avoid hyperextension and injury. Always remember this.
All of the warm ups and poses in this program should be performed with a slow flowing action.
48


Our next pose is “Upward Stretched Legs” and is approached by lying on your back with the knees bent and pointing towards the ceiling. Hands are by the side with palms facing down.
Inhale while raising your hands over your shoulders and raising the legs at the same time. The palms of the hands should then face up. Then, exhale bringing the arms and legs back to where you started. Do six rounds of breath.
49


