Chapter 9: New Fence
Buying a Fence
It is now the last week of february and we decided that we had to replace that tired old fence on one side of the garden. It has been up there for quite a long time and it has been through everything that the weather could throw at it. One part just before the heather patch had completely fallen apart and there is a large gap leading from our garden into our neighbours garden. There is a vast amount of creeping weed that had grown over it and to continue with the theme of brightening up the garden it has to be replaced. I visited my local WICKES store again and checked thier fence panels. I wanted 6ft x 6ft panels, posts and support spikes to hold the posts in the ground. I ordered 5 panels and 6 posts along with the support spikes. I t cost me about £200.00 alltogether. I arranged for them to be delivered to my address a few days later.

The Delivery
The day of delivery came and it was a reasonably sunny day. It is now into early March and the new fence panels and parts was delivered and left in our front garden. My brother and i carried them round to the back garden and seperated the panels ,posts and spikes into seperate piles. Our first job is to paint the panels with the brown wood preservative. This was going to be the main job of the day. We took a panel each and painted 1 side and put it aside to let it dry in the sun. This took about 2 hours to complete 1 side of each panel. We didnt rush this part because the finished product will enhance the garden at the end. We took a lunch break while the panels were drying, and after about an hour they were quite dry. So we commenced with the other side of the panels and after we completed the task we decided that was all we could do for today. We will continue in the morning by taking down the old fence.
Neighbours Informed
We had previously told our neighbour of our plan to erect a new fence and he was completely happy with it seeing as a new fence would benefit both of us, he even went half with the cost which was much appreciated. Even though we look at it as our fence and also a lesson to any one out there about to undertake a job like this check that it is not upsetting local residents. Some neighbours can look upon your work with dasapproval and complain to the local authority if they feel it is interfering with thier garden or property.
Dismantle Old Fence
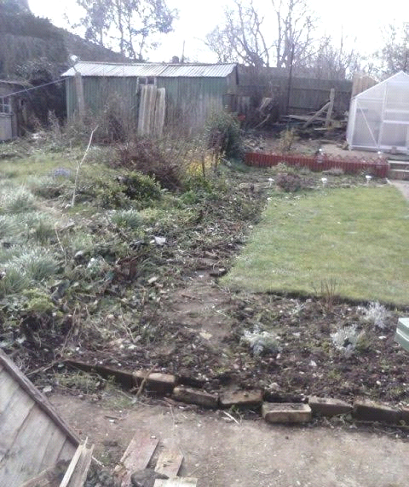
The next morning we were up early with the feeling of eagerness to continue the job.We went out in the garden early and started to dismantle the old fence. It came apart quite easy because of it's present condition. Some of the posts were still usable and the old metal spikes that were holding them in place, but the old panels were completely rotten.We piled the debris into a small pile and cleared away any weeds and overgrown bramble that had grown along where the fence had been. When we had finished there was a large clear gap between our garden and my neighbours garden.
Straight Line
We used the straight string method again to get a reasonably straight line down the centre seperating the 2 gardens and cleared away any stones, weed and bramble to make sure we had a clear straight line as a guide. There is one part of the original fence still standing that is still rigid and strong and it is supporting the gates into the respective gardens. This is the situation again that requires a bit of patience to get a good result, otherwise as you construct the new fence, it could all go bow shaped anf finish up with a very crooked fence.
The Construction
We dug a hole at the end of the fence and proceded to knock the first supporting spike into the hole so that the top part is sticking out of the ground, and filled in the gap around the spike with the loose earth and this made the holding spike strong and staple. We then put the first post into the holding spike, and this is tightened by 2 knut and bolts that is joined to the holding spike,so our first post is up. On the fence panels we screwed some joining brackets that will fix the panels onto the posts. We then got the first panel and screwed it onto the first post via the holding bracket and now we have our first panel connected. At this point with only the first post and panel up you could visualize the finished product and how it will transform your garden into your future eden.
Visual Effect
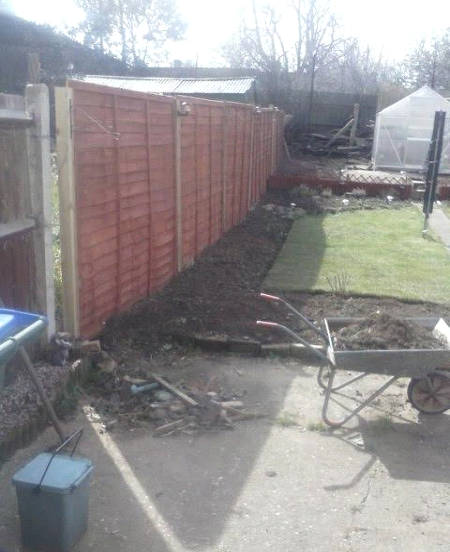
I have seen many pictures in books or online where people have constructed their fence and that brown look certainly adds the appeal. As we constructed the rest of the fence you could see the visaul effect that it was creating.We left the posts in their natural pine wood as thay are 4 by 4 and quite robust. As it neared completion it set quite a contrast with the tiered section and the greenhouse. It set about the idea that in the summer we can put hanging baskets with flower displays mounted on the posts. Along the length of the fence we will plant some shady shrubs,seeing that the sun will be behind the fence for the first part of the morning. It really gets your imagination going when you have something nice as a decent backdrop for new plants.
Completed Fence
We continued on with the job with the next post followed by a panel until finally we reached the end of the garden. This took us about 3 hours to complete, but you will always come accross a few snags along the way, like roots underground that you hafe to clear when you drive the holding stakes down etc. This is the occasion again where a bit of hard graft comes into situation, maybe a few blisters. I recomend you to wear a pair of heavy duty working gloves as you tackle the fence.The finished job looks very stunning and you have transformed your garden visually 100% already.
Chapter 10: Completion of Tier
New Ideas
As the tiered section progresses i started to see a few ideas how to lay the foundation. I made a few sketches for a blueprint as to how to continue and the best idea was to make it into sections. Some parts would have gravel laid down, part of it a lawn and other parts made into planted areas. I bought some more small picket fence panels and again coated them with the wood preserver ready to prepare for a small planting section. At this stage i could see my plan slowly coming into focus and what was written on paper was slowly turning into reality.
Started Work
We started work on the tiered section and as mentioned earlier we have made it into sections. One part between the greenhouse and the fence on the left, we made it into another tiered section and it became an alcove. We used another section of bamboo wicker fence and continued it around the back fence and the fence on the left. We bought some more small picket fence panels and again coated them in the brown wood preservative. We dug over the other tiered section to loosen up the soil in order to layer the cove section. Once the picket fence had dried we placed it into position and then spread all the loose soil onto the cove section so it formed another layer.
Buying the Parts
The next stage we had to order some bags of stone chippings. We decided to check out our local garden centre as they had some good deals on. 5 bags of 10 kilo stone chippings for £15.00. So we went down there and ordered 2 loads for £30.00. It would take about 3 working days to deliver. Also we bought a a roll of good quality weed control fabric to lay down for the stones to lay onto. For the next few days we set about the task of prepairing the rest of the tiered section. The cove section we layed the weed control fabric down so that it covered the tiered section. This would benefit in 2 ways, 1 is the obvious control of weed prevention and 2, make a good foundation for the stones .
Stone Chippings
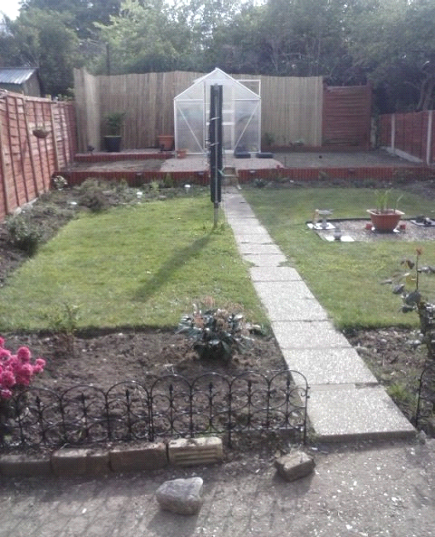
The stone chippings were delivered a few days later and we loaded them onto the cove section. Because they were in plastic bags weighing only 10 kilo's they were easy to manipulate. We split the bags open and raked them into position. We made sure that the covering was at least 2 inches deep.We then proceded to lay the rest of the stones near the front of the greenhouse, which also had a covering of weed control fabric. The effect was quite astonishing, and that part of the tiered section was now almost complete.I could see a huge difference from when i first started this project and my EDEN was slowly coming into shape.
Right Side of Tier
The right hand side of the tiered section we sew a new lawn from seed. I could visualise the finish when the lawn has grown along side the stoned section and the border section, the tiered section is beginning to look good. Using grass seed is the cheapest way to lay the lawn .The area is only about 12 square feet so we gave it a dig over and raked it nice and level.We then trod it down flat and sprinkled the grass seed evenly over. We gave it a good watering and now we need at least 2 weeks before we see any results.