Chapter 6: Building The Greenhouse
Greenhouse Delivered
We eventually recieved our greenhouse from ebay. It arrived in kit form so it had to be assembled. The weather was not too good out side, raining and windy so we opened the package in our living room and checked all the parts by laying the parts out on the floor to check that we had everything. We were able to assemble some of the parts together and assessed where they all joined . We spent the best part of 2 hours putting them in thier sets and labeling them. We couldn't construct it any further until we got the assembled parts into the garden, so we had to wait until the next day.
Assemble the Frame
The following day the weather was more in our favour.So we moved all the parts outside to the patio end of the garden and completed the frame. Up until this point we could only assemble the frame but could not yet incert the polycarbonate panels. All the frame parts were only assembled loosely and had to be tightened up at the end. Next we had to assemble the base.The base was made out galvanized steel and all the parts bolted together to make a 6ft x 6ft frame with with a 15inch prong on each corner. These will eventually be incerted into the ground and reinforced with concrete to make a strong staple base to secure the greenhouse onto.
Nice and Level
We gave the area for the greenhouse another dig over and a few rakings to make it nice and level . we positioned the base where it will be finally secured and spent some time using a spirit level to set it nice and even. I would like to enphasise here that if any one out there wants to apply this in thier future gardening plans not to rush this bit and try to do a nice job as all this effort effects the final result on completion.
Complete the Base
The sprongs in the 4 corners are face down and holes are dug for them to potrude below ground level.Prior to this i bought a few bags of quick dry cement to pour into the holes to secure the base. Once we were satisfied with the position of the base, i mixed the cement and applied it to the base area. Although we are using quick dry cement it still needs about a full hour to set rock hard. So we left the base in place with the cement for a few hours and had a bit of a rest but also quite eager to return and continue.
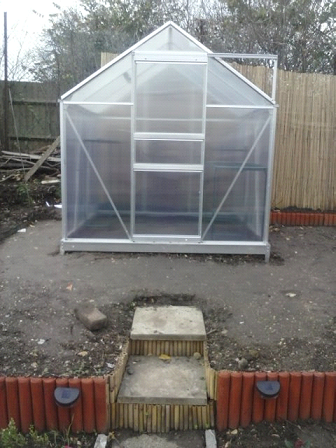
Testing the Base
Later that afternoon i checked the base and the cement had set rock hard. I tested the base by trying to lift if slightyy but it was quite sturdy and set firmly in the ground. We then checked the greenhouse frame and tightened all the nuts and bolts that locked the frame together and afterwards we had a solid structure. My brother and i then carried the frame over to the base, being aluminum it was very light but strong,remember it has not yet got the polycarbon panes in yet, and secured it to the base with specially designed brackets.We then placed the polycarbon panels into place and they were secured in place by some W shaped steel springs.
Warm Inside
It was now the first week into october and and it was still reasonably warm outside. Stepping into the greenhouse after completion you could feel the warmth that it generated,especially when the late afternoon sun shone through. Then i knew that this is going to be a mojor help for my future gardening plans.
Chapter 7: Autumn
Days Getting Shorter
At this point in the gardening plan, it is now autumn and you are limited to things doing in the garden. We have now cropped back the rose bushes, you can crop them back quite low, and doing routine weeding. The daylight hours were getting shorter but every day you will find yourself going into the garden to marvel at what you have accomplished so far. In reality when you get involved in the garden this way there is no such thing as nothing to do. Check to see if the lawn wants the last mow of the season, usually by October, after which there will be a lull in its growth. Clear away any last weeds and just keep all your gardening tools locked away after use to eliminate them rusting.
Taking Photos
could look back to see how it looked at the beginning and what we achieved so far. It really does give you a lot of inspiration and all these little plans start popping up in your head. you just say to yourself " Roll on the Spring". I looked up online for various shrubs and flowers etc that might look good for the future so i could familiarise myself with certain types. Any new construction now will continu We started taking photo's of our progress and some short video's, so we e in the new year.