PART 9
Understanding FTP
In order to be able to upload from your computer at home - you need to download and install an FTP Client.
This FTP Client is called Filezilla.
So let’s go download and save it to our desktop.
Filezilla

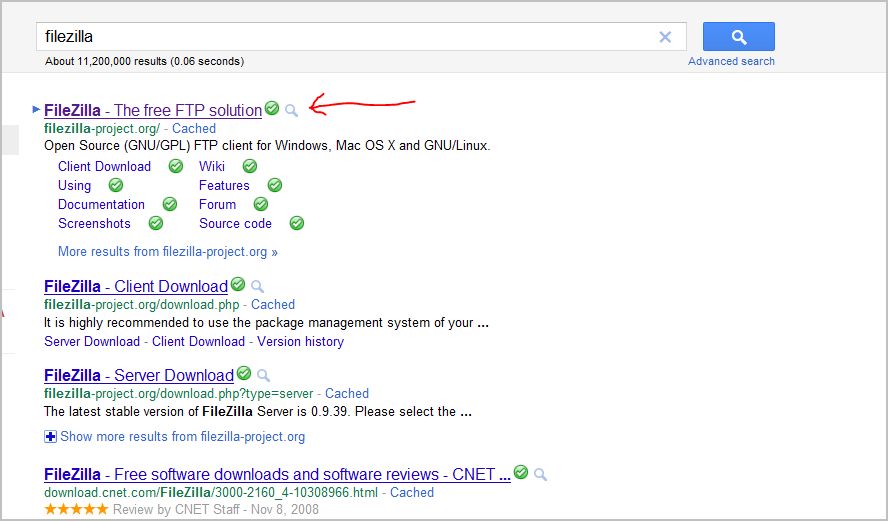
Go to Google search and type in “filezilla” (without the quotation marks).

Click on the first FileZilla link you see in the search results page and you will be directed to their download page.
THIS IS IMPORTANT…
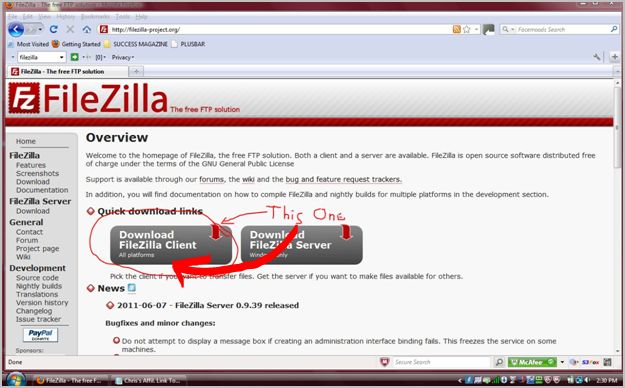
There are two different downloads on their download page…
Make sure you download the correct FTP. You want to download the FTP CLIENT.
When you are asked – save the download to your desktop.
Once FileZilla is downloaded – double click on the desktop FileZilla icon to complete the installation.
Once you have it installed – you are ready to use it.
Now – before we continue here – I just want to let you know that when you open this tool – do not be intimidated by it or become overwhelmed.
I do understand if this happens. It’s a normal reaction with the beginner and for anyone who has never used it before.
We are going to go through it together - step by step – so you will learn and understand how to use it.
After we get through - you will be amazed at how easy it really is to use.
Okay – here we go.
Double click on the FileZilla icon that’s on your desktop to open FileZilla.
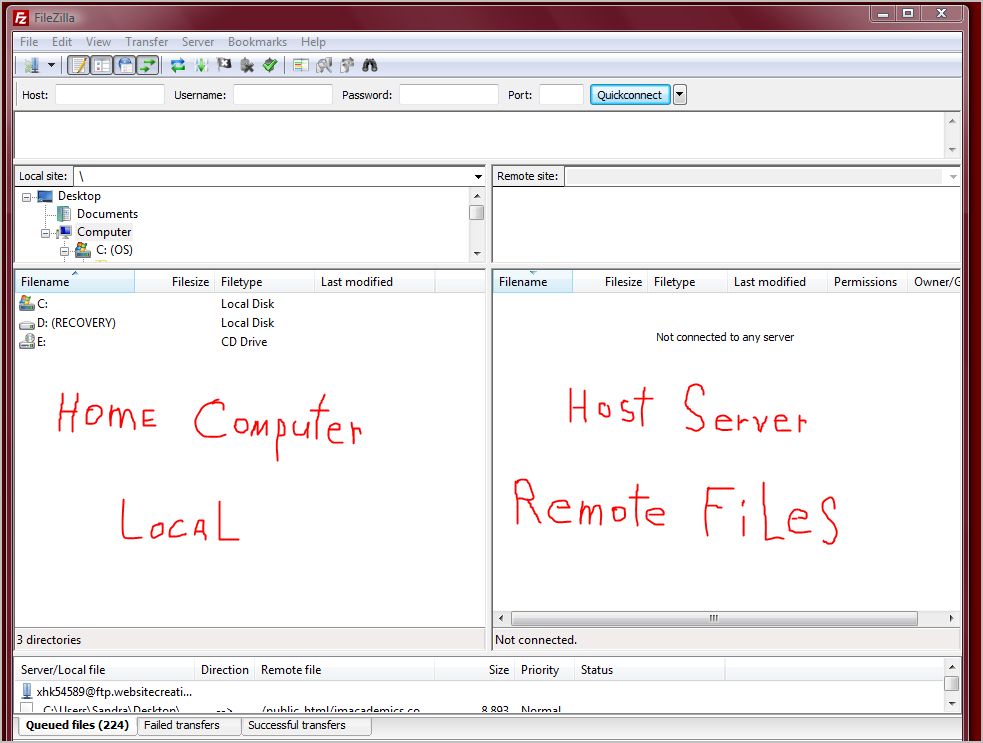
You will see what looks like the image below. You will need to be online to use FileZilla.
FileZilla Explained

In referring to the image on the previous page above – the left side is where your local files are (whatever you have on your computer at home).
The right side is the remote files. This is what you have uploaded (what you have uploaded FROM your local files) – these are files on your host server.
Do you remember when you bought your hosting account? You were sent an email with some important information containing your domain name, username and password?
You will need this information for FileZilla.
In the host field you will be typing in your domain name but – instead of typing in the www – you will type in ftp.
So – in the hosting field – you will type – ftp – dot – your domain name – dot com.
You type this all in lower case letters.
Thus – it will look like this:
ftp.yourdomainname.com
Enter your username and password – leave the “port” field empty and click on “quick connect”.
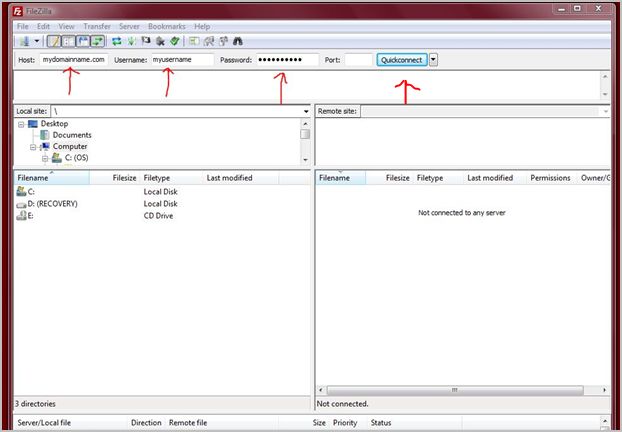
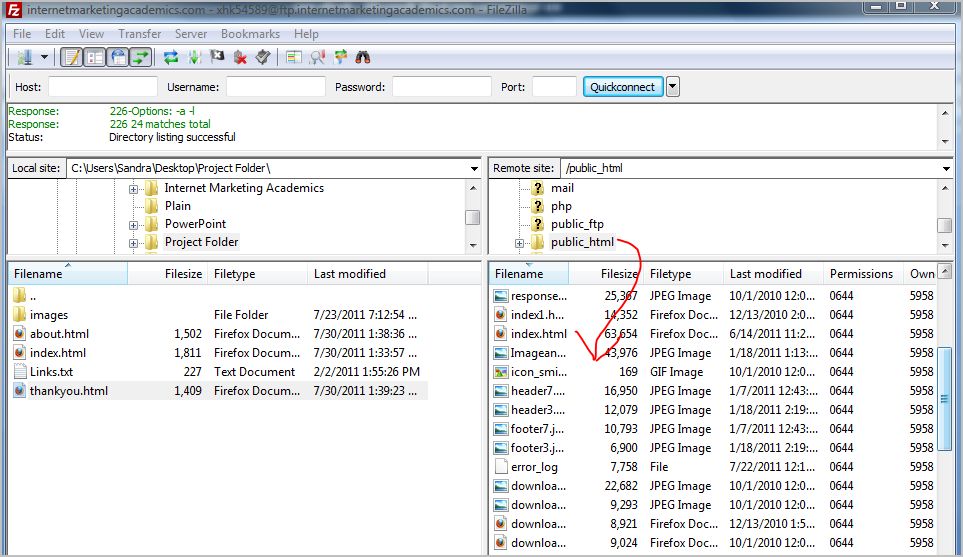
Now – on the left side towards the top – you will see “local site:”
In the area just below “local site:” – you will see your various local files listed such as “desktop”, “documents”, “computer”, etc.
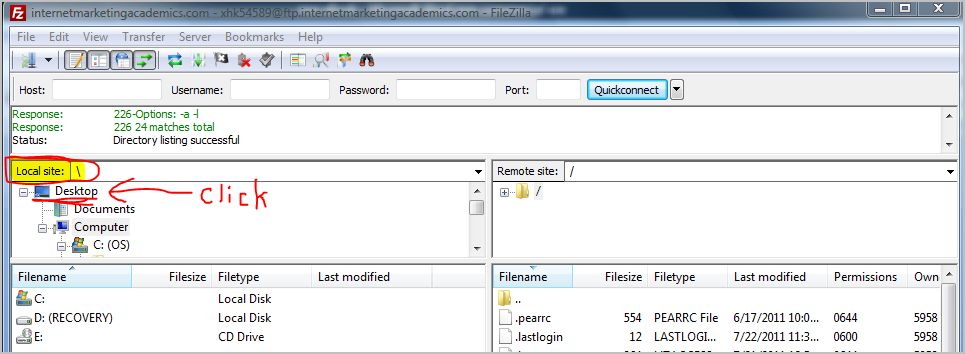
Click on the “desktop” icon. This will open up all the files located on your computers desktop.
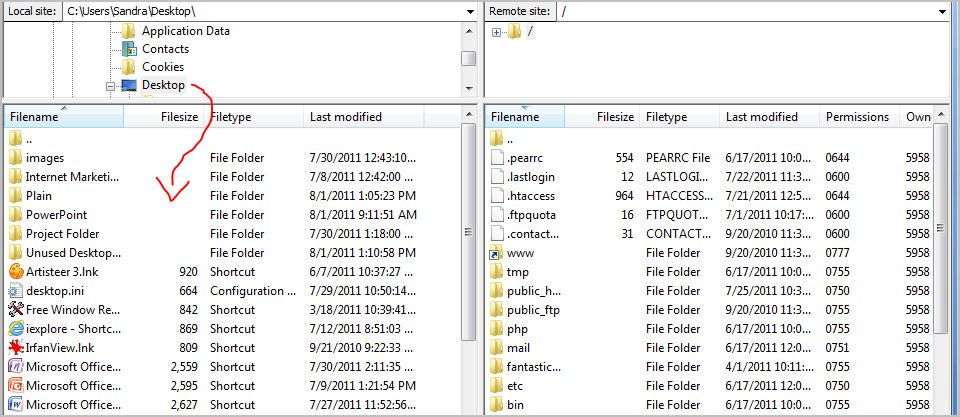
In the lower left hand side area – scroll through until you see your project folder and double click on it to open the project folder.
You will then see everything you created and saved in that folder including your images.
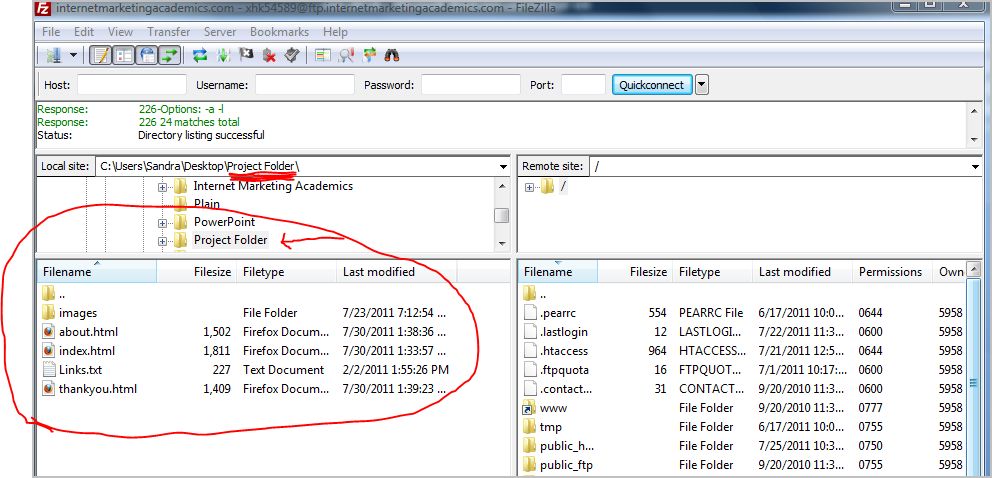
Now – on the right hand side of FileZilla you will see various file folders and other stuff listed. Scroll down to the public_html folder and double click on that folder.
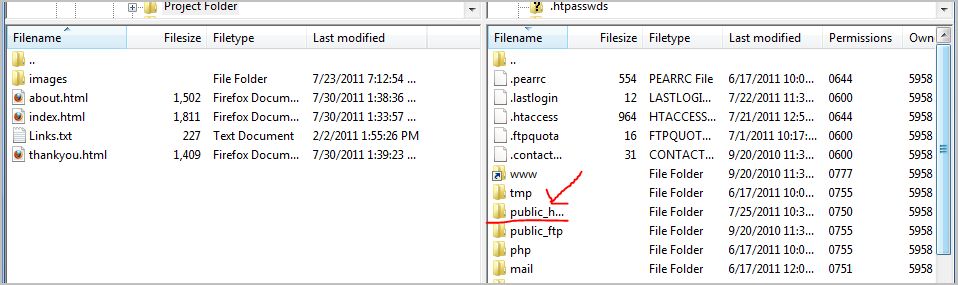
Once the public_html folder is opened – you won’t see much of anything in it because you haven’t uploaded anything to it just yet.
In my illustration below – you will see many files listed because I am using my own FTP Client as a teaching tool.
When first starting out however – you will not have much of anything in this folder.
Go back to the left hand side (to your local files) and click and drag your index.html to the right side area – anywhere in the white area.
As soon as you let go of your file – the FTP client will transfer or upload your file to the public_html folder automatically.
This only takes a few seconds.
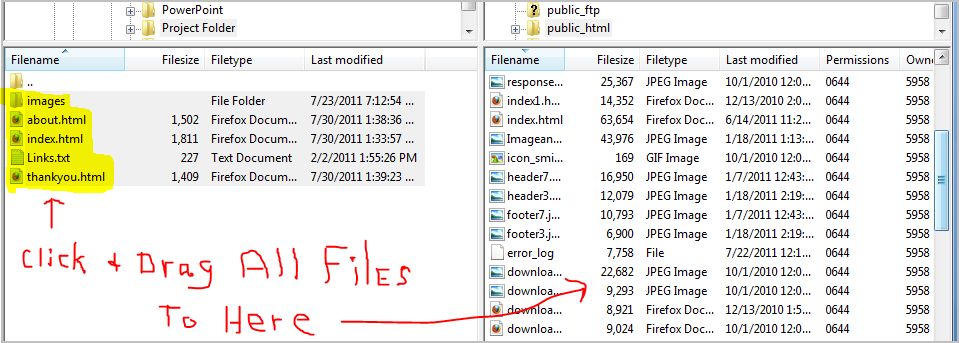
You click and drag all your files and images in the same way until everything you have created and want online is transferred or uploaded to the public_html folder.
Here’s a little trick: Right click on each file you want to upload to the public_html folder and select “upload”. The file will then upload to the public_html. This is quicker and also ensures that your files get uploaded completely to the public_html.
See the image below…

Once you have everything uploaded – open your browser and type in your domain name and the page you want to check out to make sure it’s online.
Let’s say you just uploaded your thank you page and you want to check to make sure it’s online.
You would type your FULL URL (this includes the http://) in the address bar at the top of your browser and then you hit “enter” on your keyboard.
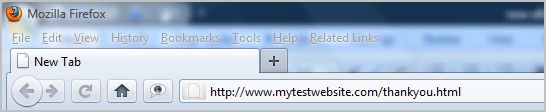
Your web page would show everything you created on your computer at home – online in your web browser.
Another example:
Let’s say you have a domain name called mydogs.com and you have a few web pages called – index.html, index1.html and index2.html.
In your browser URL address bar – you would type in:
http://www.mydogs.com/index.html
Have a look at the web page to make sure everything looks good and works properly.
Test, test, test!!!
You do the same with the other two pages. In fact – you do this with EVERY page you ever create.
If you notice – the http:// - your website address – a forward slash – your page name (index.html) – is fully typed in the URL address bar.
This is called your FULL URL.

For your next page – it would be typed and look like:
http://www.mydogs.com/index1.html

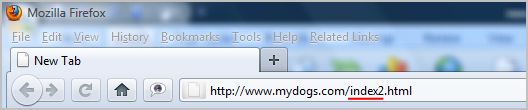
The third page would look like:
http://www.mydogs.com/index2.html
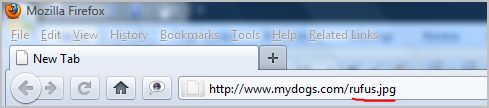
When you want to make sure your images show properly – you would type in the URL address bar – http://www.mydogs.com/yourimage.jpg (your images usually will be in .jpg format).
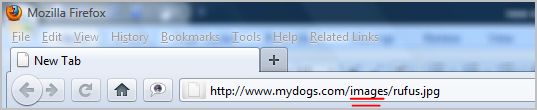
OR – if you have created an image folder inside your project folder and - uploaded the image folder itself to your public_html folder – your image address location in the URL would look like:
http://www.mydogs.com/images/rufus.jpg
After checking and testing everything out and making sure it all works properly – you are now ready to begin marketing in your niche.
And how do you begin marketing in your niche?
Well – that’s another eBook for me to write later on in order to explain the process. It also goes beyond the scope of this eBook. 
Remember – you only need to do all this once for each niche you get into.
Once you have completed it all – you never need to worry about it again unless you want to make changes to it.
Let’s continue…
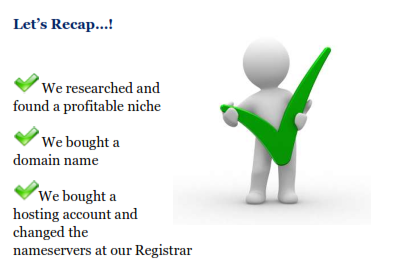
![]() We created an image folder and found some images that are relevant to our niche
We created an image folder and found some images that are relevant to our niche
![]() We created a project folder so we can place all our images and files in that folder so they will be easy to find
We created a project folder so we can place all our images and files in that folder so they will be easy to find
![]() We downloaded the HTML Editor – Kompozer
We downloaded the HTML Editor – Kompozer
![]() We created a website for the niche you will be marketing in
We created a website for the niche you will be marketing in
![]() We discovered how to create an eBook to give away as a free gift so we can start building our list
We discovered how to create an eBook to give away as a free gift so we can start building our list
![]() We downloaded our FTP Client – FileZilla to our desktop
We downloaded our FTP Client – FileZilla to our desktop
![]() We uploaded everything we created on our computer at home – to our FTP client – FileZilla
We uploaded everything we created on our computer at home – to our FTP client – FileZilla
![]() And – we tested our website online to make sure everything looks good and that all links work properly
And – we tested our website online to make sure everything looks good and that all links work properly
So once we are all finished with this – where do we go from here and what do we do now?

Well…
You start building a list of people who are interested in your niche.
Once you have a list of people – you can begin marketing related products to that list.
Building a list of people takes time and is where many beginners start to become discouraged with all their hard work they have put into their website so far.
Remember here – a website is not a business.
It’s just your foundation that contains the meat and potatoes of what your business is all about.
Many beginners are under the belief that - once they have a website up online - they will immediately begin making money online.
Having an online business just doesn’t work that way.
Starting an online business and keeping one requires hard work in the beginning and lots of tenacity.
Many beginners give up as soon as they run into a problem when something doesn’t work quite right.
If anything – you need to embrace any problems you encounter because that’s how you learn.
There is no magic button in this business. There is a system to the whole process of getting started with an online business.
I’m getting a little ahead of myself here and will touch on this a bit more a little later on – but for now – let’s go over the next step which is – building a list of people interested in your niche.