Section A: The basics... How to hold the tools
You'd think this is pretty simple, but there are a number of things you should keep in mind if you want to optimise your performance.
When applying tension, only use one finger. You can position the wrench at the top or bottom of the keyway, it does not really matter a lot of the time so you can just do whatever is comfortable for you. It's wise to give yourself as much room as possible though; having the wrench taking up space in the bottom of the keyway makes it easier to overset pins or get your pick trapped. Sometimes the pins bind better with the wrench at the bottom, so if it doesn't cause any trouble, by all means do. See example below:
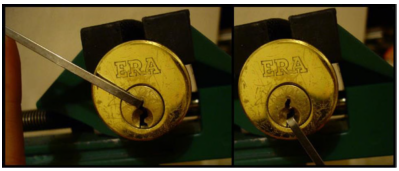
The wrenches supplied with pretty much all pick sets are designed more for bottom of keyway tension; a shorter wrench is more desirable for top of keyway but not compulsory. I find that if you trim a wrench down to about 8mm it's great for allround use, it gets in good and deep for bottom tension and doesn't stick out so much that is loses grip when up top. The actual "handle" can be as long as you please, and can be twisted or not depending on your preference.
Another thing worth mentioning is that, when using top of keyway, it's good practice to keep the wrench from making contact with the front pin so you don't get any confusion with the binding. Most of the time it doesn't really matter if you're making light contact with it though.
As for the pick, again you can do whatever you find comfortable. As long as you have a nice relaxed grip and can move it without having to put your wrist into it, you're good to go. Personally I use my thumb and middle finger to grip the handle, just before the shaft. I keep my ring finger on the shaft to get maximum feedback. Doesn't matter if the pins are at the top or bottom of the keyway. See example below:
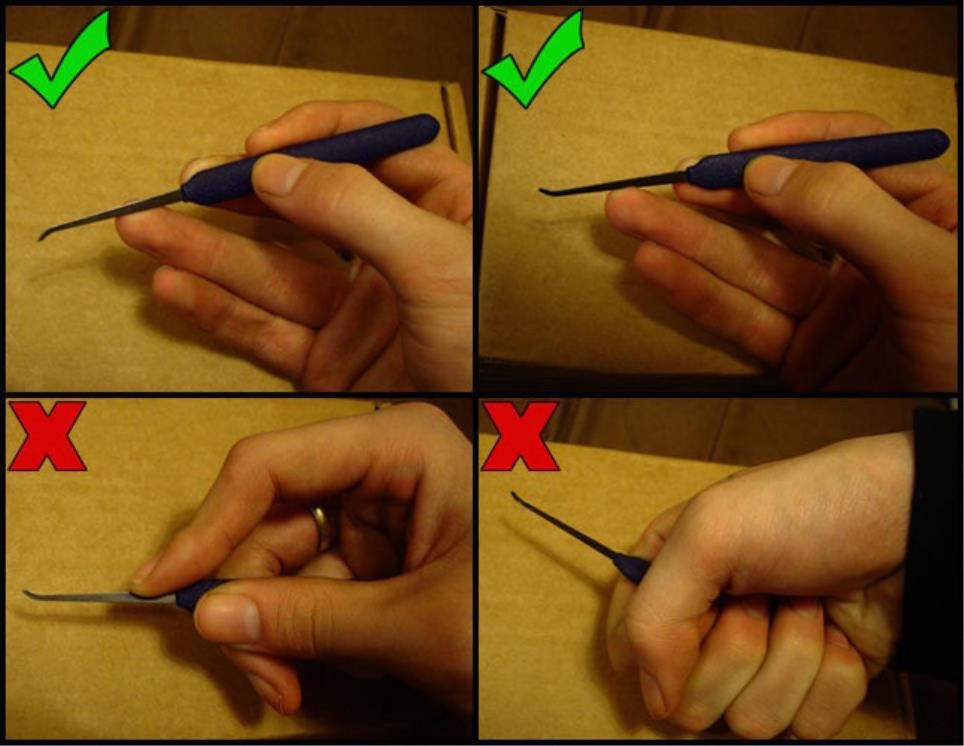
This way might not be comfortable for you, so experiment and see what you like. Just don't hold it like a knife, or in such a way that your wrist is doing all the movement, like in the bottom examples. Remember, you're moving small pins by small amounts.
All movement should be done with the fingers.
And that's that covered.
Section B: Single pin picking — The speed bump method
No, this doesn't have anything to do with bump keys. If you want to learn how to bump locks, go to our website.
Single pin picking is the art of manipulating the pins one by one, by exploiting the tolerances we looked at earlier. I recommend you start off with a short hook. And if you skipped straight to this section without getting to grips with the concept of binding and how the mechanism actually works, go back to the basics first.
Ready? Well it's about time.
This is a method you can use to find the optimal tension for any given lock — which is the most important step, and lays the groundwork to get it open with minimal frustration. I'll also give you a complete rundown of what to do and what to feel for. I'm not the only person who does it this way, it's not a groundbreaking new technique, I just haven't seen anyone else explain it in real detail.
Just before we start, a word on tension. Everyone says you need barely any pressure on the wrench, which is true, but just because a lock will open with the bare minimum, it doesn't mean you have to use that amount. There is actually a range of tension you can get away with, so I'll be teaching you how to find that range. That way, you can choose the amount you're most comfortable working with. In most cases, you really don't need to go too low.
As a beginner, using the absolute minimum, you probably won't have a clue what's going on inside the lock because the feedback will be so subtle. That was my experience, anyway. Don't get me wrong, I opened plenty of locks by applying a hair's amount of tension and working the pins, but I couldn't tell you the binding order or how high to lift any of the pins to save my life. I just felt a set here and there and after a while the lock opened, there was no real consistency. And now that I actually have developed the touch for minimal tension, ironically, I've found that it isn't necessary. So this is why we will focus on the tension range, and not the lightest touch.
The technique I use is as follows:
1. Start with a "medium" amount of tension. When I say that, I don't mean half way between snapping the wrench and barely touching it. It's still a light-ish amount, just not light-light. The easiest way to explain this is for you to put a standard (non-twistflex) tension wrench into a lock and hold it in your hand. Where your finger would push on the wrench, hold it just above one of the keys on your keyboard and push it down. Don't actually tension the lock itself, it's just there to keep the wrench from flipping around so you're pushing on the flat part. I want you to see how much it takes to just about hold it down and no more.
Now add a little more on top of that, we'll be using this as your starting point.
I'm using a standard cheap keyboard so I don't know if this is the best way to explain for everyone — it's not an exact science. Remember this isn't the amount you'll be using to actually pick it, very few locks will require anywhere near this much. It's just a starting point we'll be working from in order to find the range.
2. Insert your pick right to the back of the plug, and drag it very slowly back towards you and across the pins. As you do this, push the pick gently against the pins so you can feel them springing a little. Don't try to push them as deep as they'll go or anything like that, just use very gentle pressure. Think of it like drawing a soft line on a page, just not with a pen that's desperately low on ink. You should be able to feel a soft springiness to the pins as it rolls over each one.
What you're looking for is a pin which feels more solid than the others. This is the binding pin, and the reason I call this the speed bump method is because when you hit it, it's like the pick has hit a little bump. A lot of people push each pin individually to find which one is binding, which you can do if you want. As long as you find it, that's the main thing.
The more tension you apply, the more obvious the binding pin will be, but I wouldn't recommend using anything heavier than what I described before. Honestly, the binding pin will stick out like a sore thumb under that amount so there's really no need to start any higher.
If you can't feel anything binding under that amount of tension, and assuming you're not being dense and pushing against the warding, it's usually because the binding pin is the one right at the back. Since it's the first pin you're in contact with, it just feels like part of the back of the lock, so if you can't feel any binding, don't jump the gun and start piling on more tension. Carefully get onto the back pin and see if it gives any resistance when you push on it. I guarantee if you can't feel any binding, it'll be the pin at the back you need to be focusing on. If you're having a hard time feeling the back pin, roll gently from front to back over the pins instead until you get onto it.
If it's definitely not the back pin, then you can try more tension. Some locks do take a fair amount. Anyway, when you've identified the first binding pin, move onto step 3.
3. Position the very tip of the pick on the middle of the pin which is binding. You might find it helpful to roll the pick back and forth over it a little to get the position just right. You don't need to be exactly in the middle of the pin, but it's good practice. Next you want to apply some pressure to the pin. Think about the amount it takes to push a non- binding pin all the way down and use that.
4. Slowly start to reduce the amount of tension you're applying to the plug. The pin will start to move under the pres- sure of the pick at some point, so try your best to hold the pick pressure steady and concentrate on the tension rather than pushing harder on the pin to get it to move. You're already using quite a bit of pick pressure here, so concentrate on the tension until you feel the pin start to move a little.
When you do feel it this, you can hold the tension there for picking if you want, although this is more to set a bound- ary so you know how much is too much. You can push the pins into place from here without too much force, but there'll be a fair bit of drag as the pins move. At this point you're using max tension for that lock, and whereas you're not at a ridiculous level, it's still more than necessary.
From here it's quite easy to find a balance between the pick pressure and tension. Just play around, making sure not to go over max. You want the pins to move easily, but at the same time you also want to feel the binding slightly as they move. It takes a while to really get the feel for what I'm talking about, but when you figure this out you'll be working with the best of both worlds — great feedback, and without the grunt.
 BEFORE CONTINUING, PLEASE NOTE:
When pushing any pin into place, you should aim to keep the pick shaft from interfering with the other pin stacks as much as possible. Don't hold the pick parallel to the cylinder as you're moving a pin into place, use a sort of levering action to ensure minimal contact with the other pins (i.e. the tip goes up and the shaft stays as far down out of the way as possible).
Also, make sure to attack the pins from an angle rather than trying to get straight under them and levering upwards. It's not as easy to do it this way at first, but the reason we do all this is to help avoid oversetting. We'll be looking at this properly in the next section.
5. As you push the binding pin, when it comes to shear, you'll feel it set one way or another and you can then move onto the next binding pin. Once you've set that first pin, you can hold the tension at the same amount, or increase slightly as you set each one if necessary. You might want to increase tension to find the next binding pin although you can hold it steady, doesn't really matter.
How clear the sets feel depends on the lock. Some you'll feel a very distinct click, both in the pick and wrench, and you'll hear a nice click as well. In many locks, mostly older ones, the feedback is very dull and sometimes practically non-existent. You can feel the binding just fine, but as you actually push the pins into place, there's only a very dull click as each pin sets or they'll just come to a stop with no real indication of being set other than they've stopped moving.
You'd think that older would mean more worn, thus looser tolerances and nicer feedback — which is true, but when a lock is in use for a long period a time there's a fair amount of dirt which builds up in there and it really kills those nice clicks you're looking for. Most of the time it doesn't cause any problems as long as you keep a mental note of the binding order.
This all sounds like a very complex process, which I guess it is, but it's actually pretty simple when you get the hang of it. Of course it'll take a lot of practice to get the feel for things properly, but after a while it'll be second nature and you'll do it without thinking. You can get onto the first binding pin, set it, and have the tension figured out in a matter of seconds and from there it can be very easy, or rage-inducing, depending on the lock you're up against.
Section C: Oversetting
Oversetting can be the simple result of carelessness, or a genuine problem caused by staggered pin configurations and/or crazy security pins. At times, it can be completely unavoidable, so I wan it in some detail. Here you'll learn how to keep it from happening, and fix it when it does.
First and foremost, pushing too hard on a set pin will cause some (or all) of the other set pins to drop back down to their rest positions. With most average locks you can push set pins a little over the shear line and get away with it since they just fall back into place, but if you push too far then you're in trouble. Mostly though, as long as you don't intentionally try to force an already set pin, it's fine.
This is easy to avoid. Just be careful with the pick, and keep a mental note of which pins you've set. If you are ever in doubt about a pin, leave it alone and check the others first. If you've figured out the tension and a pin isn't moving under normal pick pressure, never try to force it. Simple as that.
It really is a massive help to keep at least a loose mental note of any pins you've set. Trust me, it's not hard to do, and you'll be especially glad you learned the habit when it comes to the higher quality locks. If you map out what the lock is doing, even roughly, it means that even if the majority of pins reset on you, you're able to get back to the same point again quickly to analyse what happened.
In addition to using too much force, you might overset pins with the pick shaft. Providing you're using the correct technique as described in the previous section, this can only really happen if you have pins which are considerably deeper setting than ones in front of them. There are actually two ways this can occur, and depends on the binding order.
In the diagram below, using a short hook you can see that by lifting pin 4 to its correct height, the shaft is pushing pin 2 too high. Ignore the other pins, we're just going to focus on those two and what happens depending on the order they bind.
Fig. 7: Example of oversetting.
If pin 2 was the first pin to bind, it wouldn't be a big problem so we'll look at that first. We would set pin 2, then feel 4 binding. Pin 2 is very long and we now have to reach under it. So with this pick, we wouldn't be able to push pin 4 deep enough to actually set it because pin 2 would be pushed up by the pick shaft.
Cases like this are simple enough. Out comes a bigger hook to reach under pin 2 and set 4 deeper. In this instance, you'd only overset pin 2 if you accidentally tried to force pin 4 with a short hook. This would result in an overset pin 2, pin 4 wouldn't set, and you'd probably reset other set pins (if there were any) in the process. You'd be pretty screwed, so don't do it. Simple rule, never try to force anything. If it doesn't want to go, the first thing you should do is grab a pick with deeper reach and scoop under the ones which are in the way.
Like I said earlier, not all locks give nice crisp feedback, and some people worry about oversetting in these cases. Understandable, but trust me, you'd still figure it out. In this example, if you pushed pin 4 as far as you could without disturbing 2, you wouldn't feel any other pins binding so you'd know that pin 4 needed to be set deeper.
Fig. 7: Example of oversetting.
Now let's look at what happens if 4 was the first to bind. This is a problem because, as you can see, 2 is above the shear line when pin 4 sets. I'm sure you can tell what happens — at the moment the plug shears pin 4, it rotates and binds pin 2 while it's above the shear line. It will stay stuck there, and you wouldn't actually be aware of this at first, since when you go over pin 2 it will just feel like a normal binding pin. Same sort of idea as before, it won't set no matter how far you push it — and since nothing else is binding, you'll know something is up with it.
This time though, instead of not being able to push it far enough, you'd find you could push it all the way without it setting — which tells you it's already gone past set and you're going the wrong way. As I'm sure you can imagine, it's not always this simple in practice, but that's the theory anyway.
If you identify a pin as overset, you need to reverse pick it back to the shear line. Sometimes multiple pins can overset, which is more complicated, but the general idea is to feel how many are binding when they shouldn't be and reverse pick until you hear that number of clicks. By now you should see why having a good mental map really comes in handy. Even if you know exactly which pins are overset, I can tell you it is always easier said than done.
The general principle of reverse picking is to drop the tension very carefully, with a sort of pulsing motion, to catch the drivers on their way down. That's all there is to it, this is more practice than specific technique. Can be very tricky depending on the tolerances of the lock, but it's doable.
When I explain this to people, a common question is, why don't we just use a deep reach pick all the time and cut out all this nonsense? Well, the reason is that it's not always as easy (or possible) to use longer hooks in tighter keyways — and there's no point making things harder on yourself without good reason. Most locks don't have crazy bittings, so it makes sense to go with the most user friendly pick until the lock starts giving you problems. Honestly, you can pick the vast majority of locks with the basic short hook. However if you do need more picks. You know where to come.
Let's recap:
If all else fails, try picking in the opposite direction. Some locks will open relatively easily one way, and be downright impossible the other.
Section D: Raking
Raking exploits the same mechanical weaknesses as single pin picking, but we attack multiple pins at a time in order to set them randomly. When I say randomly, this refers more to the motion of the pick. Binding order still applies, we just don't really pay attention to it.
This gets a lot of stick in the hobbyist community, since lock picking is viewed as a puzzle, and raking takes away any element of that. Like solving a Rubik's cube with an algorithm, it's just not the same. To a point I agree, but I can't deny that it's cool to open locks in 5 seconds flat.
This is no exaggeration, picking a lock in seconds is something games and movies aren't completely lying about — even if it's not always portrayed realistically. Like when Matt Damon started a car ignition in the Bourne Supremacy, with what looks like the HPC Flip-It. Or picking with a bobby pin, and using a completely unmodified screwdriver as a tension wrench in Fallout. Seriously, all that high tech gear and no proper picks?
But I digress. Believe it or not, a shockingly high number of locks can be raked open, and many will open very quickly this way. It's not quite as easy as it looks though, while it lacks the precision and finesse of SPP, a good raking technique still takes a hell of a lot of practice to develop. You need an extremely light touch, good tension control, and it's essential that you're able to make sense of all that scrambled up feedback. Some locks will rake open effortlessly, but most require a fairly specific combination of movement and tension to open with any kind of speed. It helps to have at least some SPP skills under your belt so you at least know the basics of what to feel for.
Whether or not a lock can be raked open easily, depends heavily on the bitting. If you look at the keys below, you'll notice the ones on the left all have something in common:
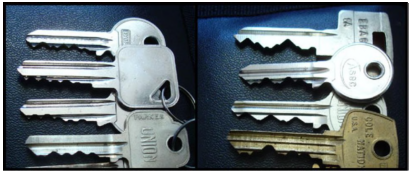
These are all very easy to rake because there isn't too much variation in height from one pin to the next, and they're mostly quite linear. The ones to the right, however, are considerably more difficult. None of them are impossible to rake open, but the alternating high/low cuts can make it very frustrating. Some people are crazy at raking and can tackle bitings like this no problem, but personally I wouldn't attempt it.
People ask about raking locks with security pins, so I'll toss in a brief bit about that. They do make it trickier, but not much. As long as the biting isn't too crazy and you know the right way to adjust the tension, it'll still rake open with very little fuss. I will talk about security pins properly in the next section though. For now, we'll look at the general technicals for raking.
When I talk about raking, I don't mean in the traditional sense. If you want to get into semantics, raking in the true sense is applying tension and pushing down on all the pins with the pick — then pulling it out of the lock rapidly and repeating the process until the lock opens. This motion is identical to plucking a chicken, and can take just as long. I'll throw a quick rake into the mix once in a while, but I'd never do it just by itself. There are much better ways.
When raking, tension holds the same importance as with single pin picking. You can still get away with a general range, although you need to bounce the tension up and down within that range rather than just settling on one amount. Personally, I just keep the tension as low as possible and find it works very well with the following techniques:
1. Scrubbing
Moving the pick in and out across the pins. I do this with varying degrees of pressure against the pins, and alternating long/short strokes. I also try different angles. Most people do this at speed, but I prefer to move the pick fairly slowly.
2. Rocking
Inserting the pick fully into the lock, and pivoting it back and forth, while moving up and down. Like a see-saw on a bouncy castle.
Usually one or the other is enough, but I've found that by combining the two or switching back and forth between them is the most effective. Like I said, most locks will have a particular movement they respond best to, so by mixing it up a little you can find what the lock wants. You'll feel small changes in the plug as pins start to find their places, so when this happens, just stick to the general movements you're using and it usually isn't long before the lock is open. If it's being stubborn, finish off with a hook. Be very gentle though, most of the pins will be set and you don't want to overset anything. Same rule again, don't try to force anything and you'll be fine.
When raking, you can place the tensioner wherever you want, although it's still best to give yourself as much room as possible for the simple fact that it may contain shallow pins and you don't wanna be oversetting too much.
Just experiment and see what works for the lock. Some may respond better to BOK (Bottom of Keyway), so if you're not having any luck with TOK you might want to try that for a short while instead to see what happens. Most of the time it makes no difference, but you might be pleasantly surprised. If it point blank refuses to open, try the other direction.
When raking a lock with spools, which are discussed in the following section, using feather light tension you'll drop into a false set fairly quickly and from there you just bounce the tension ever so slightly while raking. This takes a lot of getting used to, but when you get the hang of it, you'll discover that a lot of them will open just as quickly as those with regular pins. Sometimes you don't even drop into false at all.
That's pretty much all there is to it. Practice, practice, practice and see what works for you.
Section E: Security pins
There are many types of security pin, but we'll only be focusing on the most common ones. Security pins, or "anti- pick" pins as some call them, are designed to frustrate picking and slow you down. If you know what to feel for and how to deal with them though, in most cases they make very little difference.
When it comes to standard cylinders, they will defeat casual raking and pick gun attempts, but if you know what you're doing they're only a minor obstacle. Let's look at the 2 types of security pin most commonly used.
1. Spool pins
These are hands down the most widely used security pin. They come in many different configurations of long and short, fat and thin etc. but essentially they're all the same idea. Here are some examples of different spools:
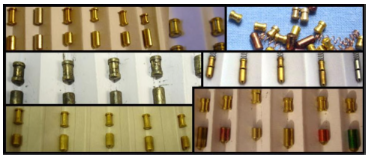
Most of the time, if a lock has spool pins you'll find that all are spooled apart from one. Plenty of locks contain all spools though, and you'll sometimes come across a lock with only 1-2 as well but this is much less common.
When picking a lock with spools, we do the exact same thing as with regular pins — look for binding pins and set them. Setting spools isn't as straightforward though, they can really frustrate the binding order so you need to pay attention. There are 2 different approaches you can take when dealing with these pins, but first we'll get the basics out of the way.
How to set a spool pin
Let's say you have a lock with just one pin. Such a thing doesn't exist, but in the name of education let's pretend. If it's a regular pin, you apply tension and the pin binds. You lift it, and when it reaches the correct height the pins will shear. Lock open, easy peasy. Spools behave very differently though. When you apply tension, the plug will rotate a good few degrees and lock up in that position:

Fig. 8: Example of false set.
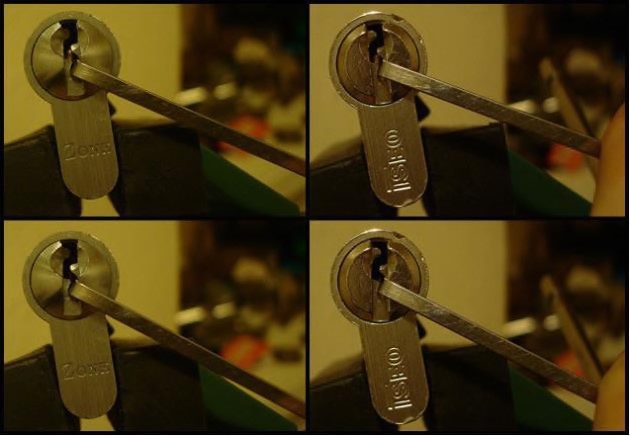
Below are some real examples. The upper portions of the images show the locks at their normal rest positions, and false sets are underneath:
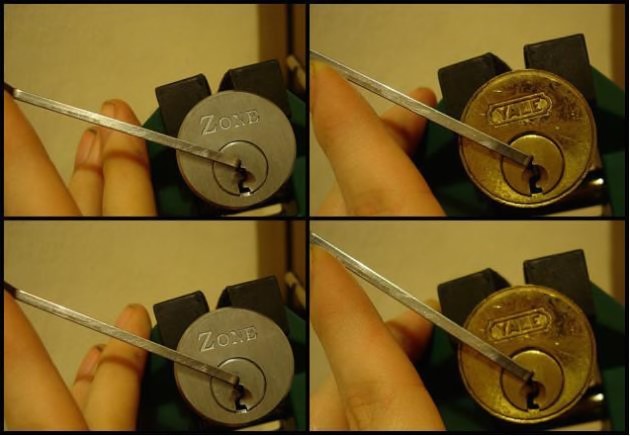
This is called a false set, and the amount of rotation you get depends on the dimensions of the spool. Long and thin will give a large false set, whereas short and fat will give a very small rotation. When dealing with spools, no matter how small the false set is, it will always be obvious. Trust me, you'll feel it in the wrench the same way you do when the lock is open, so don't worry about the different types.
Whatever shape the spools are, we tackle them the same way. When you lift a spool, it tries to straighten up and this forces the plug back in the opposite direction. This is called counter rotation, and in order to set the pin properly you need to just go with it and control your tension so that it doesn't go too far.
You want the plug to go back far enough to allow the pin over the shear line, but not so much that it drops any previously set pins. It's a simple case of pushing gently on the pin as normal, while reducing the tension very carefully until the pin sets. If you're doing it properly, as soon as the pin sets, your tension will carry it straight into false again and this continues until the lock is open.
Well, it's not quite as simple as that.
True binding order vs. forcing false
Unlike regular pins, you'll get binding and counter rotation on any spool pin you push against, so you need to be a little more wary. Reason being, any spool will start to straighten out as you lift it, so if you're not paying attention and just setting the pins randomly, you could be there for a while.
For example, let's look at a a lock which is fully spooled and has a binding order of 2-4-1-5-3. If you just worked your way from back to front, because of pins resetting you'd be left with just pin 2 set and the others at rest. Working from back to front again you'd only have pins 2 and 1 set. After the third time you'd only have 2 and 4, but these are now in the correct order and neither will reset again.
Following this pattern, you'd be setting them in the order 5-4-3-2-1-5-4-3-1-5-3-1-5-3 before the lock opens. If you didn't just stick to that pattern and attempted to actually reset pins which dropped aswell, to be honest you'd be there all day. And when it's possible to just do it in the correct order, that's a whole lot of bull if you ask me.
If you don't want these pins to drive you insane, you need to find the pin which is binding more than the others. Thankfully, this isn't too difficult. One of the pins will give very strong binding and counter rotation as soon as you push on it, and that's the one you want to look for. Any other pin will feel springy for a short distance then hit a "stop", at which point it'll give counter rotation.
So, you want to find the pin which feels solid and gives counter rotation straight away. If you do this, and keep a note of the order so you don't get confused between binding and set pins, you'll be able to blast through them in the correct order and they won't give you any trouble at all. And now you know how to determine the true binding order of a fully spooled lock. Nice. But what happens if we toss a regular pin or 2 in there? Prepare for fun.
Because of how a spool pin is shaped, there is a smaller area blocking the shear line. Let's say you have a lock with one regular pin and one spool... the spool can't possibly bind before the regular pin, meaning you can always set the regular pin first. This doesn't mean the regular pin actually sets first though.
As you know, with spools, just because you're getting counter rotation it doesn't mean you're on the correct pin. Like- wise, just because the regular pin is binding it doesn't mean that one