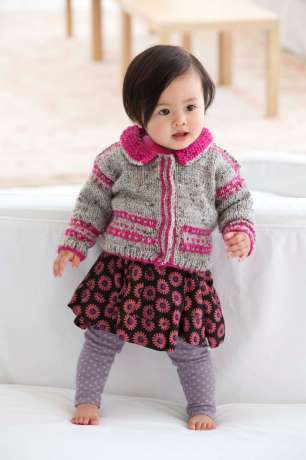
Chic Baby Cardigan
By: Lion Brand Design Team
Sizes: 1 (2, 3) years
Finished Chest 21 (23 1/2, 26) in. (53.5 (60, 66) cm), closed
Finished Length 12 (13, 14) in. (30.5 (33, 35.5) cm)
Note: Pattern is written for smallest size with changes for larger sizes in parentheses. When only one number is given, it applies to all sizes. To follow pattern more easily, circle al numbers pertaining to your size before beginning.
Materials:
LION BRAND VANNA’S CHOICE (Art. #860)
#401 Grey Marble 2 (3, 3) bal s (A)
#112 Raspberry 1 (1, 1) ball (B)
or colors of your choice
LION BRAND knitting needles size 7 (4.5 mm)
LION BRAND knitting needles size 9 (5.5 mm)
LION BRAND stitch markers
LION BRAND stitch holders
LION BRAND large-eyed blunt needle
4 small snap fasteners
Sewing needle and thread
Gauge: 16 sts + 22 rows = 4 in. (10 cm) in St st (k on RS, p on WS) with larger needles. BE SURE
TO CHECK YOUR GAUGE.
When you match the gauge in a pattern, your project will be the size specified in the pattern and the materials specified in the pattern will be sufficient. If it takes you fewer stitches and rows to match the gauge, try using a smaller size hook or needles; if more stitches and rows, try a larger size hook or needles.
Abbreviations
beg = begin(ning)
k = knit
k2tog = knit 2 sts together
p = purl
p2tog = purl 2 sts together
rep = repeat
RS = right side
st(s) = stitch(es)
St st = Stockinette stitch
WS = wrong side
Stitch Explanations
Kfb (knit in front and back) Knit next st without removing it from the left needle, then k through the back of same st – 1 st increased
M1 (make 1) An increase worked by lifting the horizontal strand lying between needles and placing it onto left needle. Knit this new stitch through the back loop – 1 st increased.
Pattern Stitches
K1, p1 Rib (worked over a multiple of 2 sts + 1 additional st)
Row 1 (RS): K1, *p1, k1; rep from * to end of row.
Row 2: K the knit sts and p the purl sts.
Rep Row 2 for K1, p1 Rib.
Two Color Pattern (worked over a multiple of 2 sts)
Rows 1 and 3 (WS): With B, purl.
Row 2: *With B, k1, with A, k1; rep from * to end of row.
Rows 4 and 6: With A, knit.
Row 5: *With B, p1, with A, p1; rep from * to end of row.
Rows 7-9: Rep Rows 1-3.
Notes
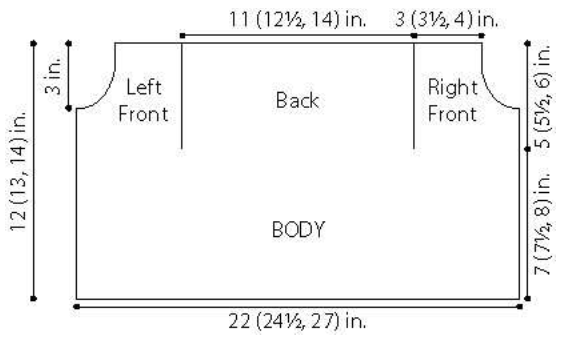
1. Cardigan body is worked in one piece to armholes, then divided for back and fronts.
2. Two color pattern is worked in stranded colorwork. Carry unused color across WS of work.
3. Front bands are worked in one with the fronts.
4. Collar and sleeves are worked separately.
CARDIGAN
Body
With smaller needles and B, cast on 101 (109, 115) sts. Change to A and work in K1, p1 Rib for 1 in. (2.5 cm), end with a WS row as your last row.
Decrease Row (RS): Work in K1, p1 Rib as established over 5 sts, place marker (pm) *k5 (7, 13) k2tog; rep from * to last 5 sts, pm, work in K1, p1 rib over last 5 sts – 88 (98, 108) sts.
Change to larger needles.
Next Row (WS): Work in K1, p1 Rib to first marker, slip marker (sm), p to next marker, sm, work in K1, p1 Rib over last 5 sts.
Next Row: Work in K1, p1 Rib to first marker, sm, k to next marker, sm, work in K1, p1 Rib over last 5 sts.
Begin Two Color pattern
Row 1 (WS): With A, work in K1, p1 Rib to marker, sm, join B and work Row 1 of Two Color pattern to next marker, sm, with A, work in K1, p1 Rib over last 5 sts.
Row 2: With A, work in K1, p1 Rib to marker, sm, join B and work next row of Two Color pattern to next marker, sm, with A, work in K1, p1 Rib over last 5 sts.
Rows 3-9: Continue as established, working first and last 5 sts in K1,p1 Rib with A and remaining sts in Two Color pattern.
At the end of Row 9, fasten off B and continue with A only.
Next Row: With A, work in rib as established to marker, sm, work in St st (k on RS, p on WS) to next marker, sm, work in rib as established to end.
Continue as established, working first and last 5 sts in rib and remaining sts in St st until piece measures about 7 (7 1/2, 8) in. (18 (19, 20) cm) from beg, ending with a WS row as your last row.
Divide for Fronts and Back
Note: Fronts and back are worked with separate balls of yarn. For smallest size, wind A into 3 separate balls. Dividing Row: With A, work in rib as established to marker, sm, k17 (19, 21) for right front; join a 2nd ball of A and k44 (50, 56) sts for back; join a 3rd ball of A a nd k 17 (19, 21) for left front, sm, work in rib as established to end.
Continue as established, working fronts and back with separate balls of yarn and keeping first and last 5 sts in rib and remaining sts in St st until piece measures about 2 (2 1/2, 3) in. (5 (6.5, 7.5) cm) from Dividing Row, end with a WS row as your last row.
Shape Neck
Next Row (RS): Bind off 5 sts, remove marker, k to end of right front, across back and to last 5 sts of left front, sm, work in rib to end.
Next Row: Bind off 5 sts, remove marker, p to end of left front, across back and right front.
Next Row: Bind off 3 sts, working each piece with separate bal s of yarn, k to end of row.
Next Row: Bind off 3 sts, working each piece with separate bal s of yarn, p to end of row.
Next Row: Bind off 2 sts, working each piece with separate bal s of yarn, k to end of row.
Next Row: Bind off 2 sts, working each piece with separate bal s of yarn, p to end of row – 12 (14, 16) sts remain on each front.
Work even in St st, with separate balls of yarn until piece measures about 4 (4 1/2, 5) in. (10 (11.5, 12.5) cm) from Dividing Row, end with a RS row as your last row.
Two Color pattern, upper edge of left front
Beg with Row 1, work rows 1-6 of Two Color pattern across sts of left front, slip sts for back and for right front onto holders.
Next Row (WS): With A, knit.
With A, bind off all stitches.
Slip sts of back onto needle and work same as for upper edge of left front, then sl sts of right front back onto needle and work same as for upper edge of left front.
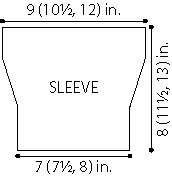
SLEEVES (make 2)
With smaller needles, and B cast on 29 (31, 33) sts. Change to A and work in K1, p1 Rib for 1 in. (2.5 cm), end with a RS row as your last row.
Next Row: Work in rib as established to last 2 sts, p2tog – 28 (30,32) sts. Change to larger needles.
Join B and work Rows 1-9 of Two Color pattern. At the end of Row 9, cut B.
Next Row (RS): With A, k1, m1, k to last st, m1, k1 – 30 (32, 34) sts.
Work 3 rows in St st.
Repeat last 4 rows 3 (5,7) more times – 36 (42, 48) sts.
Work even in St st until piece measures 6 1/2 (10, 11 1/2 ) in. (16.5 (25.5, 29 cm) from beg, end with a RS row as your last row.
Join B and work Rows 5-9 of Two Color pattern. At the end of Row 9, cut B.
Next Row (RS): With A, knit 1 row.
Bind off all sts.
COLLAR
With smaller needles and B, cast on 60 (62, 64) sts.
Work in Garter st (k every row) for 6 rows.
Change to larger needles.
Next Row: Kfb in first st, k to end of row – 61 (63, 65) sts.
Rep last row 5 times – 66 (68, 70) sts. Change to A, cut B.
With A, bind off.
FINISHING
Sew shoulder seams. Sew sleeve seams and then sew Sleeves into armholes. Sew cast on edge of collar to neck edge.
With B and large-eyed blunt needle, work a vertical row of chain st along each line created by the purl sts in each front band.
With sewing needle and thread, sew snap fasteners evenly spaced along front edges.
Weave in ends.
Every effort has been made to produce accurate and complete instructions. We cannot be responsible for variance of individual knitters or crocheters, human error, or typographical mistakes.
©2013 Lion Brand Yarn Company, all rights reserved.