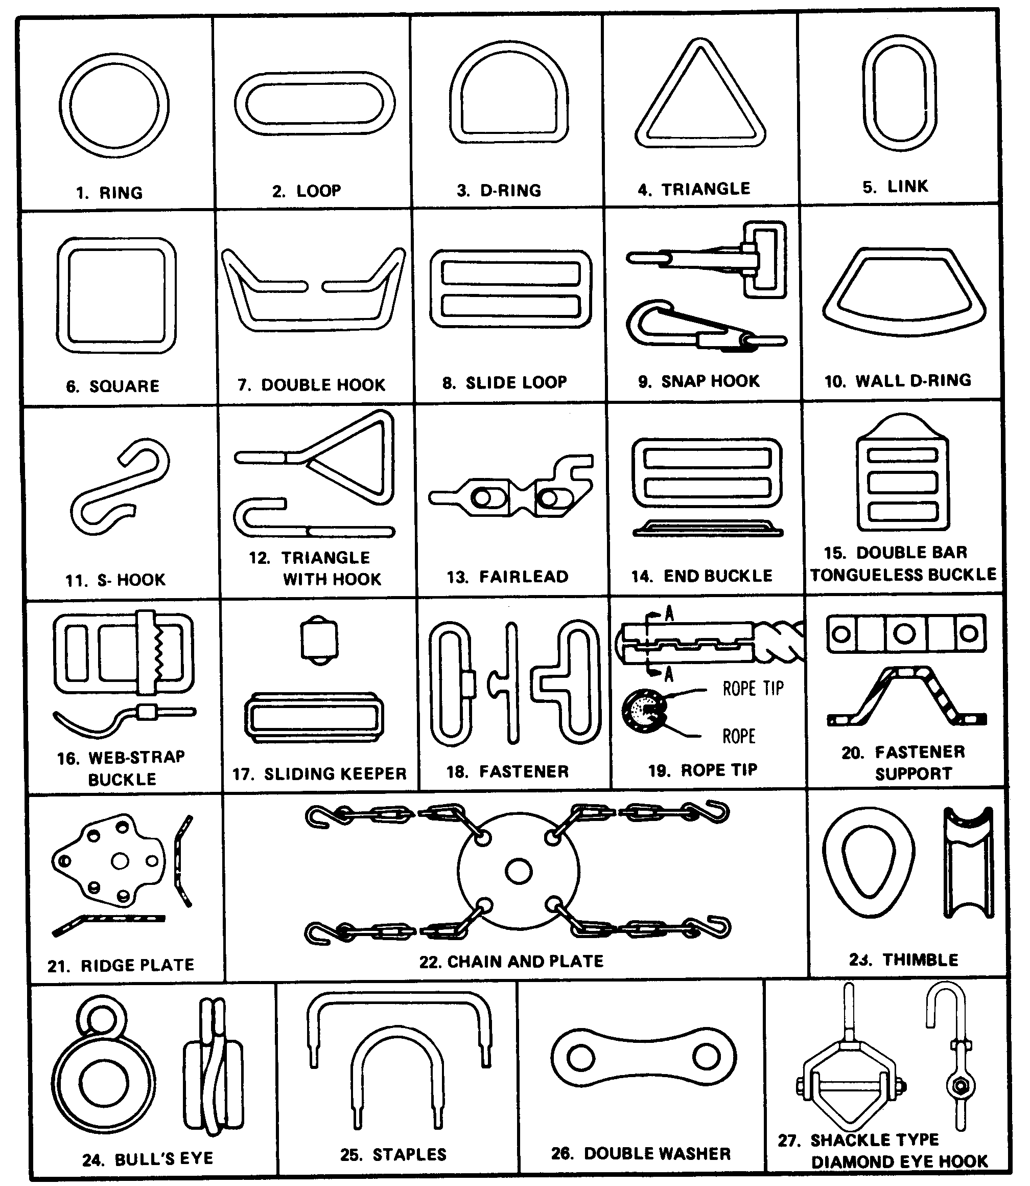
18. Fasteners
Hooking metal devices used to fasten belt ends
19. Rope tips
Metal caps used to finish rope ends
20. Fastener supports
Metal, U-shaped pieces used to hold the male sections of style 1 snap
fasteners
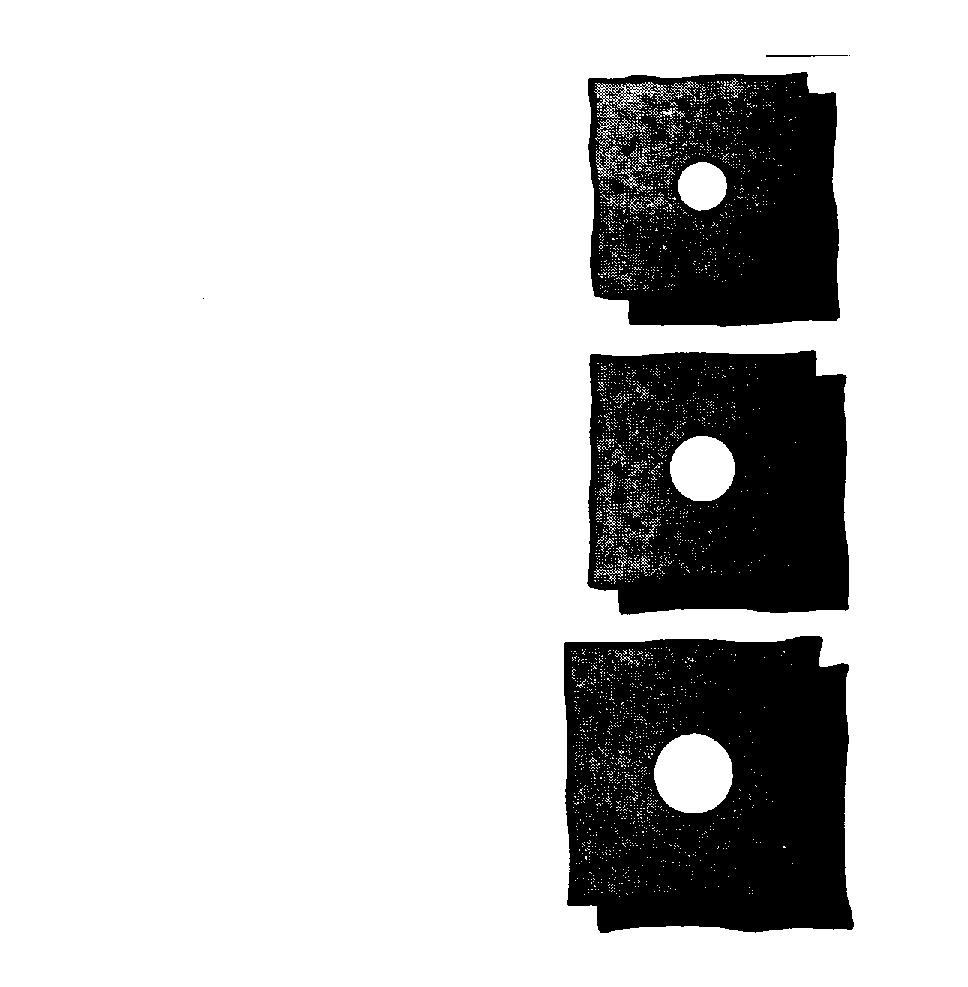
21. Ridge plates
Metal plates with holes used to protect and support the canvas around
ridge pole spindles
22. Chains and plates
Metal plates with chains used at peaks on pyramid-shaped tents
23. Thimbles
Oval metal inserts which fit into splice eyes and are used to reinforce the
ends of lines
24. Bull’s eyes
Round wooden blocks with holes in the center used to carry hoisting lines
25. Staples
U-shaped metal pieces with finished ends which are riveted to cloth
26. Double washers
Metal pieces with holes in each end which are used to prevent staples
from pulling through cloth
27. Shackle-type diamond eye hooks
Heavy steel wire hooks which have upper and lower shackles connected with
bolts and nuts
12-2
FM 10-16
Figure 12-1. Hardware pieces
12-3
FM 10-16
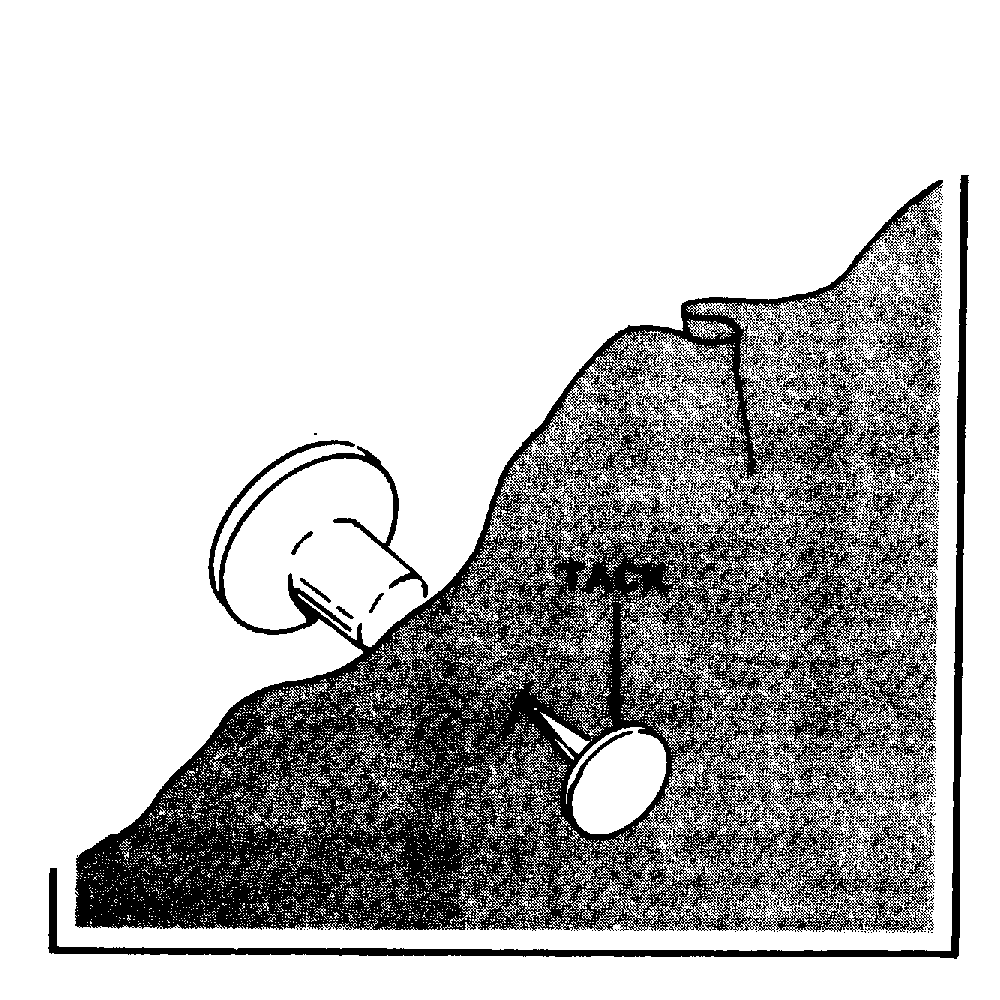
12-2. REPLACING TACK-BUTTONS
A tack-button (Figure 12-2) is a two-part button that is used to close openings on canvas and webbed items. It can be attached either by hand or by using a tack-button attaching machine (Figure 12-3). Both ways are described below.
a. Attaching by Hand. To hand fasten a tack-button--
(1) Remove the damaged tack-button, and repair the canvas or webbing.
(2) Mark the exact position of the tack-button with chalk.
(3) Place the canvas or webbed item faceup on top of a smooth, hard surface.
(4) Push the tack through the chalk mark from the underside of the canvas or webbing.
(5) Tap the button lightly with a rawhide mallet hard enough to clinch the tack and button to
the canvas or webbing without damaging the tack-button or cloth.
Figure 12-2. Tack-button
12-4
FM 10-16
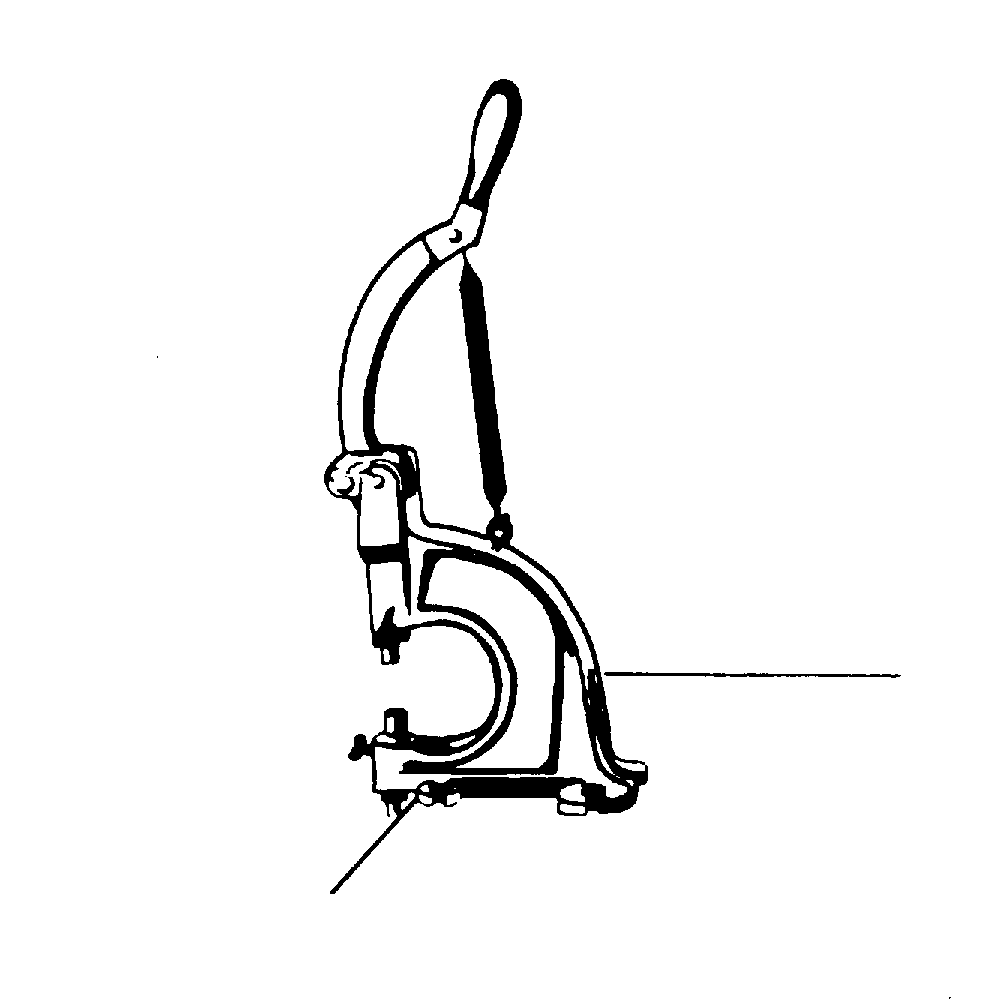
Figure 12-3. Tack-button attaching machine
b. Attaching by Machine. Detailed instructions for operating a tack-button attaching machine are given in TM 10-3530-207-14. To machine fasten a tack-button--
(1) Remove the damaged tack-button, and repair the canvas or webbing.
(2) Mark the exact position of the tack-button with chalk.
(3) Put the appropriate upper and lower die in the machine, and adjust the pitch.
(4) Raise the hand lever, and put the button into the upper die.
(5) Drop the tack, point up, into the lower die.
(6) Position the canvas or webbing faceup over the lower die and tack.
(7) Press down the hand lever firmly to clinch the tack and button to the cloth.
(8) Raise the lever and remove the canvas or webbing item.
(9) Remove the die from the machine.
12-5
FM 10-16
12-3. REPLACING GROMMETS
Grommets are large metal eyelets or rings which are used to reinforce canvas and webbing where holes are made to hold ropes, lines, spindles, and webbed straps. If the canvas surrounding the grommet is damaged, it is repaired with a grommet-support patch before the grommet is replaced. In an emergency, the damaged grommet can be removed, and a larger grommet can be put in its place. This is done only when there is enough undamaged canvas to support the larger grommet adequately. Grommets are
handworked or die-inserted.
a. Handworked. A handworked grommet is an iron ring sewn in place around a grommet hole. This type of grommet is often used in large tents because it can take a lot of strain. To handwork a grommet--
(1) If the old grommet hole will be used, obtain a rawhide mallet, sailmaker’s needle,
thread, wax, and an iron ring with an inside diameter larger than that of the hole. Also obtain a fid (a tapered, wooden or metal pin).
(2) If a new grommet hole will be cut, obtain the tools listed above, a heavy woodblock, and
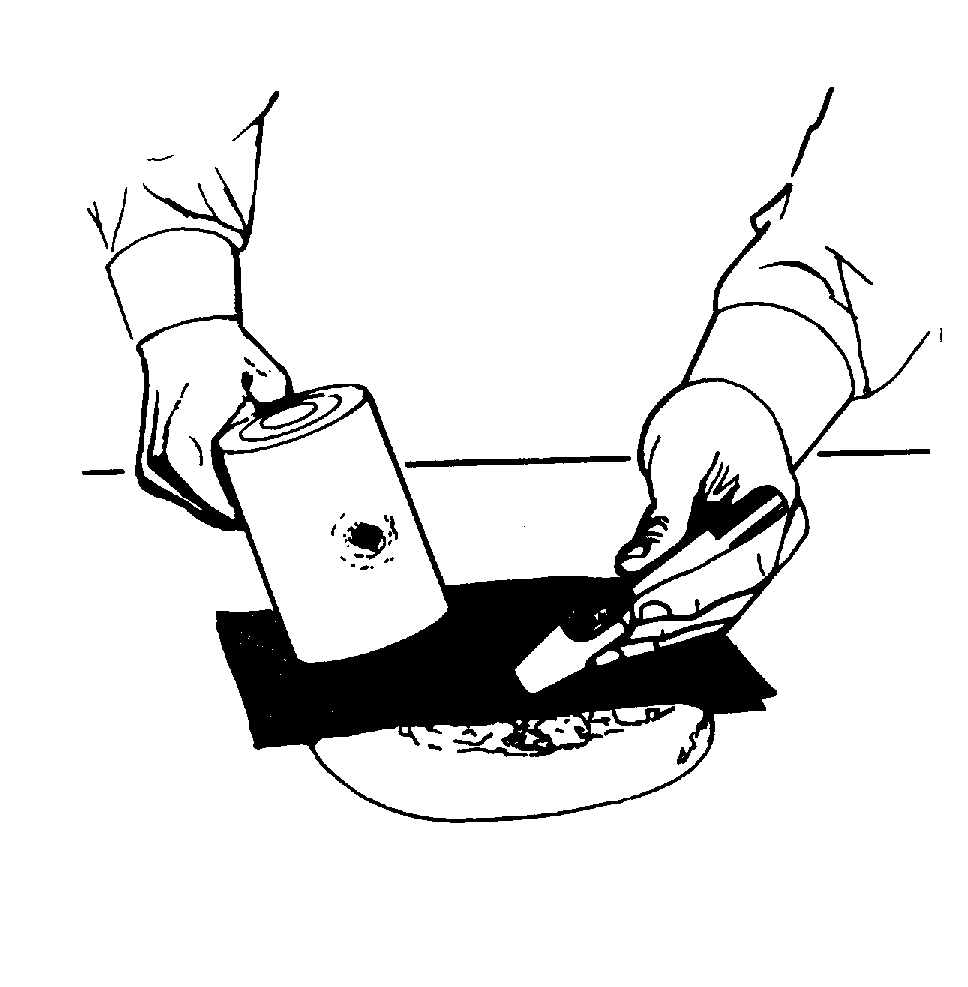
a size 5 cutting punch for a 1/2- or 3/4-inch ring or a size 6 cutting punch for a 1-inch ring. Position the canvas faceup on the end-grain surface of the woodblock, and cut a grommet hole with the appropriate cutting punch (Figure 12-4).
(3) Center the ring over the grommet hole.
(4) To make stitching easier, use the sailmaker’s needle to make a series of equally spaced
holes about 1/8 inch from the outside edge of the metal ring (Figure 12-5). Do not make the holes any larger than 1/16 inch across.
Figure 12-4. Cutting a grommet hole
12-6
FM 10-16
1/2 INCH RING
3/4 INCH RING
1 INCH RING
Figure 12-5. Series of equally spaced holes
(5) Thread the needle with four strands of waxed thread, and knot the ends. Twist the
strands together, rewax the thread, and cut off the knot.
(6) Stick the needle into one of the needle holes, and draw the thread through the hole until
a 1/2-inch end is left.
(7) Hold the 1/2-inch length of thread down against the canvas and the edge of the ring with
the free end pointing clockwise.
(8) Bring the needle up through the grommet hole, over the ring and the 1/2-inch end, and
stick it down into the next needle hole.
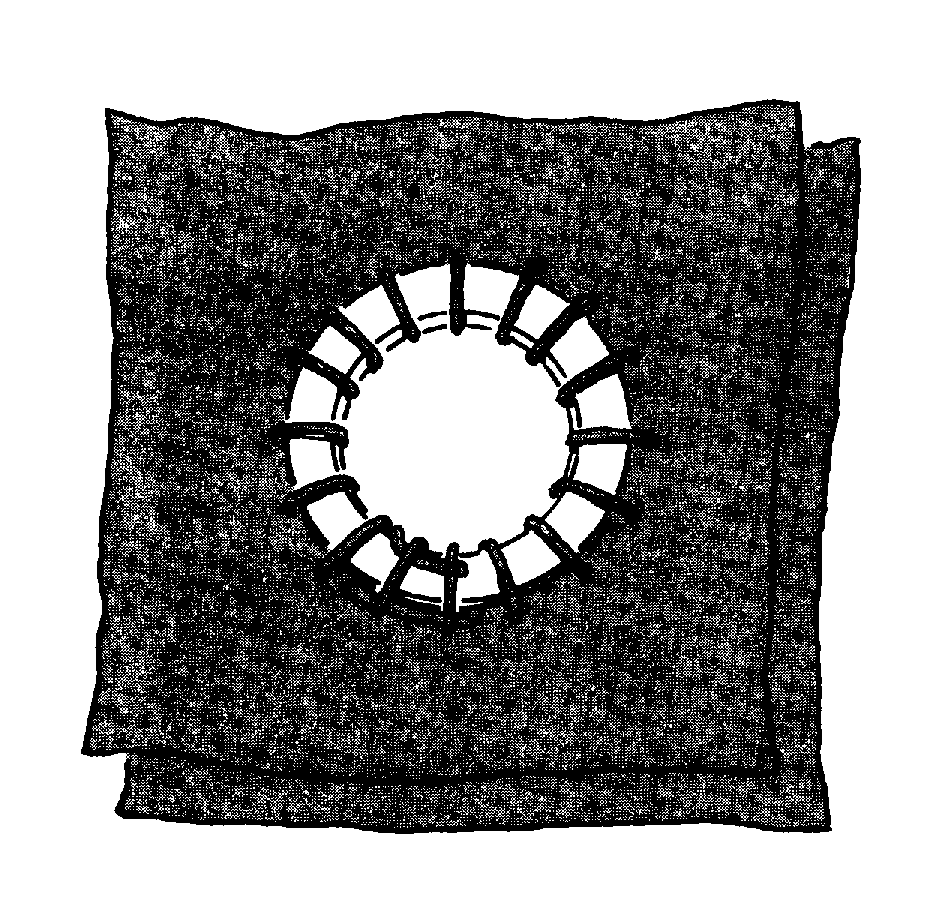
(9) Continue stitching clockwise, making a series of round stitches around the grommet
hole (Figure 12-6).
(10) Finish the stitching by sticking the needle under the last two stitches and pulling the
thread up tightly.
(11) Leave free a 1/2-inch length of thread, and cut the thread.
12-7
FM 10-16
(12) Flatten the stitching by pushing the fid into the grommet hole, first from one side and
then the other.
Figure 12-6. Series of round stitches around a grommet
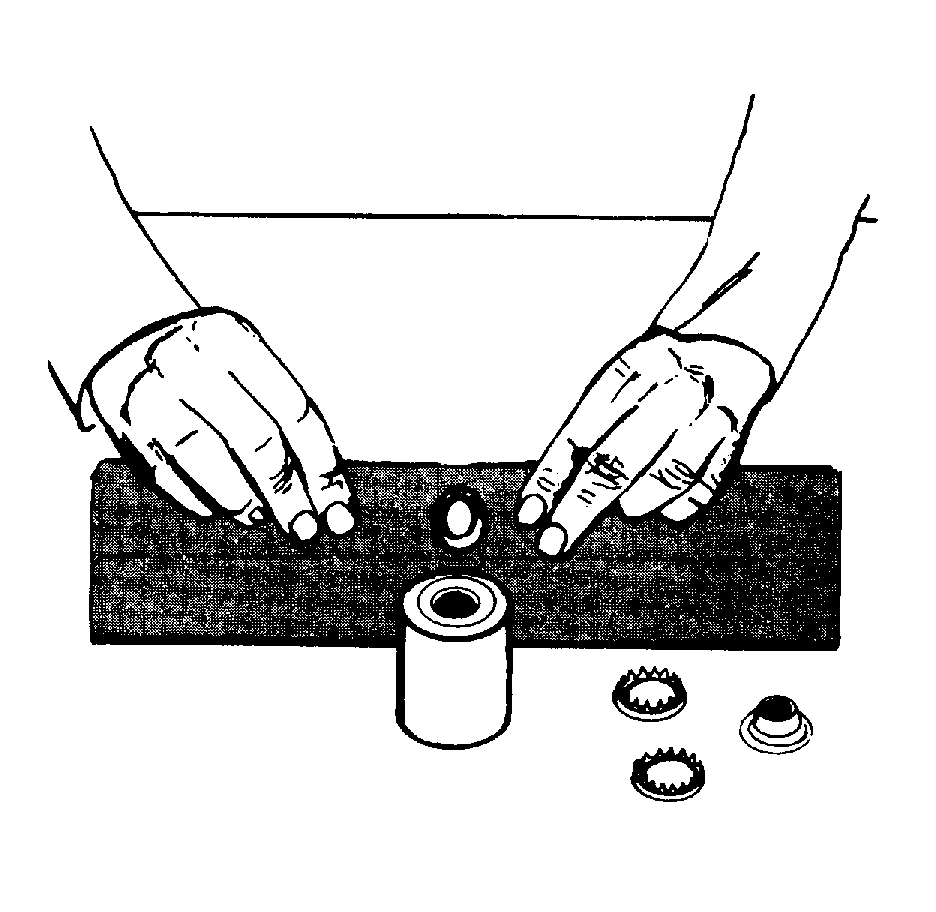
b. Die-Inserted. A die-inserted grommet consists of two brass parts. The male half, called a barrel, is smooth. The female half, called a washer, has spurs that grip the canvas or webbing. Punch-and-die sets are used to clinch the two parts together. To insert a grommet--
(1) If the old grommet hole will be used, obtain a rawhide mallet, a brass grommet, and a
punch-and-die set. Use a size 4 punch-and-die with a size 4 grommet and a size 5 punch-and-die with a size 5 grommet.
(2) If a new grommet hole will be cut, obtain the tools listed above, a heavy woodblock, and
a size 5 cutting punch for a size 4 grommet and a size 6 cutting punch for a size 5 grommet. Position the canvas faceup on the end-grain surface of the woodblock, and cut a grommet hole with the cutting punch.
(3) Insert the barrel into the hole through the underside of the canvas.
(4) Place the canvas and the flat bottom part of the barrel on the grommet die (Figure 12-7).
(5) Place the washer, spurs down, over the barrel.
(6) Insert the punch into the barrel, and hold the punch in place with one hand.
12-8
FM 10-16
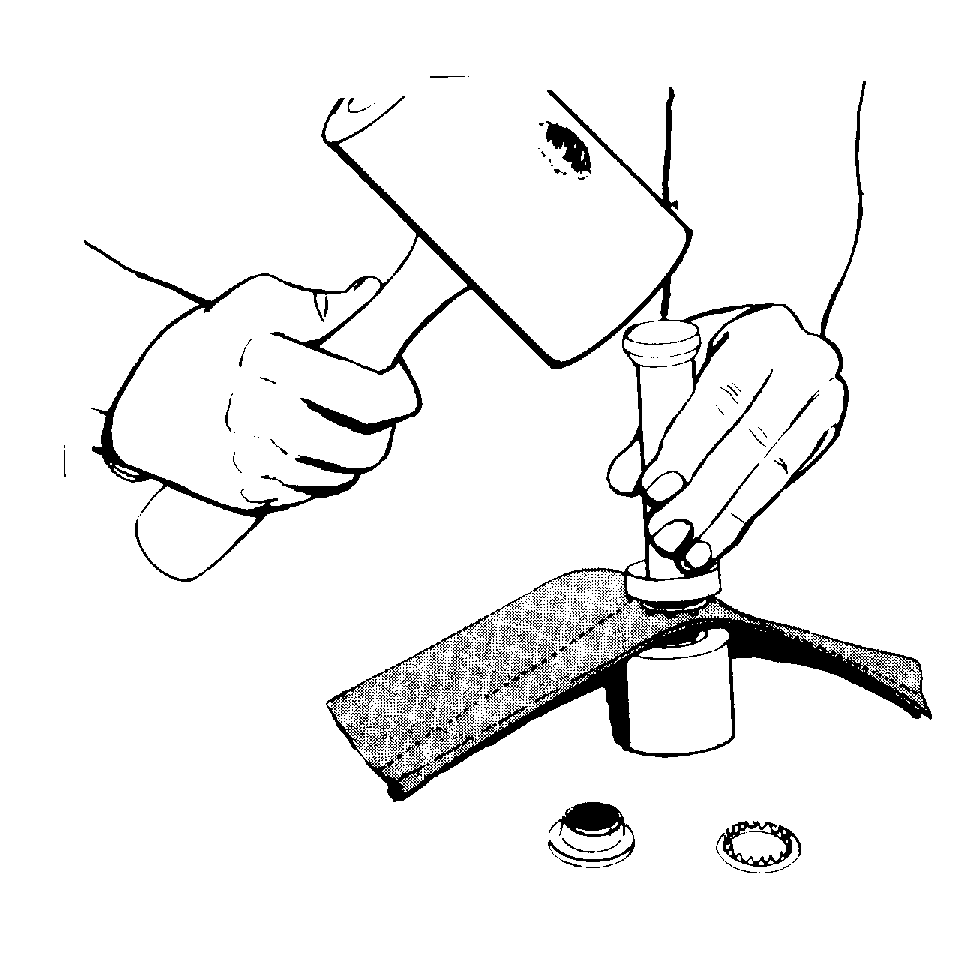
(7) Hit the top of the punch with a rawhide mallet hard enough to clinch the two parts to the
canvas without damaging the grommet or the canvas (Figure 12-8). When the parts are clinched properly, the edge of the barrel has a smooth roll.
Figure 12-.7. Placing barrel on grommet die
Figure 12-.8. Hitting punch with a rawhide mallet
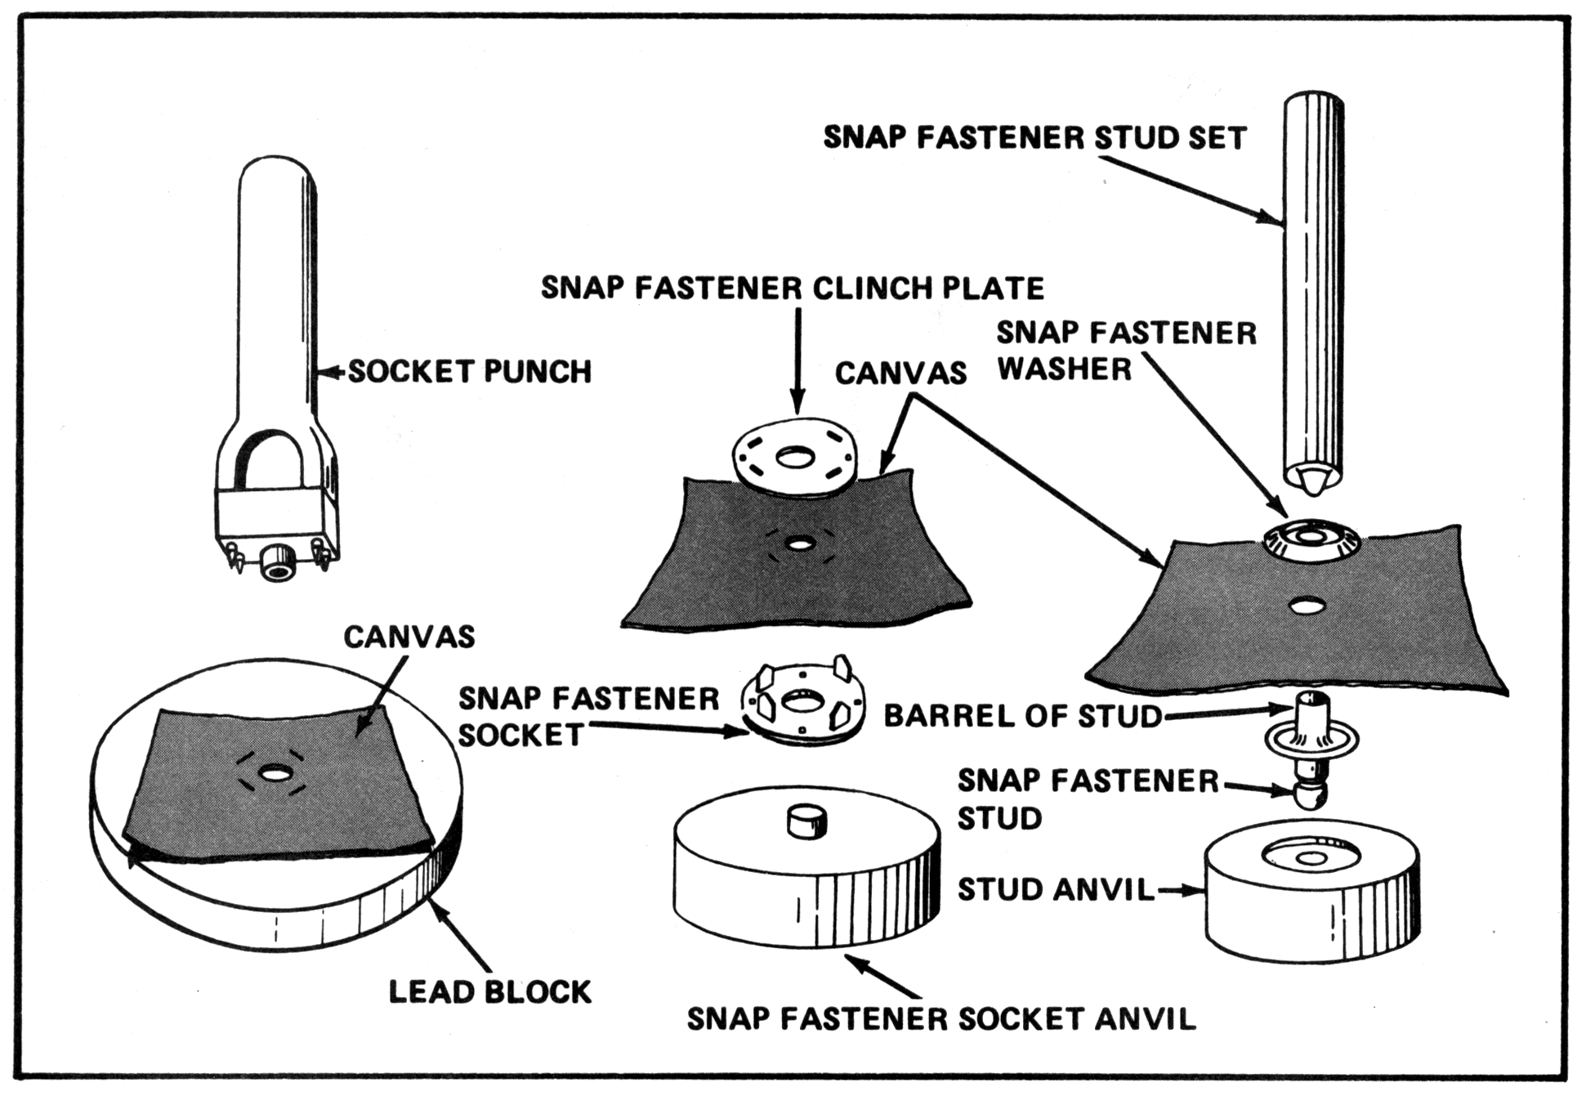
12-4. REPLACING SNAP FASTENERS
The two types of snap fasteners used to close openings on canvas and webbing are styles 1 and 2. Style 1
can be used on heavier canvas than style 2.
a. Style 1 Snap Fastener. A style 1 snap fastener has two sections, a female half and a male half.
The female half has two parts, a socket and a clinch plate. The male half also has two parts, a stud and a washer. The stud is available in two sizes, single and double. The double stud is twice as long as the single stud and can hold an additional layer of canvas. To install a style 1 snap fastener (Figure 12-9)--
(1) Obtain a style 1 snap fastener, chalk, socket punch, socket anvil, hole punch, stud set,
stud anvil, rawhide mallet, and lead block.
(2) Remove the old snap fastener, and patch or replace the canvas if necessary.
(3) Mark with chalk the exact position of the hole for the female half of the snap fastener.
(4) Place the canvas over the lead block so that the chalk mark is centered on the block.
(5) Center the socket punch over the chalk mark.
(6) Hit the socket punch with a rawhide mallet to make slots for the socket prongs and a
center hole.
(7) Insert the socket prongs into the slits through the underside of the canvas.
12-9
FM 10-16
(8) Place the clinch plate over the socket prongs.
(9) Place the canvas and socket, prongs up, on the socket anvil.
(10) Bend the socket prongs toward the center with the top of the socket punch until the
prongs are flat against the clinch plate and the plate and socket are securely clinched to the canvas.
(11) Mark the exact position of the hole for the male half of the snap fastener.
(12) Use a hole punch to make a hole a little smaller than the barrel of the stud so that the
barrel will fit snugly into the hole.
(13) Insert the barrel of the stud up through the hole.
(14) Center the canvas and stud, with the barrel up, on the stud anvil.
(15) Place the washer over the barrel of the stud.
(16) Place the tip of the stud set in the barrel. Hold the stud set in place with one hand.
(17) Hit the top of the stud set with the rawhide mallet, securely clinching the stud and the
washer to the canvas.
b. Style 2 Snap Fastener. The style 2 snap fastener is identical to the snap fastener used on clothing.
Paragraph 4-11 describes this style of snap fastener and how it is installed. Follow the same instructions to install a style 2 snap fastener on canvas and webbing, but use a patch instead of a darn to repair the supporting canvas in a tent.
12-10
FM 10-16
Figure 12-9. Replacing a type 1 snap fastener
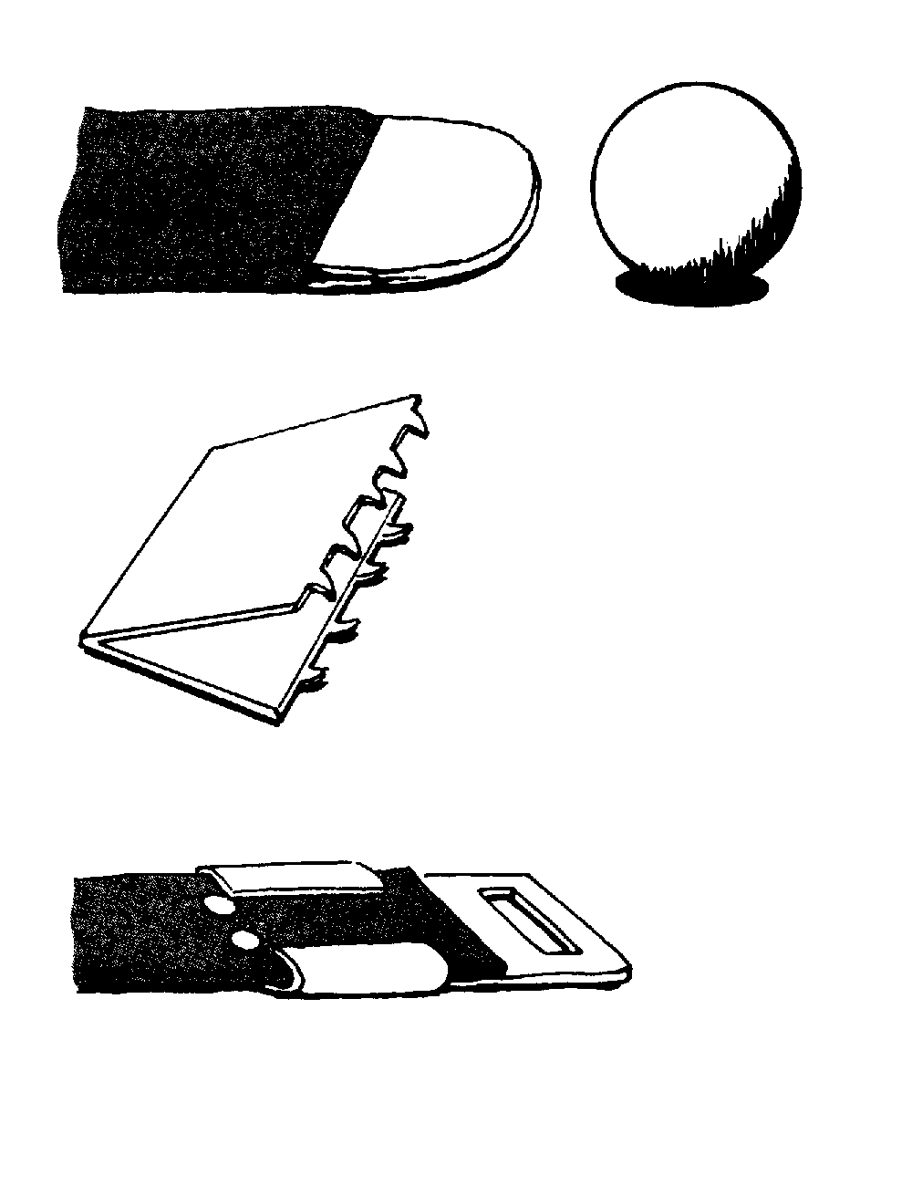
12-5. ATTACHING END CLIPS
End clips are metal tips used to prevent the cut ends of webbing from unraveling. They also make it easier to insert webbing ends into grommets and buckles. The three types of end clips (Figure 12-10) are ball-type, flat-type, and end buckle.
a. Ball-Type End Clip. The ball-type end clip looks like a hollow metal ball before it is attached to webbing. It fits like a thimble over the end of the webbing. To attach this clip, stick the webbing into the clip, partially flatten the clip with a hammer, straighten the webbing, and finish flattening the clip.
b. Flat-Type End Clip. The flat-type end clip is a V-shaped strip of metal. The ends of the clip have teeth which grip the webbing. To attach this clip, stick the webbing into the jaws of the clip, and flatten the clip with a hammer.
c. End Buckle Clip. The end buckle clip is a flat-type end clip with a slot for a buckle or hook. It also has holes for riveting the clip in place after it has been flattened with a hammer.
12-11
FM 10-16
BALL-TYPE CLIP
FLAT-TYPE END CLIP
END BUCKLE CLIP
Figure 12-10. End clips
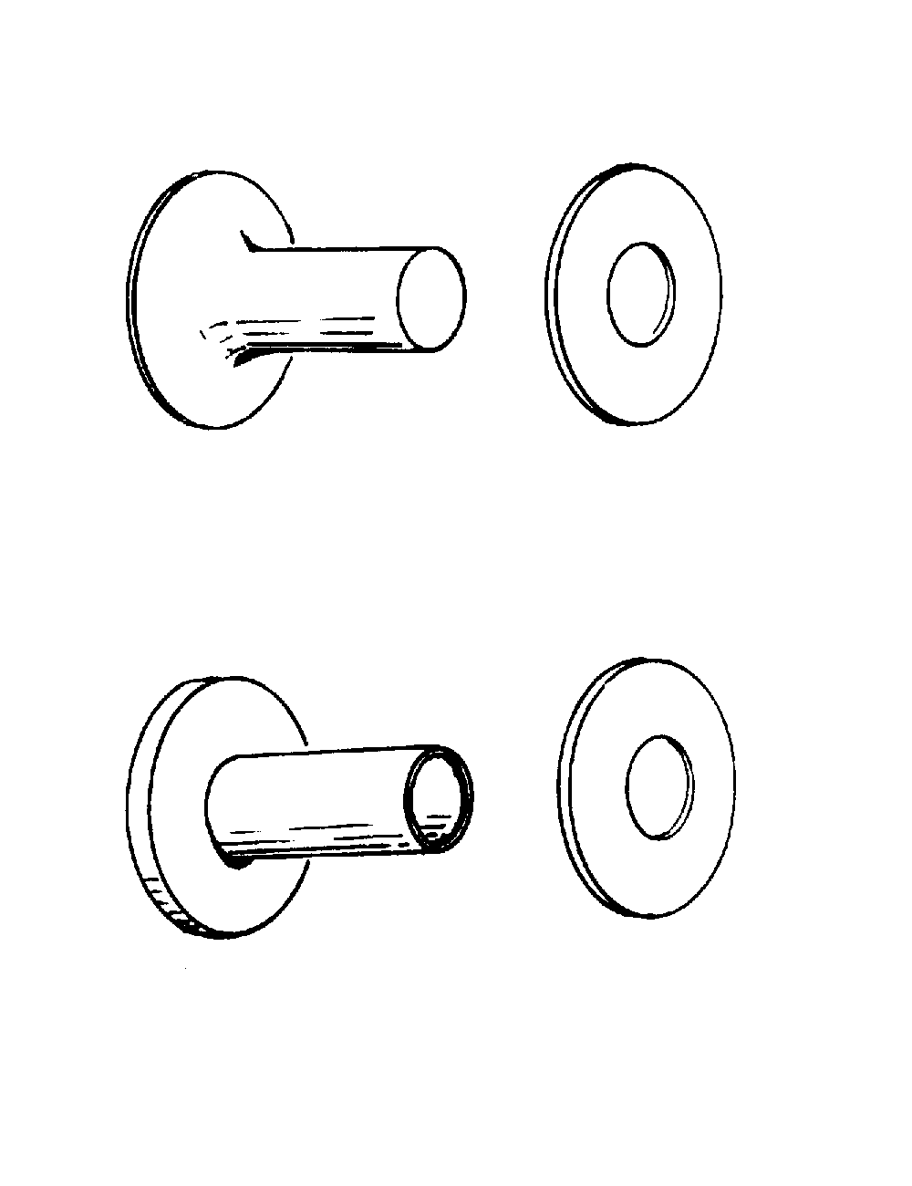
12-6. INSTALLING RIVETS
Rivets are metal pins and heads which are used to hold two or more pieces of canvas together. The two types of rivets are belt and tubular. All rivets are installed by the same method.
a. Belt Rivets. Belt rivets (Figure 12-11) are made of solid brass or copper. They come in sizes 8, 10, 12, and 14, with lengths from 3/8 to 1 1/4 inches. The head of this type of rivet is called a burr. The burr size used should match that of the rivet.
b. Tubular Rivets. Tubular rivets (Figure 12-11) are made with hollow brass shanks. They come in 3/16- to 3/4-inch lengths. The head of this rivet is called a cap. The end of a tubular rivet is beveled so that it will form a flange inside the rim of the cap.
c. Installation. To install a belt or tubular rivet--
(1) Use a hole punch to cut a hole in the layer or layers of canvas or webbing. Make the
hole small enough to fit tightly around the rivet.
(2) Insert the rivet into the hole. Use a size of rivet that will pass through all the canvas or webbing with very little excess and still take a cap or burr.
12-12
FM 10-16
(3) Place the canvas or webbing and the rivet, head down, on a metal block.
(4) Place the burr or cap on the rivet.
(5) Clinch the burr and belt rivet together by hitting the burr with a ball peen hammer.
Clinch the cap and tubular rivet together by hitting the cap with a plain-faced hammer.
Figure 12-11. Rivets
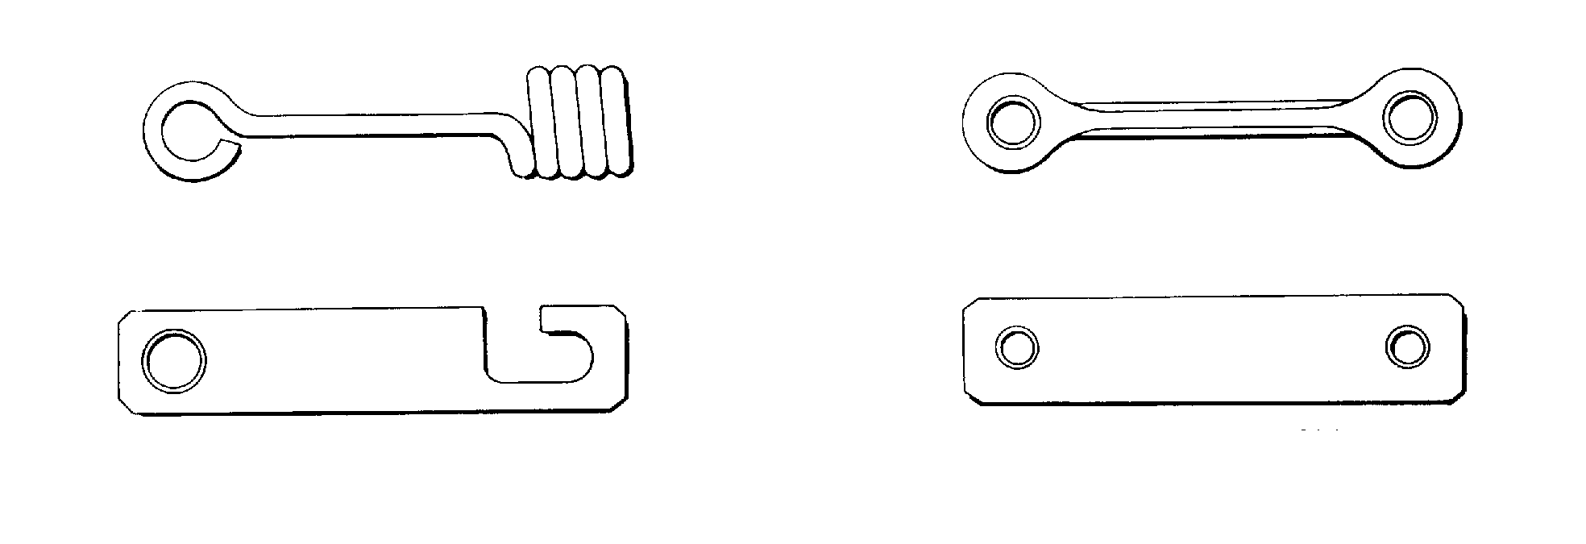
12-7. INSTALLING TENT LINE SLIPS
Tent line slips (Figure 12-12) are metal devices used to adjust eave and guy lines on a tent. There are four types of tent line slips.
a. Wire Slip. A wire slip is 4 inches long and 3/16 inch wide. It is made of steel. One end is coiled like a spring, and the other end is looped to form an eye. To install a wire slip--
(1) Pass one end of an eave line through the coil from the opening closest to the outside.
(2) Pull 2 feet of line through the coil.
(3) Pass the same end of the line through an eave grommet from the roof side to the wall
side.
(4) Pass the same end of the line through the eye of the wire slip.
12-13
FM 10-16
(5) Secure the slip to the line by tying an overhand knot in the end of the line.
WIRE SLIP TYPE II BARBELL SLIP
TYPE I QUICK-RELEASE SLIP TYPE II FLAT SLIP
Figure 12-12. Tent line slips
b. Type I Quick-Release Flat Slat. This slip is 4 inches long and 7/8 inch wide. It is made
of magnesium alloy. It has a round hole at one end and a quick-release side opening at the other end. To install a type I quick-release flat slip--
(1) Pass one end of an eave line through the hole in the slip.
(2) Pull 2 feet of line through the hole.
(3) Pass the same end of the line through an eave grommet from the roof side to the wall
side.
(4) Pass the same end through the side opening at the other end of the slip.
(5) Secure the slip to the line by tying and overhand knot in the end of the line.
c. Type II Barbell Slip. This slip is 4 inches long and has a 7/16-inch-wide hole at each end. It looks like a barbell. To install a type II barbell slip--
(1) Pass one end of and eave line through on of the holes in the slip.
(2) Pull 2 feet of line through the hole.
(3) Pass the same end of the line through an eave grommet from the roof side to the wall
side.
(4) Pass the same end of the line through the other hole in the slip.
(5) Secure the slip to the line by tying an overhand knot in the end of the line.
12-14
FM 10-16
d. Type III Flat Slip. This slip is similar to the quick-release flat slip, but it has a hole at each end instead of a hole and a side opening. It is installed using the same method that is used to install a type II barbell slip.
12-15
FM 10-16
CHAPTER 13
REPAIRING WEBBING
13-1. TYPES OF WEBBING
Webbing is a strong band woven from nylon or cotton. It is used to construct the chapes, loops, billets, straps, and handles which are sewn to canvas items. Nylon webbing is waterproof and mildew-resistant.
It also resists fraying and breaking. Repairs to nylon webbing usually involve restitching the webbing which has been pulled loose from the supporting canvas. Cotton webbing is treated to make it subject to wear because it is made of a natural fiber. Repairs to cotton webbing often involve replacing the entire webbing.
13-2. CHAPES
Chapes (Figure 13-1) are folded and overlapped strips of canvas or webbing. They are used to attach hardware, such as buckles and rings, to tents and canvas items. Chapes are called D-ring chapes, buckle-chapes, and other similar names, according to the hardware they carry. Damaged chapes are replaced with new chapes which are fitted and sewn in place using folds and seams identical to those used in the original construction of the item. Directions for fitting, sewing, and reinforcing chapes are given below.
Figure 13-1. Chapes
13-1
FM 10-16
a. Fitting. Webbing for chapes is folded and overlapped to fit a certain use or piece of hardware.
Four types of folds are used to fit chapes.
(1) Type 1 Fold. Type 1 fold (Figure 13-2) is made with a piece of webbing that is twice as
long as the planned chape. To make a type 1 webbing fold--
(a) Fold the webbing in half, and crease the fold flat.
(b) Insert one half of the webbing through the hardware.
(2) Type 2 Fold. For type 2 fold (Figure 13-3), the webbing is cut so that it is twice as long as the planned chape. To make a type 2 webbing fold, insert one end of the webbing through the hardware, and then--
(a) Fold one end of the webbing under until it is 1 to 2 inches from the other end.
(b) Move the hardware until it lies in the fold.
(c) Fold under the other end of the webbing so that the two ends butt against one
another.
(3)..Type 3 Fold. Type 3 fold (Figure 13-4) is made with webbing 1 to 2 inches longer than
twice the length of the planned chape. To make a type 3 webbing fold, place the hardware on the webbing, and then--
(a) Fold one end under until it is 1 to 2 inches from the other end. Slide the
hardware on the webbing until it lies in the fold.
(b) Fold the other end of the webbing under so that the two ends overlap.
(4)..Type 4 Fold. Type 4 fold (Figure 13-5) is made by folding a piece of webbing that is
four times as long as the planned chape. To make a type 4 webbing fold--
(a) Fold the webbing in half.
(b) Stick the folded end through the hardware.
(c) Fold the webbing in half again so that the first fold is on top and even with the
two cut ends. Move the hardware so that it lies in the second fold.
13-2
FM 10-16
Figure 13-2. Type 1 fold
Figure 13-3. Type 2 fold
Figure 13-4. Type 3 fold
13-3
FM 10-16
Figure 13-5. Type 4 fold
b. Sewing. Chapes are topstitched in place with an X-shaped seam (Figure 13-6). Webbing sewn
in place with this type of stitching is less likely to pull loose. To sew a chape in place--
(1) Position the chape on top of the canvas item.
(2) Insert the chape and canvas under the presser foot of a heavy-duty sewing machine so
that the hardware is to the left.
(3) Start stitching a seam in the upper right-hand corner 1/4 inch from the edge. Tack the
seam at the beginning.
(4) Stitch around the four sides of the chape in a clockwise direction. Pivot the chape and
canvas on the needle at each corner.
(5) Pivot the chape and canvas on the needle, and stitch diagonally across the chape from
the upper right-hand corner to the lower left-hand corner.
(6) Pivot the chape and canvas on the needle. Stitch over the side seam to the upper left-
hand corner.
(7) Pivot the chape and canvas on the needle. Stitch across the chape diagonally from the
upper left-hand corner to the lower right-hand corner.
(8) Pivot the chape and canvas on the needle. Stitch over the side seam to the upper right-
hand corner. Tack the seam at the end.
13-4
FM 10-16
START STITCH ROW HERE
1/4 INCH
Figure 13-6. X-shaped chape seam
c. Reinforcing. Some chapes are subject to a lot of pulling and tugging. These chapes should be reinforced to prevent the underlying canvas from tearing. Use one of the following methods to reinforce chapes:
(1) Webbing. Sew another piece of webbing across the chape as reinforcement (Figure 13-
7). Sew the reinforcement in place the same way the chape was sewn in place.
(2) Stitching. Sew four parallel rows of machine stitching the length of the chape (Figure
13-8). Hand sew four round stitches on both sides of the looped end of the chape. Sew five round stitches on the end looped through the hardware.
13-5
FM 10-16
Figure 13-7. Reinforcement webbing
Figure 13-8. Reinforcement stitching
13-3. LOOPS
Loops are pieces of webbing which form openings when they are sewn to canvas items. They are used to hold and fasten lines and straps in place. Four kinds of loops can be made with webbing.
a. Flat Loop. The flat loop (Figure 13-9) lies entirely against the canvas item. To make a flat loop-
(1) Cut a piece of webbing the length of the planned loop plus enough to form a turnunder
at each end.
(2) Turn under the ends.
(3) Sew the webbing to the canvas item with X-shaped seams.
13-6
FM 10-16
Figure 13-9. Flat loop
b. Short Loop. The short loop (Figure 13-10) sticks out a short distance from the canvas item. To make a short loop--
(1) Cut a piece of webbing. Allow for a short loop and the turnunder at each end.
(2) Fold the webbing in half to form a little loop.
(3) Sew a seam across the webbing at the base of the loop.
(4) Turn under the ends.
(5) Sew the webbing to the canvas item with X-shaped seams.
c. Two-Ply Long Loop. The two-ply long loop (Figure 13-11) is used where a strong, lengthy loop is needed. To make this loop--
(1) Cut two pieces of webbing. Allow for a long loop and the turnunder at each end.
(2) Sew the two pieces of webbing together with a row of stitches along each edge.
(3) Fold the webbing to form a long loop.
(4) Sew a seam across the webbing at the base of the loop.
(5) Turn under the ends.
(6) Sew the webbing to the canvas item with X-shaped seams.
d. Edge-Type Loop. The edge-type loop (Figure 13-12) is used on tarpaulins for tie-line fastenings.
It is also used as the female half of a toggle fastener. To make this loop--
(1) Cut a piece of webbing twice the length of the planned loop plus enough to form a
turnunder at each end.
(2) Turn under the ends.
13-7
FM 10-16
(3) Place the webbing on the canvas item so that the ends of the webbing are even and the
inside edges touch.
(4) Sew the webbing to the canvas item with one X-shaped seam.
STITCHING
LOOP
Figure 13-10. Short loop
LOOP
STITCHING
Figure 13-11. Two-ply long loop
13-8
FM 10-16
Figure 13-12. Edge-type loop
13-4. STRAPS
Straps are bands of webbing by which canvas items are held, fastened, pulled, or lifted. The ends of straps are left plain or rolled, angled, or shaped to take hardware, billets, and chapes.
a. Plain End Strap. A strap with a plain end (Figure 13-13) is a piece of webbing cut to size. The end is finished by attaching an end clip or by looping it through a piece of hardware, turning under the raw edge, and sewing it in place to the strap. A plain strap that has a buckle on one end and an end clip on the other is a billet (Figure 13-14).
b. Rolled-End Strap. A strap with a rolled end (Figure 13-15) is tapered by rolling and folding the edges to the center of the webbing. Both the inner and outer edges are sewn in place. The end of the strap is finished by attaching an end clip, or by looping it through a piece of hardware, turning under the raw edge, and sewing it in place to the strap. If a 2-inch-wide strap is tapered to a 1-inch end, the taper should be about 2 1/2 inches long.
END CLIP
Figure 13-13. Plain-end strap
13-9
FM 10-16
1 INCH
Figure 13-14. Billet
Figure 13-15. Rolled-end strap
c. Angled-End Strap. A strap with an angled end (Figure 13-16) has corners which have been