CELL BIOLOGY
Study of Microscope: Simple and Compound
Micro means “small” Scope means “opportunity”, so it is an opportunity to view the microscopic world. Variety of microscopes is available to examine objects that are not visible to the naked eye. Study of different kinds of microscope is termed as microscopy.
Anton Van Leeuwenhoek was the first person to use microscope for biological studies. Robert hook designed a compound microscope.
Simple Microscope:
The two points which are less than 0.1 mm apart can’t be distinguished as two with naked eyes but simple microscope can do this. Eye can’t resolve an image that is less than 5microm as the distance between rods and cones on retina is 5 micron.
A simple microscope uses a convex lens to magnify images though only 3X magnification could be achieved by a single convex lens. However, the combination of lenses can used to magnify the image further like, double concave lens fitted between two convex lenses. This helps us to achieve the maximum magnification of 100X.
Principles of microscopy:
Power of a microscope to distinguish very closely placed two pointed objects is termed as resolving power. Human eyes can distinguish two pointed objects if they are lying at a distance of 0.1mm in between, whereas a simple microscope can distinguish the same objects as two if they are lying at a distance of more than 0.2pm. This increase in the power of resolution with microscope aided eyes can help us explore a whole new world although this resolution has a limit. Hence, the minimum distance between the two objects which the microscope can distinguish as two is called its limit of resolution. Limit of resolution is inversely proportional to the resolution power of a microscope.
Light from the light source (mirror) is allowed to pass through a thin and almost transparent object to get an enlarged virtual image. A biconvex lens is used for this magnification. More the lens is close to the object higher the resolution and magnification. Adjustment of light intensity will create more contrast which can be increased further by using stained sample
Uses of simple microscope:
Compound Microscope
It is an upright microscope which utilizes two sets of lenses in order to get higher magnification and resolving power which provides a two-dimensional image.
Illumination system:
Light source light is a either a mirror placed below the stage or a built in illumination source coming from a bulb.
A condenser is placed between the mirror/light source and stage, which condenses the light rays to a common focus on the object on slide to be examined. Condenser is fitted with a diaphragm which is located below the condenser and is used to control the amount of light entering into the system. More of light provides more resolution however some samples like Amoeba can be seen well in low light.
Mechanical stage:
It is used to hold the sample slide on place for viewing. Stage is equipped with two movable vernier scales which facilitates the controlled and measurable movement of slide on the stage. This gives us an exact location of the part /sample viewed which can be used for subsequent viewing of same part /sample on that slide.
Body tube:
It is a hollow tube through which light passes from objective to ocular and then is receives by our eyes. The curved arm is attached to the tube for facilitating its handling. Tube comes with little variations like monocular, binocular or photo binocular (with camera attachment)
Lens system:
The magnification is obtained by using two sets of lenses, one at each end of a long metallic tube. The set of lenses located at bottom of tube, near the stage and above the sample slide is called as an objective lens. The set of lenses located at the top of the tube where the observer places his eye is called as eyepiece lens or ocular.
Objective lenses:
There are three to four objective lenses of different magnifications (10X, 40X and100X) mounted on a revolving nose piece. 100X lens can be used only by placing an oil drop between the cover slip and objective lens. Oil has a specific gravity similar to glass which reduces the refraction of light and improves the quality of image. At any point of time only one objective lens can be used for observation. Greater the magnification power of a lens smaller is the working distance (distance between the sample and the lens).
Eyepiece/ocular:
Monocular microscope has only one eyepiece whereas binocular microscope has two eyepieces attached. Generally the ocular come with 5X, 10X, 12.5X or 15X magnifications. Oculars also consist of elements. Some eyepiece also come equipped with a pointer to pin point the exact structure/part. Pointer is attached a flexible hinge and a handle which provides it a rotational flexibility.
Adjustment knobs:
Coarse adjustment is done by larger knob which does the initial focusing
Fine adjustment is done by a smaller knob which does the perfect focusing after the initial focusing is done.
Working of compound microscope:
In compound microscope, image formation takes place in two steps and so does the magnification. First real, inverted and magnified image is formed by the objective lens. Second image is virtual, inverted and more magnified. This image is received by the retina of eye. The combined magnification is calculated by multiplying the power of objective lens used with the power of eyepiece.
Uses of compound microscope:
It has a wide spread usage because of its higher magnification.
MEASUREMENTS: OCULAR AND STAGE MICROMETERS
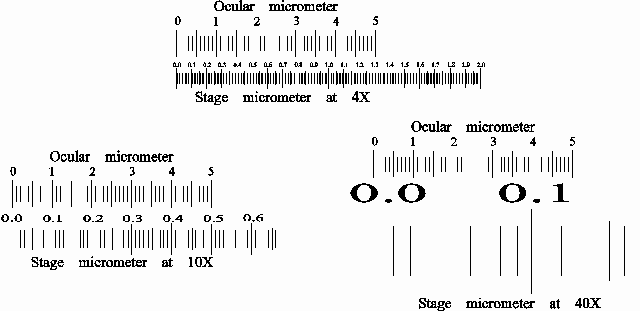
To measure an object seen in a microscope, an ocular micrometer serves as a scale or rule. This is simply a disc of glass upon which equally spaced divisions are etched. The rule may be divided into 50 subdivisions, or more rarely 100 subdivisions. To use the ocular micrometer, calibrate it against a fixed and known ruler, the stage micrometer. Stage micrometers also come in varying lengths, but most are 2 mm long and subdivided into 0.01 mm (10 micrometer) lengths. Each objective will need to be calibrated independently. To use, simply superimpose the ocular micrometer onto the stage micrometer and note the relationship of the length of the ocular to the stage micrometer (see figure). Note that at different magnifications, the stage micrometer changes, but the ocular micrometer is fixed in dimension. In reality, the stage micrometer is also fixed, and what is changing is the power of the magnification of the objective.
|
|
|
|
|
|
Fig. : Superimposed ocular and stage micrometers
Hemacytometer (for cell counting, volume and area measurements)
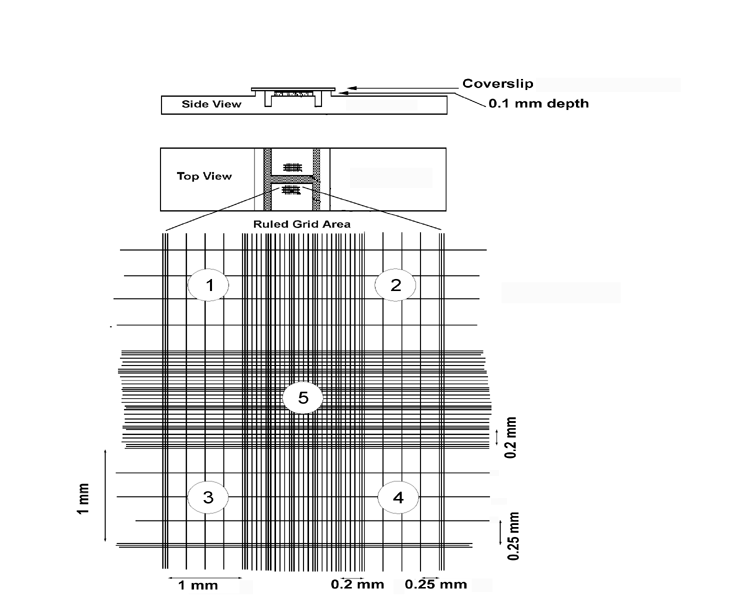
Fig. : Improved Newberg’s chamber
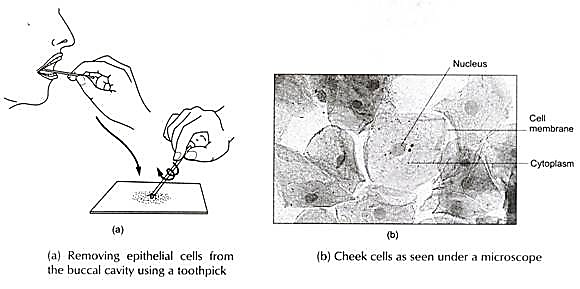
Study of cell: Preparation of temporary mount of human buccal epithelial cells.
All living organisms are made up of cells. The shape, size and the number of these units vary in organisms. The three major components of a eukaryotic cell are the cell membrane, cytoplasm and nucleus. Animal cells are usually irregular in shape. They do not have a cell wall. They are surrounded by a cell membrane and contain cytoplasm and nucleus. The epithelium or epithelial tissue provides a covering or lining for some parts of the body. It may be single or multi-layered. The lower most layer normally rests upon a non-cellular basement membrane. It is protective/sensory/absorptive/and secretory in nature and also helps in exchange and movement of materials inside the body.
Requirement:
Live material/concerned tissue, beakers, glass slides, coverslips, watch glasses, dropping bottle, dropper, methylene blue stain, glycerine, NaCl solution
(0.9% w/v), needle, forceps, brush, toothpick, water, wash-bottle, dissecting tray, microscope.
Procedure
Precautions:
1. The cheeks should be scraped gently avoiding any injury.
2. Over-staining and under-staining of the cells should be avoided.
3. Coverslip should be placed carefully avoiding the entry of air bubbles.
4. A dry and clean glass slide and coverslip should be used.
5. The cheek cells should be spread properly to avoid their folding and overlapping.
Fig. Stained Temporary preparation of Cheek epithelial cells.
Observation
Many flat, oval or irregular cells are seen. The cell membrane encloses hyaline cytoplasm and an oval, dense nucleus. The cell wall is absent as in all animal cells.
Record your observations as given below:
|
Features |
Observations |
|
|
1. No. of cells in a focus |
|
|
|
2. Shape of cells |
|
|
|
3. Nature of cell boundary |
|
|
|
4. Nucleus: Present/absent Shape / location- |
|
|
|
|
Preparation of blood smears to observe the blood cells
In this experiment, we make a human blood smear, to examine and identify different types of cells in the blood smear using leishman’s stain, we were required to prepare a blood smear where a drop of blood was obtained by piercing the skin of the finger using a sterile lancet and used to prepare the smear. The smear was then stained using leishman’s stain and then observed under both low and high power of a light microscope.
The human blood consists of a liquid extracellular matrix called plasma. In the plasma is suspended different types of blood cells such as erythrocytes (red blood cells), leukocytes (white blood cells) and thrombocytes (platelets).
These cells are described below
Red blood cells (erythrocytes)
These are the most numerous. After decent staining, the red blood cells are orange-red, about 7.5 microns in diameter (useful comparison for measurement), and may show a lighter-staining area in the middle.. Red blood cells are not real cells since they lack nuclei, they are highly specialized end product of a cell line.
White blood cells. these are in an area of the smear where the red blood cells touch each other, but are not on top of each other. They are divided into:
Neutrophils
These make up about 55-60% of all blood leukocytes, 10-12 microns in diameter. Dark-staining (dark blue to purple) nucleus is lobulated; young (about 3%) neutrophils have a stab or horseshoe shaped nucleus. There are plenty of grey and purple colored granules in the cytoplasm.
Eosinophils
They are (12-15 microns in diameter) usually have a bilobed nucleus. The cytoplasm is filled with orange-red granules, so that you cannot “see through.”
Basophils
They are so few (less than 1% of leukocytes), that most likely you do not find one in your own blood smear. Therefore, go see an example in the demo microscopes in the interlab. Note that the dark blue or purple granules are large, numerous, and often mask the nucleus. Basophils and their connective tissue equivalents mast cells also play an important role in defense against foreign. They are much smaller than red blood cells (about 2_3 microns) and have a mixture of blue and orange-red staining. They have no nuclei, since they are really pieces of a megakaryocytic cytoplasm.
Lymphocytes. These consist about 30% of all leukocytes, they all look alike in ordinary blood smear. They have a very darkly staining, dense, round nucleus. Most lymphocytes are not much larger than the red blood cells, though their diameter may vary as much as 8 μm to 12 μm. The narrow cytoplasmic rim (in a well-stained smear) appears clear, sky-blue. Lymphocytes perform most of our immunological defense.
Monocyte,
These consist about 3 to 8% of all blood leukocytes), precursor of macrophages is a large cell (12_19 μm), usually much larger than the lymphocytes. Cytoplasm is especially abundant and lacks the sky-blue color; instead, it is often muddy grey looking. The nucleus is much less dense than in lymphocytes, it looks spongy, you can almost see through it. Often the nucleus is horseshoe shaped, or bent over itself (and resembles brain).
Remember that the red blood cells and platelets are not true cells (no nuclei), however, they are the ones who perform their functions within the blood vessels, whereas the leukocytes perform in the other.
Platelets play a critical role in normal hemostasis by stopping blood loss after vascular injury.
By adhering to sites of injury, recruiting other platelets and blood cells to the developing clot, and activating the plasma coagulation cascade, primary hemostasis is effected. In synchrony with the end products of the coagulation cascade.
Materials/ apparatus
Sterile lancets
Microscope slides
cover slips
Microscope
70% Alcohol
Distilled water
Leishmans stain
Cotton wool
Filter paper
D.P.X / Canada Balsan
Procedure
A drop of blood was obtained by piercing the skin at the tip of the finger using a clean sterile lancet after it had been cleaned using ethanol. The blood drop was placed on a clean microscope slide near the center. A second microscope slide was held inclined at a position 45o with the short edge touching the other slide just behind the drop of blood. The second slide was pulled firmly and evenly on the opposite side of the blood drop there by making a thin blood smear. The slide was then waved in air for drying. The smear was then covered with two drops of leishman’s stain and left to stand for one minute. Three drops of distilled water were then gently added to the slide from side to side to mix the water with the stain. The mixture was allowed to stand for 10 minutes. The stain was then drawn off the slide using a filter paper held at the side of the slide.
The surface of the slide was then rinsed using distilled water. The blood smear was then dried and then examined under low and High power of the microscope.
Common causes of a poor blood smear
1. Drop of blood too large or too small.
2. Spreader slide pushed across the slide in a jerky manner.
3. Failure to keep the entire edge of the spreader slide against the slide while making the smear.
4. Failure to keep the spreader slide at a 30° angle with the slide.
5. Failure to push the spreader slide completely across the slide.
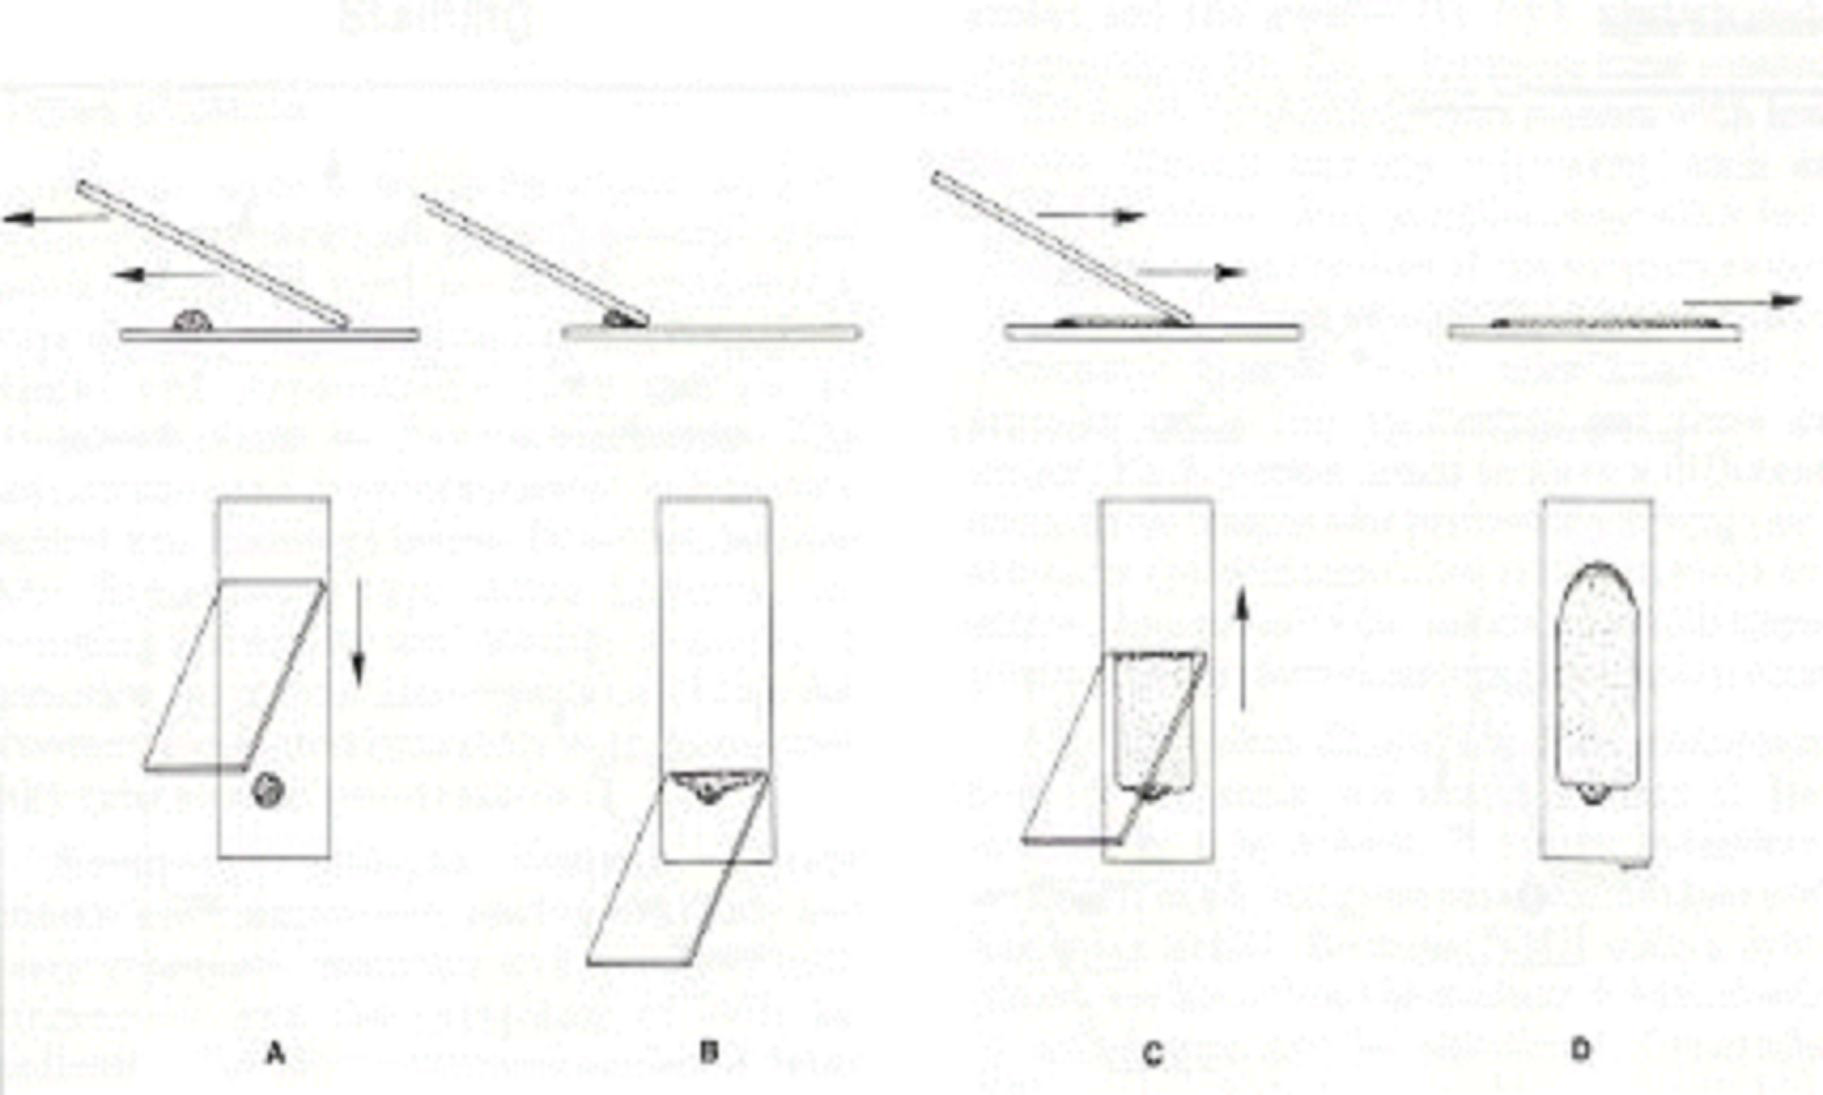
This picture illustrates the proper procedure for making blood smears.
Notice the angle and direction that the spreader slide is pulled, first BACK towardsthe drop of blood, then quickly FORWARD to the end of the slide. The spreaderslide is held in the dominant hand.
Results
As Observed under low power
The stain appeared pale and some stain precipitates were present in the smear.
The red blood cells appear dark-pink in colour and spherical in shape.
The monocytes had lighter purple nuclei with cytoplasm.
Platelets were observed clumped together and smaller than red blood cells
More cells appeared clearer at the edge of the smear than in the middle the blood smear was thickest, and cells overlapped each other.
As observed Under high power.
The red blood cells were separated from each other and had a graduated central pillar.
A drawing of the red blood cells in the human blood smear as observed under high power of a light microscope.
A drawing of the monocytes in the human blood smear as observed under high power of a light microscope.
A drawing of blood plates in the blood smear as observed under high power of a
microscope.
Discussion
Not many cells were observed under the microscope and this was due to use of much stain but also due to the thickness of the blood smear at certain points of the slide more so at the spot where the blood drop was introduced onto the slide.
Not all blood cells were observed because of their small size and also because the stain used could only isolate more clearly the cells reported above.
Recommendations.
To ensure that the blood smear is thin and that blood cells are evenly distributed on the slide, the smear should be made immediately after the drop blood is introduced onto the slide.
To be able to observe or view smaller cell more clearly, immersion oil should be applied on to the slide so as to increase the refractive index of the cells observed under the light microscope.
Applications
A blood smear is a blood test used to look for abnormalities in blood cells. The three main blood cells that the test focuses on are:
The test provides information on the number and shape of these cells, which can help doctors diagnose certain blood disorders or other medical conditions.
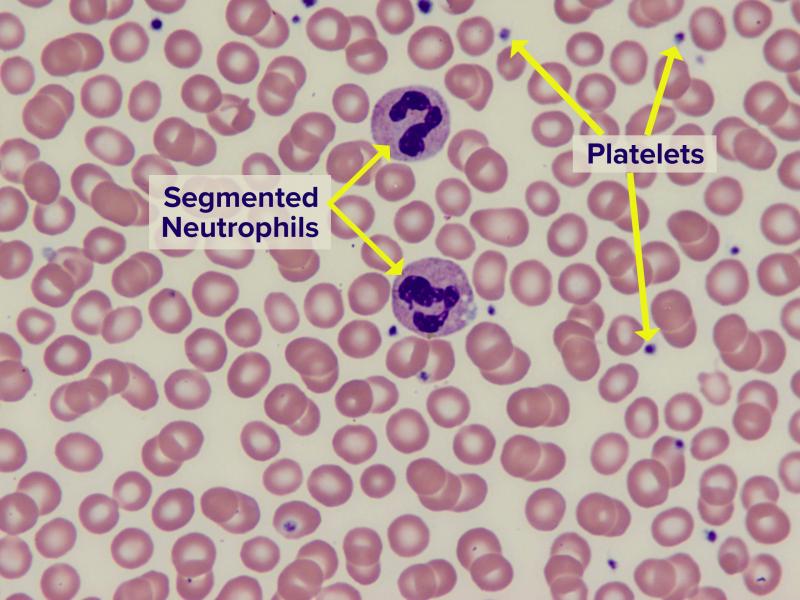
Fig. Normal blood smear with red blood cells (majority of cells shown), white blood cells (segmented neutrophils) and platelets (small purple dots). Image credit: Bette Jamieson, MEd
REFERNCE
Brown, Barbara, Hematology: Principles and Procedures, Fifth edition (P. 96-97)
Harming, Denise, Clinical Hematology and Fundamentals of thermostats, Third edition. (P. 606- 608).
Temporary preparation of mitosis in onion root tips
Introduction : Onion root-tip is an ideal material to demonstrate mitosis. Old dried onions when set on jars containing water give out roots within 24 hours. If the onions do not give out roots, pods of garlic may be used.
Material : Old dried onions ( with orange coloured peel ),Cornoy’s fixative –(Acetic acid : Alcohol 1:3),aceto-orcein or aceto-carmine stain, glass jars (coupling jar or small beaker), spirit lamp, razor blade, fine forceps, needles, etc.
Stain preparation:
Aceto-orcein preparation (1% solution)
Orcein is extracted from two species of lichens, Rocellatinctoria and Lecanoraparella. Orcein also is available in a synthetic form, but the natural form is preferred for chromosome analysis, because it gives better contrast. Orcein is used in form of a 1% solution in 45% acetic acid. This solution is prepared by pouring 55 mL boiling glacial acetic acid over 1 g orcein powder. The solution is cooled, 45 mL of distilled water added, and filtered. This solution is unstable and should be prepared fresh before use.
Aceto-orcein staining
Aceto-orcein staining does not require the addition of iron ions. The staining prodedure is similar to the aceto-carmine method. Fixed material is transferred for an approprioate time to 1% aceto-orcein and then analyzed by the squash technique.
Aceto-carmin staining
There are several versions of this stain. An iron containing stain is often used because of the darker bluish-red color produced
Non-iron version
Iron containing version
Cautions: ALWAYS use caution and wear personal protective equipment when in the laboratory with concentrated acids (or any other time)! Always add acid slowly into water and do not add water into acid!
Procedure :
Result : If the cells are well separated, various stages of mitosis with red stained chromosomes and nuclei are seen.
Exercise : Identify the various stages of mitosis viz., prophase, metaphase, anaphase and telophase, Make a sketch showing each stage. Count the total number of cells examined and the number of cells in each stage and determine the mitotic index.
Mitotic Index = Number of cell in mitosis X 100
Total number of cells
Precautions :
Smear of onion root tip (Alternative method for group study).
As a group activity (in Practical class) instructor may want students to stain the dividing cells in the growing tip of onion roots so that chromosomes are visible. The method described here is modified from Sharma and Mookerjea
1. Germinate seedlings or place an onion bulb in water so that roots begin to grow.
2. With a razor blade cut off the ro

Reads:
5
Pages:
31
Published:
Jun 2025
Introducing The Right Education. Inside this eBookyou will discover the topics about why the right university isimportant for your future, paying a visit to t...
Formats: PDF, Epub, Kindle, TXT

Reads:
16
Pages:
224
Published:
Jul 2024
This is the last of four subject parts of the new ('final") version of the Essential Graduate Physics series of lecture notes and problems, which was released...
Formats: PDF, Epub, Kindle, TXT

Reads:
29
Pages:
464
Published:
Jul 2024
This is the thrid of four subject parts of the new ('final") version of the Essential Graduate Physics series of lecture notes and problems, which was release...
Formats: PDF, Epub, Kindle, TXT

Reads:
12
Pages:
420
Published:
Jul 2024
This is the second of four subject parts of the new ('final") version of the Essential Graduate Physics series of lecture notes and problems, which was releas...
Formats: PDF, Epub, Kindle, TXT