We use the word “workout” loosely here because, as we’ve pointed out, yoga is less workout and more mind-body exploration. Workout implies sweating as you push your body into exercise mode. That isn’t what yoga is about.
So, here’s a good way to start your yoga plan. Do these exercises in the order given for a good beginning workout.Easy Pose
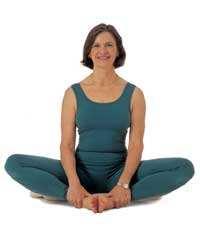
Begin with the easy pose. Easy pose is a comfortable seated position for meditation. This pose opens the hips, lengthens the spine and promotes grounding and inner calm. Basically, you’re sitting cross legged like you did in school as a young child. “Criss cross apple sauce”, as my teacher used to say!
With the buttocks on the floor, cross your legs and place your feet directly below your knees. Rest your hands on your knees with the palms facing up.Press your hip bones down into the floor and reach the crown of the head up to lengthen the spine. Drop your shoulders down and back and press your chest towards the front of the room.
Relax your face, jaw, and belly. Let your tongue rest on the roof of your mouth just behind your front teeth. Breathe deeply through the nose down into the belly and hold as long as is comfortable.
Downward-Facing DogAfter the easy pose, move into downward-facing dog. This is one of the most widely recognized yoga poses. Downward-Facing Dog is an all-over, rejuvenating stretch.
Benefits include:
• Calms the brain and helps relieve stress and mild depression
• Energizes the body
• Stretches the shoulders, hamstrings, calves, arches, and hands
• Strengthens the arms and legs
• Helps relieve the symptoms of menopause
• Relieves menstrual discomfort when done with head supported
• Helps prevent osteoporosis
• Improves digestion
• Relieves headache, insomnia, back pain, and fatigue
• Therapeutic for high blood pressure, asthma, flat feet, sciatica, sinusitis
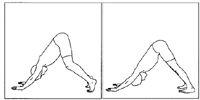
Come onto the floor on your hands and knees. Set your knees directly below your hips and your hands slightly forward of your shoulders. Spread your palms, index fingers parallel or slightly turned out, and turn your toes under.
Exhale and lift your knees away from the floor. At first keep the knees slightly bent and the heels lifted away from the floor. Lengthen your tailbone away from the back of your pelvis and press it lightly toward the pubis. Against this resistance, lift the sitting bones toward the ceiling, and from your inner ankles draw the inner legs up into the groins.
Then with an exhalation, push your top thighs back and stretch your heels onto or down toward the floor. Straighten your knees but be sure not to lock them. Firm the outer thighs and roll the upper thighs inward slightly. Narrow the front of the pelvis.
Firm the outer arms and press the bases of the index fingers actively into the floor. From these two points, lift along your inner arms from the wrists to the tops of the shoulders. Firm your shoulder blades against your back then widen them and draw them toward the tailbone. Keep the head between the upper arms; don't let it hang.
Stay in this pose anywhere from 1 to 3 minutes. Then bend your knees to the floor with an exhalation and rest.Sun Salutations
On days when you think you have no time for yoga, try and do at least one or two rounds of the Sun Salutation. You'll feel the difference.
After downward-facing dog, move into 3 rounds of sun salutations. Stand facing the direction of the sun with both feet touching. Bring the hands together, palm-to-palm, at the heart. Inhale and raise the arms upward. Slowly bend backward, stretching arms above the head. Exhale slowly bending forward, touching the earth with respect until the hands are in line with the feet, head touching knees.
Inhale and move the right leg back away from the body in a wide backward step. Keep the hands and feet firmly on the ground, with the left foot between the hands. Raise the head. While exhaling, bring the left foot together with the right.
Keep arms straight, raise the hips and align the head with the arms, forming an upward arch. Exhale and lower the body to the floor until the feet, knees, hands, chest, and forehead are touching the ground. Inhale and slowly raise the head and bend backward as much as possible, bending the spine to the maximum
While exhaling, bring the left foot together with the right. Keep arms straight, raise the hips and align the head with the arms, forming an upward arch. Inhale and move the right leg back away from the body in a wide backward step.
Keep the hands and feet firmly on the ground, with the left foot between the hands. Raise the head. Exhale slowly bending forward, touching the earth with respect until the hands are in line with the feet, head touching knees.
Inhale and raise the arms upward. Slowly bend backward, stretching arms above the head. Stand facing the direction of the sun with both feet touching. Bring the hands together, palm-to-palm, at the heart.
The sequence will look something like this:
 Tree Pose - Vriksha Asana
Benefits include:
• Strengthens thighs, calves, ankles, and spine
• Stretches the groins and inner thighs, chest and shoulders
• Improves sense of balance
• Relieves sciatica and reduces flat feet
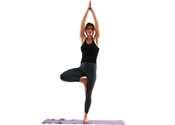
Stand with the feet together and the arms by your sides. Bend the right leg at the knee, raise the right thigh and bring the sole of the right foot as high up the inside of the left thigh as possible.
Balancing on the left foot, raise both arms over the head, keep the elbows unbent and join the palms together. Hold the posture while breathing gently through the nostrils for about 10 complete breaths.
Lower the arms and right leg and return to the tad-asana, standing position with feet together and arms at the sides. Pause for a few moments and repeat on the opposite leg. Do this two or three times per leg or as long as is comfortable.
The challenge of the vriksha-asana is maintaining balance on one leg. Poor balance is often the result of a restless mind or distracted attention. Regular practice of this posture will help focus the mind and cultivate concentration (dharana).
When practicing vriksha-asana it may help to imagine or picture a tree in the mind and apply the following technique: Imagine that the foot you are balanced on is the root of the tree and the leg is the trunk.
Continue by imagining the head and outstretched arms as the branches and leaves of the tree. You may be unsteady for a while and find the body swaying back and forth, but don't break the concentration. Like a tree bending in the wind and yet remaining upright, the body can maintain balance.
Aim to achieve the "rootedness" and firmness of a tree. Regular practice of the vriksha-asana improves concentration, balance and coordination. Because the weight of the entire body is balanced on one foot, the muscles of that leg are strengthened and toned as well.
As you advance in this posture and are able to remain standing for more than a few moments, try closing the eyes and maintaining your balance. Extended Triangle PoseBenefits include:
• Stretches and strengthens the thighs, knees, and ankles
• Stretches the hips, groins, hamstrings, and calves; shoulders, chest, and spine
• Stimulates the abdominal organs
• Helps relieve stress
• Improves digestion
• Helps relieve the symptoms of menopause
• Relieves backache, especially through second trimester of pregnancy
Use caution if you suffer from low blood pressure, have a heart condition, or have neck problems.
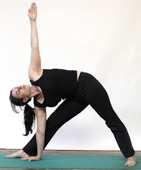
Stand with the feet together and the arms by your sides. Separate the feet slightly further than shoulder distance apart. Inhale and raise both arms straight out from the shoulders parallel to the floor with the palms facing down.
Exhale slowly while turning the torso to the left, bend at the waist and bring the right hand down to the left ankle. The palm of the right hand is placed along the outside of the left ankle. The left arm should be extended upward. Both legs and arms are kept straight without bending the knees and elbows.
Turn the head upward to the left and gaze up at the fingertips of the left hand. Inhale and return to a standing position with the arms outstretched. Hold this position for the duration of the exhaled breath. Exhale and repeat on the opposite side.
The triangle pose is basically doing slow toe touches while concentrating on your breathing and stretching your body.Seated Forward Bend – Paschimottanasana
Literally translated as "intense stretch of the west," Paschimottanasana can help a distracted mind unwind.
Benefits include:
• Calms the brain and helps relieve stress and mild depression
• Stretches the spine, shoulders, hamstrings
• Stimulates the liver, kidneys, ovaries, and uterus
• Improves digestion
• Helps relieve the symptoms of menopause and menstrual discomfort
• Soothes headache and anxiety and reduces fatigue
• Therapeutic for high blood pressure, infertility, insomnia, and sinusitis
Use caution if you suffer from asthma or have a back injury.
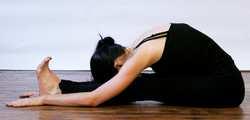
Sit on the floor with your buttocks supported on a folded blanket and your legs straight in front of you. Press actively through your heels. Rock slightly onto your left buttock, and pull your right sitting bone away from the heel with your right hand. Repeat on the other side.
Turn the top thighs in slightly and press them down into the floor. Press through your palms or finger tips on the floor beside your hips and lift the top of the sternum toward the ceiling as the top thighs descend.
Draw the inner groins deep into the pelvis. Inhale, and keeping the front torso long, lean forward from the hip joints, not the waist. Lengthen the tailbone away from the back of your pelvis. If possible take the sides of the feet with your hands, thumbs on the soles, elbows fully extended; if this isn't possible, loop a strap around the foot soles, and hold the strap firmly. Be sure your elbows are straight, not bent.
When you are ready to go further, don't forcefully pull yourself into the forward bend, whether your hands are on the feet or holding the strap. Always lengthen the front torso into the pose, keeping your head raised.
If you are holding the feet, bend the elbows out to the sides and lift them away from the floor; if holding the strap, lighten your grip and walk the hands forward, keeping the arms long. The lower belly should touch the thighs first, then the upper belly, then the ribs, and the head last.
With each inhalation, lift and lengthen the front torso just slightly; with each exhalation release a little more fully into the forward bend. In this way the torso oscillates and lengthens almost imperceptibly with the breath. Eventually you may be able to stretch the arms out beyond the feet on the floor.
Stay in the pose anywhere from 1 to 3 minutes. To come up, first lift the torso away from the thighs and straighten the elbows again if they are bent. Then inhale and lift the torso up by pulling the tailbone down and into the pelvis.
Bound Angle Pose - Baddha KonasanaBound Angle Pose, also called Cobbler's Pose after the typical sitting position of Indian cobblers, is an excellent groin and hip-opener.
Benefits include:
• Stimulates abdominal organs, ovaries and prostate gland, bladder, and kidneys
• Stimulates the heart and improves general circulation
• Stretches the inner thighs, groins, and knees
• Helps relieve mild depression, anxiety, and fatigue
• Soothes menstrual discomfort and sciatica
• Helps relieve the symptoms of menopause
• Therapeutic for flat feet, high blood pressure, infertility, and asthma
• Traditional texts say that Baddha Konasana destroys disease and gets rid of fatigue.
Sit with your legs straight out in front of you, raising your pelvis on a blanket if your hips or groins are tight. Exhale, bend your knees, pull your heels toward your pelvis, then drop your knees out to the sides and press the soles of your feet together.
Bring your heels as close to your pelvis as you comfortably can. With the first and second finger and thumb, grasp the big toe of each foot. Always keep the outer edges of the feet firmly on the floor. If it isn't possible to hold the toes, clasp each hand around the same-side ankle or shin.
Sit so that the pubis in front and the tailbone in back are equidistant from the floor. The perineum then will be approximately parallel to the floor and the pelvis in a neutral position. Firm the sacrum and shoulder blades against the back and lengthen the front torso through the top of the sternum.
Never force your knees down. Instead release the heads of the thigh bones toward the floor. When this action leads, the knees follow.Stay in this pose anywhere from 1 to 5 minutes. Then inhale, lift your knees away from the floor, and extend the legs back to their original position.
Wide-Angle Seated Forward Bend - Upavistha Konasana
Upavistha Konasana is a good preparation for most of the seated forward bends and twists, as well as the wide-leg standing poses
Benefits include:
• Stretches the insides and backs of the legs
• Stimulates the abdominal organs
• Strengthens the spine
• Calms the brain
Use caution with this exercise if you have a lower back injury.
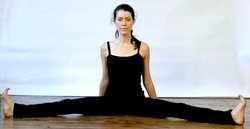
Sit with your legs extended out in front of you, then lean your torso back slightly on your hands and lift and open your legs to an angle of about 90 degrees (the legs should form an approximate right angle, with the pubis at the apex). Press your hands against the floor and slide your buttocks forward, widening the legs another 10 to 20 degrees. If you can’t sit comfortably on the floor, raise your buttocks on a folded blanket.
Rotate your thighs outwardly, pinning the outer thighs against the floor, so that the knee caps point straight up toward the ceiling. Reach out through your heels and stretch your soles, pressing though the balls of the feet.
With your thigh bones pressed heavily into the floor and your knee caps pointing up at the ceiling, walk your hands forward between your legs. Keep your arms long.
As with all forward bends, the emphasis is on moving from the hip joints and maintaining the length of the front torso. As soon as you find yourself bending from the waist, stop, re-establish the length from the pubis to the navel, and continue forward if possible.
Increase the forward bend on each exhalation until you feel a comfortable stretch in the backs of your legs. Stay in the pose 1 minute or longer. Then come up on an inhalation with a long front torso.
Full Boat PoseAn abdominal and deep hip flexor strengthener, Boat Pose requires you to balance on the tripod of your sitting bones and tailbone.
Benefits include:
• Strengthens the abdomen, hip flexors, and spine
• Stimulates the kidneys, thyroid and prostate glands, and intestines
• Helps relieve stress
• Improves digestion
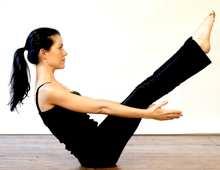
Sit on the floor with your legs straight in front of you. Press your hands on the floor a little behind your hips, fingers pointing toward the feet, and strengthen the arms. Lift through the top of the sternum and lean back slightly. As you do this make sure your back doesn't round; continue to lengthen the front of your torso between the pubis and top sternum. Sit on the "tripod" of your two sitting bones and tailbone.
Exhale and bend your knees, then lift your feet off the floor, so that the thighs are angled about 45-50 degrees relative to the floor. Lengthen your tailbone into the floor and lift your pubis toward your navel. If possible, slowly straighten your knees, raising the tips of your toes slightly above the level of your eyes. If this isn't possible remain with your knees bent, perhaps lifting the shins parallel to the floor.
Stretch your arms alongside the legs, parallel to each other and the floor. Spread the shoulder blades across your back and reach strongly out through the fingers. If this isn't possible, keep the hands on the floor beside your hips or hold on to the backs of your thighs.
While the lower belly should be firm, it shouldn't get hard and thick. Try to keep the lower belly relatively flat. Press the heads of the thigh bones toward the floor to help anchor the pose and lift the top sternum. Breathe easily. Tip the chin slightly toward the sternum so the base of the skull lifts lightly away from the back of the neck.
At first stay in the pose for 10-20 seconds. Gradually increase the time of your stay to 1 minute. Release the legs with an exhalation and sit upright on an inhalation.
Bridge PoseThis active version of Bridge Pose calms the brain and rejuvenates tired legs.
Benefits include:
• Stretches the chest, neck, and spine
• Calms the brain and helps alleviate stress and mild depression
• Stimulates abdominal organs, lungs, and thyroid
• Rejuvenates tired legs
• Improves digestion
• Helps relieve the symptoms of menopause
• Relieves menstrual discomfort when done supported
• Reduces anxiety, fatigue, backache, headache, and insomnia
• Therapeutic for asthma, high blood pressure, osteoporosis, and sinusitis
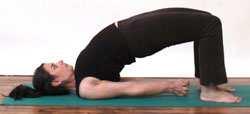
Lie supine on the floor, and if necessary, place a thickly folded blanket under your shoulders to protect your neck. Bend your knees and set your feet on the floor, heels as close to the sitting bones as possible.
Exhale and, pressing your inner feet and arms actively into the floor, push your tailbone upward toward the pubis, firming (but not hardening) the buttocks, and lift the buttocks off the floor. Keep your thighs and inner feet parallel. Clasp the hands below your pelvis and extend through the arms to help you stay on the tops of your shoulders.
Lift your buttocks until the thighs are about parallel to the floor. Keep your knees directly over the heels, but push them forward, away from the hips, and lengthen the tailbone toward the backs of the knees. Lift the pubis toward the navel.
Lift your chin slightly away from the sternum and, firming the shoulder blades against your back, press the top of the sternum toward the chin. Firm the outer arms, broaden the shoulder blades, and try to lift the space between them at the base of the neck (where it's resting on the blanket) up into the torso.
Stay in the pose anywhere from 30 seconds to 1 minute. Release with an exhalation, rolling the spine slowly down onto the floor.Legs-Up-the-Wall Pose - Viparita Karani
Said to reverse the normal downward flow of a precious subtle fluid called amrita (immortal) or soma (extract) in the Hatha Yoga Pradipika, modern yogis agree that Viparita Karani may have the power to cure whatever ails you.
Benefits include:
• Relieves tired or cramped legs and feet
• Gently stretches the back legs, front torso, and the back of the neck
• Relieves mild backache
• Calms the mind
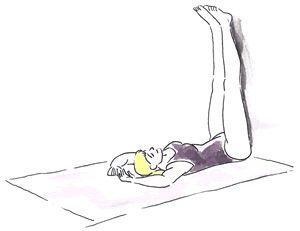
The pose described this is a passive, supported variation of the shoulder stand. For your support you'll need one or two thickly folded blankets or a firm round bolster. You'll also need to rest your legs vertically (or nearly so) on a wall or other upright support.
Before performing the pose, determine two things about your support: its height and its distance from the wall. If you're stiffer, the support should be lower and placed farther from the wall; if you're more flexible, use a higher support that is closer to the wall.
Your distance from the wall also depends on your height: if you're shorter move closer to the wall, if taller move farther from the wall. Experiment with the position of your support until you find the placement that works for you.
Start with your support about 5 to 6 inches away from the wall. Sit sideways on right end of the support, with your right side against the wall (lefthanders can substitute "left" for "right" in these instructions). Exhale and, with one smooth movement, swing your legs up onto the wall and your shoulders and head lightly down onto the floor.
The first few times you do this you may slide off the support and plop down with your buttocks on the floor. Don't get discouraged. Try lowering the support and/or moving it slightly further off the wall until you gain some facility with this movement, then move back closer to the wall.
Your sitting bones don't need to be right against the wall, but they should be "dripping" down into the space between the support and the wall. Check that the front of your torso gently arches from the pubis to the top of the shoulders.
If the front of your torso seems flat, then you've probably slipped a bit off the support. Bend your knees, press your feet into the wall and lift your pelvis off the support a few inches, tuck the support a little higher up under your pelvis, then lower your pelvis onto the support again.
Lift and release the base of your skull away from the back of your neck and soften your throat. Don't push your chin against your sternum; instead let your sternum lift toward the chin. Take a small roll (made from a towel for example) under your neck if the cervical spine feels flat. Open your shoulder blades away from the spine and release your hands and arms out to your sides, palms up.
Keep your legs relatively firm, just enough to hold them vertically in place. Release the heads of the thigh bones and the weight of your belly deeply into your torso, toward the back of the pelvis. Soften your eyes and turn them down to look into your heart.
Stay in this pose anywhere from 5 to 15 minutes. Be sure not to twist off the support when coming out. Instead, slide off the support onto the floor before turning to the side. You can also bend your knees and push your feet against the wall to lift your pelvis off the support. Then slide the support to one side, lower your pelvis to the floor, and turn to the side. Stay on your side for a few breaths, and come up to sitting with an exhalation.
Corpse Pose - SavasanaSavasana is a pose of total relaxation—making it one of the most challenging asanas.
Benefits include:
• Calms the brain and helps relieve stress and mild depression
• Relaxes the body
• Reduces headache, fatigue, and insomnia
• Helps to lower blood pressure
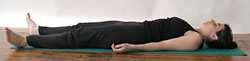
In Savasana it's essential that the body be placed in a neutral position. Sit on the floor with your knees bent, feet on the floor, and lean back onto your forearms. Lift your pelvis slightly off the floor and, with your hands, push the back of the pelvis toward the tailbone, then return the pelvis to the floor.
Inhale and slowly extend the right leg, then the left, pushing through the heels. Release both legs, softening the groins, and see that the legs are angled evenly relative to the mid-line of the torso, and that the feet turn out equally. You should narrow the front pelvis and soften (but don't flatten) the lower back.
With your hands lift the base of the skull away from the back of the neck and release the back of the neck down toward the tailbone. If you have any difficulty doing this, support the back of the head and neck on a folded blanket. Broaden the base of the skull too, and lift the crease of the neck diagonally into the center of the head. Make sure your ears are equidistant from your shoulders.
Reach your arms toward the ceiling, perpendicular to the floor. Rock slightly from side to side and broaden the back ribs and the shoulder blades away from the spine. Then release the arms to the floor, angled evenly relative to the mid-line of torso.
Turn the arms outward and stretch them away from the space between the shoulder blades. Rest the backs of the hands on the floor as close as you comfortably can to the index finger knuckles. Make sure the shoulder blades are resting evenly on the floor. Imagine the lower tips of the shoulder blades are lifting diagonally into your back toward the top of the sternum