When you insert a chord symbol, a dialog box opens up where you can fill in the type of chord.
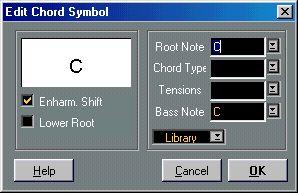
The Chord Symbol dialog.
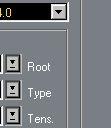
1. Enter the root note in the “Root” field.
You can either type in a chord letter or select a note from the pop-up menu to the right.
2. Specify a chord type in the “Type” field.
You can either type it in (for example, by typing a “7”) or select an option from the pop-up menu to the right.
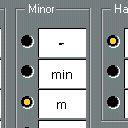
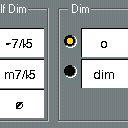
Note that there are several display options for some chord types:
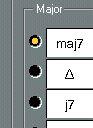
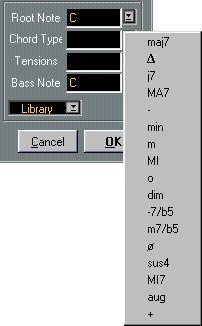 Major 7th
3. If you wish, specify a tension in the “Tension” field.
Again, this can be done by typing or by using the pop-up menu. However, there are some special display options which you can only get by typing (see the table below). You might also want to add some text here (such as “no third”, etc.). If you wish, you can select the basic tensions from the pop-up menu, and then add special options by typing.

 enclosed in brackets.

 separated by a slash sign.

 above one another.
 You can also combine several options. This is


a combination of two options, along with a
space to put the “9” above the “5”. Note that
only one “(“-sign is needed when the “|” op
tion is used.
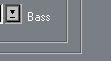
4. If you want to have a special bass note (like for example to have a C major with a D bass note) set the “Bass” pop-up menu to anything but the Root Note. The program will “remember” the relation between root and bass note, so that if you change the root note, the bass note will follow.
5. If you want the Root note to be displayed in lower case, activate the “Lower Root” checkbox.
6. If needed, click on the button labelled “Enharm. Shift”, to turn this on or off.
The Chord Symbol appears in the score.
P You can make further settings to determine how the chords should be displayed - see page 226.
• If you want to edit a chord, double click on the symbol.
A dialog appears, similar to the dialog you got when inserting the chord. The difference is that this dialog is non-modal, that is, it can remain open while you continue to work in the score. Typically, you would double click on a chord, adjust its properties and click Apply. Then if you like, select another chord in the score. The dialog is continuously updated to reflect the currently selected chord, allowing you to edit several chord symbols without having to close the dialog in between. Finally, to close the dialog, click its close box.
The Library pop-up menu in the Chord dialog allows you to add commonly used chord types and tensions to a list of “presets”, for quick access:
1. Set up the desired chord in the dialog.
2. Pull down the Library pop-up menu and select “Add”.
• Selecting an item from the Library pop-up menu applies the stored chord type and tension.
The root and bass notes are not affected.
• You can also access this pop-up menu from the score, by pressing [Ctrl] and clicking on a chord symbol.
This allows for very quick editing of chord types, without having to access the Edit Chord dialog.
1. Open the recording in the Score Editor.
If you want the chords to be inserted on another Track, you can create an empty Part on that Track and open it along with the recording.
2. If you like, make settings for how the chords should be displayed in the Preferences– Scores dialog.
You can change all these settings after you inserted the chords as well.
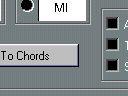
3. Use the To pop-up menu to decide which part of the score to create chords for. This allows you to create chord symbols for all chords inside the loop, for all selected notes etc.
4. Activate the Staff where you want the chords by clicking in it.5. Select “Make Chords” from the pop-up Do menu.
The chords appear. They can be moved, duplicated and deleted as any other symbol. You can also double click on a chord symbol to edit it in the Chord Symbol dialog (in the same way as when creating Chords manually - see above).
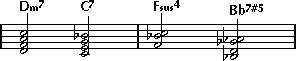 A staff after using Make Chords.
• Instead of using the “Make Chords” item in the Do pop-up menu, you can click on the Make Chord icon on the Score Toolbar.
 The Make Chords icon
• If the option “Use for Make Chords” is activated in the Edit Guitar Lib dialog (see page 196), guitar chord symbols will be added as well (if the Guitar Lib contains any guitar symbols that match the chords).
About the analysis• The MIDI Chords are expected to be played in their most basic inversion. If not, an extra bass note is added. For example, the notes CEG are interpreted as C major, but GCE is interpreted as C Major with a G bass note. If you don’t want any interpretation of the inversion (no special bass notes) hold down [Ctrl] while selecting Make Chords.
• All notes on all staves are taken into consideration. Whenever there is any change on any staff, the notes are reinterpreted and a new Chord Symbol added. This means you should probably avoid having the melody Track in the Score Editor when you use Make Chords, or you will get a lot more Chords than you expect, possibly with strange tensions.
• In addition to the above, the Quantize value is used. At the most, there will be a new chord at each Quantize position.
• There must be at least three notes at a certain position for the program to interpret it as a chord. Also some combinations of notes simply don’t make any sense to the program and won’t produce any chords.
• The analysis method isn’t infallible. It can’t be because the same set of notes can be interpreted differently depending on context. Some editing may be needed. If you record the track solely to create chords automatically, play the chord as simple as possible, in the correct inversion, without added octaves, etc.
Selecting a Font and Size for the Chords

2. Use the Font pop-up to select a font for the chords.
Cubase VST comes with a special font for this (ChordFont 4.0), but you can use any font you like.
3. Use the four Size value fields to select sizes for the four different chord “elements”. You can type in values or use the pop-up menus. Normally, you would want the “Root” size to be the largest and the “Tension” size the smallest.
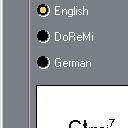
4. Use the radio buttons to the left to select a chord display mode.This affects how the Root and Bass notes are displayed:
English Regular notation.
DoReMi “Do-Re-Mi-...” are used instead of “C-D-E-...”
German As English notation, but “B” is displayed as “H”, and “Bb” or “A#” are displayed as “B”.
5. Click OK to close the dialog.
If you want to try out your settings without closing the dialog, you can click the “Apply” button at the upper right corner.


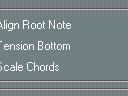
 2. Use the four sections of radio buttons to specify how the four most common chord types should be displayed.
7. To close the dialog and save the settings as “default” settings for the next time you use the Make Chords function, click OK.
This does not apply the settings to the currently edited score (with the exception of the settings of the three checkboxes, which affect all chords in the Song).