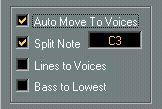
If you have a Track already recorded and you want to use polyphonic voicing for it, you have the option of letting the program automatically put notes into voices. This is done by activating “Auto Move To Voices” in the Polyphonic Settings dialog.
1. Open the Staff settings dialog box for the staff.
2. Switch the system to Polyphonic.
3. Click Edit and set up the Voices as described above.
See below for details.
5. Close the Polyphonic Settings dialog and the Staff Settings dialog. The notes are now moved to the voices.
Activate This: No option
When you “only” want the program to automatically resolve overlapping notes. The program does this by moving notes to different voices. For example if a whole note starts at the same time as four quarter notes, the whole note will wind up in its own voice. To make this work, you must of course have enough voices activated in the Polyphonic Voices dialog.
When you want to move all notes below a certain pitch to the “lower voices”, that is, to move them to the bass clef. This of course requires you to have at least one of the lower voices activated. Overlapping notes will also be treated as described above. Make sure the Split Note is set to a reasonable value if this option is activated!
When you want all musical “lines” to be put in one voice each, regardless if the is need for resolving overlapped notes or not. Select this option for example for vocal scoring.
The notes with the highest pitch are picked to the top voice and so on. Make sure you have enough voices activated, or the lowest voice will contain more notes than you expect!
If you want “bass” notes moved to the bass clef, make sure one or more of the “lower” voices are activated.When you want the lowest note to be put in its own voice on the bass clef. This of course assumes you have at least one of the “lower” voices activated. Otherwise, the notes will be put on the lowest of the “upper” voices.
If things didn’t turn out exactly as you expected it, just repeat the procedure and try other settings. Some trial and error might be required to find the right combination. But there are of course cases which no computer program can handle automatically. If you for example need crossed voicings, some manual adjustments are necessary, see page 143.
P Please note that graphical “collisions” are only handled automatically for Voice 1 and 2 on the upper staff and Voice 5 and 6 on the lower. If you use more than two voices on a system you might have to use the Layout Tool to perform “Graphic Moving” of notes, to make the score more legible.