Moving Notes between Voices
There are two major situations when you will need to manually move notes between voices:
• When you have recorded something and switched the system to Polyphonic without using “Auto Move To Voices”.
• When you have used Auto Move To Voices and need to make manual adjustments to the voicing you got.
1. Select the Note(s) you want to move to a particular Voice.
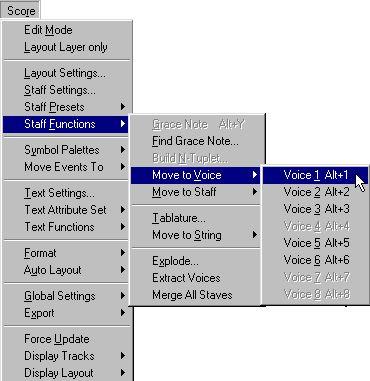
2. Select Move to Voice from the Staff Functions submenu found on the Score menu.
 Move to Voice and the submenu it invokes.
3. In the submenu, select the Voice you want to move the notes to.
Voices not activated are shown in grey.
Alternatively, you can use the computer keyboard.
1. Select the Note(s) you want to move to a particular Voice.
2. Hold down [Alt] and press the number key on the computer keyboard corresponding to the Voice you want to move the notes to.
This is the default key command. As usual, you can specify custom key commands for this if you wish, in the Preferences–Key Commands–Score dialog.
Alternative Ways of handling Voices
Below we suggest some other “advanced” ways of putting notes into Voices. This is based on the relation between voices and MIDI Channels, so please make sure you understand how this connection works.
• You can use Logical Edit (described in its own chapter in the Getting into the Details documentation) to put notes into voices, based on other more complex criteria, like for example their pitch and length. This is done by setting up Logical Edit so that the notes that meet the criteria get their MIDI Channel changed to that of Voice.
• When you enter notes using Step Input you can change the MIDI Channel on your input device and thereby directly enter notes into separate Voices.
• You can play back each Voice on a different MIDI Channel, simply by setting the Track to Any. This can for example be used as a convenient way of “proof-hearing” each voice separately.
• You can use the Input Transformer to assign a certain key range to a MIDI Channel, and thereby automatically put notes into voices when recording.
• For brass and vocals, you might record each voice on its own Track, and use the “Merge All Staves” function to automatically copy each recording to a separate voice on a new Track (see page 145).
• When you have assigned parts to voices, you can use the Extract Voices function to create one Track out of each voice (see page 146).


