• Double click on a note head.
• Select one or several notes and select Get Info from the Edit menu.
• Select one or several notes and click the “i” icon on the Score Toolbar.

• Select one or several notes and use a key command (by default, [Ctrl]-[I]).
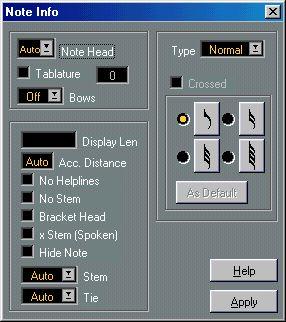 The Note Info dialog contains the following settings:
 Setting:
Note Head
Description:
Used for selecting custom note head shapes (see page 156).
Used for creating or editing Tablature (see page 296). This feature can be used for individual notes or together with the automatic “Make Tablature” function.
Used for adding bow up/bow down articulation.This allows you to change the displayed length of notes, without affecting playback. Note that the Display Quantize settings still apply (see page 124). To reset this value to “Auto” (so that notes are displayed according to their actual length), scroll the value down to zero.
Use this to specify how far from the note, horizontally, you want the accidental. The higher the number the further away.Hide Note With and without help lines
Hides the note stem completely
When this is activated, notes will be displayed with brackets:

 Bracket Head off and on.
 Determines the stem direction, as described above.
 Determines the direction of ties. When this is set to “Auto” (the default setting) the program will choose a tie direction depending on the stem direction of the tied notes.
• You can also flip the direction of a tie directly in the score, by selecting a tied note, holding down [Ctrl] and clicking the “Flip” button on the Score Toolbar.
Determines the note type. There are four options:
• Normal. This is how notes usually are displayed.
• Grace. When this is selected, notes will be displayed as grace notes. This
is described in detail on page 174.
• Cue. When this is selected, notes will be displayed as cue notes (smaller
notes, often used as “guide notes” or optional lines). See page 172.
• Graphic. These are special notes, useful for example for guitar notation
(pull-offs) and trills (as “help notes”, indicating which notes to trill between). In both these cases the “No Stems” option could be useful.
Graphic notes are not included in the “automated cutting” (see page
170). They are positioned after the note(s) they “belong to” (as opposed
to grace notes).
• After changing a setting, you can apply the change to the selected note(s) by clicking the Apply button.
Note that you can select other notes while the dialog remains open, adjust their settings and click Apply.