When you open Score Edit for a Part played in real-time, the score may not look as legible as you would first expect. The Score editor can ignore the minor time variances in performance and make a neater score almost instantly. To achieve this, there are a number of settings in a Staff Settings dialog box that determine how the program displays the music. In this chapter we will describe the options in “regular” Cubase. Cubase VST Score and Cubase VST/32 have additional options.
There are two ways to open the Staff Settings dialog:
• Double click in the white area to the left of the staff.
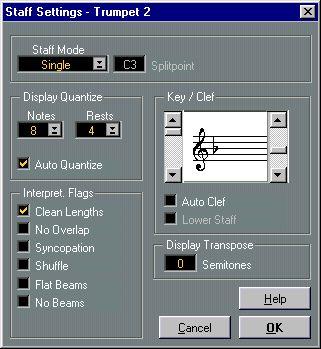
• Activate a Staff by clicking in it, and select “Staff Settings” from the Do pop-up menu (or, if you are using Cubase VST Score or Cubase VST/32, from the Score menu). The Staff Settings dialog appears:
P
The settings you do in this dialog box are independent for each Staff (Track), but common for a piano staff which you have created by choosing the “Split” option in the Staff Mode pop-up menu (see below).
Key and Clef
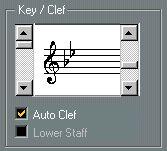 If you activate the “Auto Clef” checkbox, the program attempts to guess the correct clef, judging from the pitch of the music.
Staff Mode
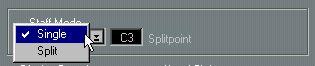
This pop-up determines how the staff should be shown:
• When set to “Single”, all notes in the Part are shown in the same staff.
• When set to “Split”, the Part is split on the screen into a bass and treble clef, as in a piano score.
You use the Splitpoint value field to set the note where you want the split to occur. Notes above and including the split note will appear on the upper staff, and notes below the split note will appear on the lower staff.

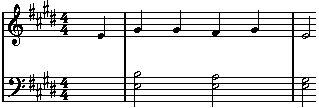 Before and after setting a split at C3.
• To set the clef and key for the lower staff, activate the “Lower Staff” checkbox in the Key/Clef section.
Display Quantize
Notes are not an absolute language, and you must give the program a few hints on how the score should be displayed. This is done using the Display Quantize section of the Staff Settings dialog.
P These are only display values used for the graphics in the Score Editor. They do not affect the actual playback in any way.Here is a description of the functions:
Parameter Description
Notes Determines the smallest note value to be displayed and the “smallest position” to be recognized and properly displayed. Set this to the smallest significant note position used in your music.
For example, if you have notes on odd sixteenth note positions, you should set this value to 16.
The “T” values are for triplet note values.
This setting is partly overridden by Auto Quantize (see below).
Rests This value is used as a “recommendation” - the program will not display rests smaller than this value, except where necessary. In effect, this setting also determines how the length of notes should be displayed. Set this value according to the smallest note value (length) you want to be displayed for a single note, positioned on a beat.
Auto Quantize Generally, if your music contains mixed triplets and straight notes, try activating this checkbox. Otherwise, make sure it is deactivated.Auto Quantize uses involved methods to make your score look as legible as possible. Auto Quantize allows you to mix straight notes with tuplets (triplets) in a Part. But, Auto Quantize also uses the (display) Quantize value. If it can't find an appropriate note value for a certain note or group of notes, it will use the set Quantize value to display it.
If the part is imprecisely played and/or complex, Auto Quantize may have a problem “figuring out” exactly what you “mean”.If you are using Cubase VST Score or Cubase VST/32, there is more information in the chapter “Transcribing MIDI Recordings” in the Score Layout and Printing document.
Flags
These provide additional options for how the score should be displayed: Parameter
Clean Lengths
When this is activated, notes that are considered to be chords will be shown with identical lengths. This is done by showing the longer notes as shorter than they are. When Clean Lengths is turned on, notes with very short overlaps are also cut off; a bit as with No Overlap (see below), but with a more subtle effect.
When this is activated one note will never be shown as overlapping another, lengthwise. This allows long and short notes starting at the same point to be displayed without ties; the long notes are cut off in the display. This will make the music more legible.
An example measure with No Overlap deactivated...Syncopation ...and with No Overlap activated.
When this function is activated, syncopated notes are shown in a more legible way.
Flat Beams No Beams ...and when it is On.
Activate this function when you have played a shuffle beat and want it displayed as straight notes (not triplets). This is very common in jazz notation.• When you are done with the settings, close the dialog, by clicking the OK button. This applies the settings to the active Staff/Track. If you are editing several Tracks at once (see next page), you can apply the Staff Settings to all these Tracks at once, by holding down the [Alt] key when you click OK.
P Remember that the Staff settings are done independently for each Track.