Automating the VST Channel Mixer
Your actions in the VST Channel Mixer window can be automated in a very straightforward way: by “writing” them into a special Audiomix Part. When played back, this Part will repeat your fader movements and button presses just like you performed them. You will even see the faders and buttons move on the screen, like on a physical mixer with motorized controls.
P
Write/Read Automation applies to “both” Channel Mixer windows. As mentioned previously, these are not separate mixers, but two separate window “Views” of the same Channel Mixer. Hence, if you activate Write Automation in VST Channel Mixer 1, Write automation is automatically activated in VST Channel Mixer 2 as well.
What can be automated?
Mixdown in Cubase VST can be completely automated! The following parameter settings are recorded with the Write function:
For each channel (see below for limitations regarding Insert Effect automation):
• Volume
• Pan
• Mute
• EQ Bypass switch
• Settings for 4 EQ modules
• 8 x Effect Send Active switches
• 8 x Effect Send levels
• 8 x Effect Send PRE switches
• Effect Send Bypass switch
• 4 x Insert Effect Program selection
• 4 x Insert Effect parameters (the 15 first parameters for each effect)
P
Insert Effects can be only automated for the first 32 audio channels, the eight Groups and the 16 first ReWire/VST Instrument channels (depending on what is activated).
Global for all channels:
• Master volume Left and Right
• 8 x Send Effect “Master” level
• 8 x Send Effect Program selection
• 8 x Send Effect parameters (the 16 first parameters for each effect)
• 4 x Master Effect Program selection
• 4 x Master Effect parameters (the 8 first parameters for each effect)
Recording your actions
1. Open the VST Channel Mixer.
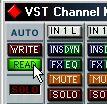
2. Click on the Write button in the upper left corner to activate recording. While this button is “lit” (activated), every volume, pan, mute or solo movement you make will be recorded.
 3. Start playback.
4. Move the faders and pan controls, mute and solo as you would during a manual mixdown.
Since you can repeat this recording several times, it is probably easiest to mix one or a couple of channels at a time, and stop and deactivate the Write function in between. That way, you can also Undo your last run if you’re not satisfied, using the Undo command on the Edit menu.
5. Stop playback.
If you check the Arrange window, you will note that a special Mixer Track called “Audio Mix” has been created. This Track contains one long Part named “Audio Mix”, in which all your VST Channel Mixer actions are stored. Don’t worry about the length of this Part; it will automatically be lengthened if you record past its end.
Please note that there is only one Audio Mix Part/Track, created the first time you use the Write function in your Arrangement. No new Parts are created the next time you use the Write function; information is added to the existing Part instead.
 6. Deactivate the Write function by clicking on the button.
P
Exiting the VST Channel Mixer will automatically deactivate the Write function.
Recording Mixer settings in Stop mode
The Write function works in Stop mode as well as during playback. If you activate Write when Cubase VST is stopped, all changes you make to your mixer parameters are recorded at the current Song Position. This feature can be used creatively if you need initial mixer settings, abrupt changes, etc.
Undoing your recording
If you select Undo from the Edit menu, all actions recorded since you last activated Write will be undone. Therefore, make it a habit to always deactivate Write after each recording “pass” and listen to what you recorded.
• If you find this too cumbersome, you can make separate Audiomix Parts for the different audio channels or recording “passes”, and edit/delete these afterwards. This is described on page 476.
Playing back your recorded Mixer actions
1. Check that the Audiomix Track or Parts are not muted.
2. Activate the Automated playback by clicking on the Read button in the upper left corner of the VST Channel Mixer.

You may have Write and Read activated simultaneously, if you want to watch and listen to your recorded mixer actions while you’re recording fader movements for another mixer channel, etc.
3. Start playback as usual.
The mixer faders and controls will move automatically, following your recorded actions.
Moving and Muting the Audiomix Part
The Audiomix Part can be handled as any Mixer Part:
• If you want to turn off VST Channel Mixer automation from the Arrange window, you can mute the Audiomix Part or Track. • You can copy recorded mixer actions to several places in your Arrangement by cutting out the relevant section of the Audiomix Part with the Scissors tool and duplicating it, placing the copies wherever you want them.
Working with one Audiomix Part for each Audio Channel
Although Cubase VST only creates one dedicated Audiomix Track, there is a way to structure your Mixer Automation into different Parts for different channels, which makes it easier to edit and redo mixer recordings you’re not satisfied with:
1. Record your fader movements and other mixer actions for the first audio channel, as described on the previous page.
2. Deactivate the Write function and go to the Arrange window.
3. Make a new Mixer Track.
It might be a good idea to name it after the audio channel you just mixed, to avoid confusion later on.
4. Move the entire Audiomix Part to the new Track.
5. Open the VST Channel Mixer again, activate the Write function and record your mixer actions for the next audio channel.
Now Cubase VST creates a new Audiomix Part on the original, empty Audiomix Track. If you activate the Read function, your previously recorded Part will be played back from its new Track, so you can watch your recorded fader movements while you continue with new audio channels.
6. Repeat steps 2 to 5 for as many channels you like.
You will end up with a number of Mixer Tracks, all playing back simultaneously, affecting different audio channels in the VST Channel Mixer. If you want to, you can keep it that way. If you like to clean up your Arrange window, you can Merge the Parts into one (see page 56) or put all the Tracks in a Folder Track (see the chapter “About Folder Tracks”).
Editing the Audio Mix Part
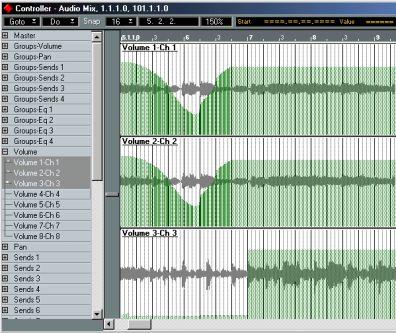
The Audio Mix Part contains Mixer Events, which can be edited in the Controller Editor or in List Edit:
In the Controller Editor

If you open the Audio Mix Part in the Controller Editor, the recorded controls are displayed graphically, superimposed on the audio waveforms. You can edit and create the controller curves just as you would edit MIDI Controller messages - see the chapter “The Controller Editor”.
P
You cannot view and edit switch parameters (parameters with on/off values) in the Controller Editor.
In List Edit

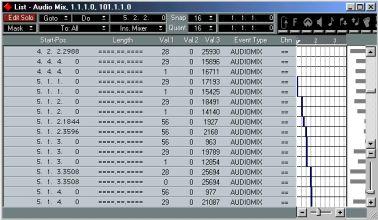
If you open the Audio Mix Part in List Edit, the recorded controls are shown numerically in the list. This is useful if you want to set a fader to a specific value at a certain position, or if you want to edit switch parameters.
1. Select the Audio Mix Part in the Arrange window and open List Edit.
2. Pull the divider to the right so that you can see the Comment column. This column shows which Mixer parameter (volume, pan etc) and audio channel each Event controls.
P
Switch parameters (parameters with on/off values) are handled in a special way. All information about a switch Event (switch name, on/off) will be displayed in the Comments column, but do not try to edit a Switch value if you are not sure about how the Value 2 encoding works (see page 479).
3. Select an Event that corresponds to the fader (or other Mixer control) you want to edit.
4. Pull down the Mask pop-up menu and select “Mask It”.
This will hide all Events except those of the same type as the selected (that is, only Events of the same type and the same audio channel as the selected one will be shown).
5. Edit the values in the Value 2 column in the list.
You can also use the “Value 2 display” to the right, to perform a kind of graphical editing.
P
The value 101 for a fader corresponds to 0 dB (unity gain).
6. When you’re done, pull down the Mask pop-up menu, select “No Mask” and press [Return] to leave List Edit.
How List values work for Switches
The text in the Comments column corresponds to the numerical value in the Value 1 column. Each continuous parameter (such as volume, pan, etc) on each audio channel, has a unique Event number (value 1), while the Value 2 column shows the parameter values. However, switches (on/off-parameters) are handled in a special way: All switches on the same audio channel share the same Event number!
All other information (which switch is it and what is its state) is encoded into Value 2. If you want to edit the values of switch Events, you have to consult the tables below to find the appropriate values. This is the Value 2 functionality for switches on each audio channel:
Switch Name
Mute
Solo
EQ Bypass
Effect send DRY
Effect send 1 On/Off
Effect send 2 On/Off
Effect send 3 On/Off
Effect send 4 On/Off
Effect send 5 On/Off
Effect send 6 On/Off
Effect send 7 On/Off
Effect send 8 On/Off
Effect send 1 PRE switch Effect send 2 PRE switch Effect send 3 PRE switch Effect send 4 PRE switch Effect send 5 PRE switch Effect send 6 PRE switch Effect send 7 PRE switch Effect send 8 PRE switch EQ module 1 Enable switch EQ module 2 Enable switch EQ module 3 Enable switch EQ module 4 Enable switch
“On” value “Off” value
64 0
65 1
66 2
67 3
68 4
69 5
70 6
71 7
80 16
81 17
82 18
83 19
72 8
73 9
74 10
75 11
84 20
85 21
86 22
87 23
76 12
77 13
78 14
79 15


