The Export Audio Tracks function in Cubase VST allows you to mix down any number of audio tracks, complete with effects and mixer automation, to a new audio file, in one of several file formats, mono or stereo. Furthermore, all ReWire and VST Instruments channels that are activated and playing will also be included.
P Please note that MIDI Tracks are not included in this type of mixdown. To make a complete mixdown containing both MIDI and audio, follow the instructions on page 520.There are three different modes for the Export Audio Tracks function:
• Between Locators
This mode will export all unmuted audio Tracks between the left and right locators and create a Mixdown file according to the specified settings in the Export Audio dialog.
This mode will create a separate file for each selected audio Part in the Arrangement.
• Selection Range
This mode will create a Mixdown file based on the current Selection Range. All unmuted audio within the range will be included in the Mixdown file.
• For the “Between Locators” mode, set up the left and right locator, to encompass the area that you want to mix down.
The rule is: All audio you hear on playback will be included in the Mixdown file!
• For the “Selected Parts” mode, select all Parts that you wish to mix down. You don’t have to make any settings for unselected Parts, even if they are audible on playback. They wont be included in the Mixdown file.
• For the “Selection Range” mode, define a range with the Selection Range tool.2. Set up your Tracks, so that they play back the way you want.
You can use the automation in the Channel Mixer, as well as Effects and Master Effects. If you are planning not to include any of these features in the exported audio file, you should turn them off while preparing the Tracks as well, to hear what you get.
• You can also open this dialog by clicking the “Export Audio” button in the VST Master Mixer.
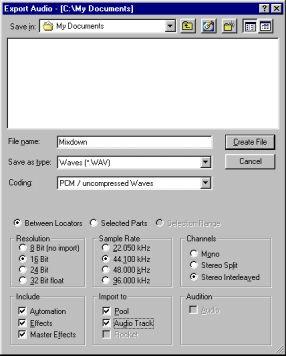 5. Set the Mixdown mode (Between Locators, Selected Parts or Selection Range) by clicking the corresponding radio button.
6. Decide whether you want to include automation and/or effects, by using the “Include” checkboxes.
You can independently include the automation from the VST Channel Mixer, the Mixer Effects and the Master Effects. If you are exporting with Dithering activated (see below and page 455), you should make sure that “Include Master Effects” is activated!
7. If you want to automatically import the resulting audio file back into Cubase VST, activate the “Import to” checkboxes.
If you activate the “Pool” checkbox, the file will appear in the Pool. Activating the “Audio Track” checkbox as well, will place the file in a new Part on an Audio Track, starting at the Left Locator. For more info about the created Audio Track, see page 519.
8. If you want an audible verification during the mixdown process, activate the “Audition Audio” checkbox.
This will cause the unmuted audio Tracks to rapidly play back while the mixdown file is created.
9. Select a file type.
You can choose between AIFF, Real Audio and WAVE. Which type to choose depends on which other programs you plan to use the file in.
10.If you selected the Wave file type, you can use the Coding pop-up menu to select a coding (compression) format for the file.
The “standard” format (required if you want to be able to re-import the files into Cubase VST) is “PCM/uncompressed Waves”. The other coding formats on this menu are useful when you are creating audio for use in multimedia applications, etc.
11.If you selected the Real Audio file type, the Coding pop-up menu allows you to choose the desired audio quality for the file.
The text field below the Coding pop-up menu shows a description of the currently selected Coding and its proper use. Note that the choice of mono or stereo is included in the Coding options.
• You can make a mono file, in which case the left and right channels are mixed (as when using the mono switch in the VST Master Mixer).
• You can select Stereo Interleaved, in which case a true stereo file is created.
• Finally, you can select the Stereo Split option, in which case two mono files (one for each stereo side) will be created. The “Import to Pool/Audio Track” options are not available if this option is selected.
The choices are 8, 16, and 24 Bit. Cubase VST/32 is also able to export 32 Bit files.
• 8 Bit audio files are of limited fidelity, but can be useful for multimedia applications, or situations when you want to keep the file size down.
• 32 Bit files can be imported into some high-end audio editors such as Steinberg WaveLab 3.0.
• If you plan to use the file in a “regular” version of VST (Cubase VST or Cubase VST Score), you have to select the 16 or 24 Bit option.
P When you export to a resolution of 16 Bit or lower, you should consider activating the Dither function in the Master Mixer (see page 455). Note that you must activate the “Include Master Effects” checkbox for the Dithering to be included in the mixdown.
14.Select a sample rate (Wave or AIFF file types only).
You can choose between 22.05, 44.1 and 48 kHz. If you are using the Cubase VST/32 version, you can also select 96kHz. However, to be able to re-import and play 96kHz files in Cubase VST/32, your audio hardware and its drivers must support this sample rate.
P It is possible to import and/or audition the file no matter which sample rate is selected. Please note however, that if the selected sample rate is another than the one used by Cubase VST, the pitch and length of the audio will be incorrect when you play it.
15.Select a folder and a name for the audio file to be created.
If you have selected the “Stereo Split” option above, the two files will have the same name, but with the letter “L” appended for the left channel and “R” for the right channel file.
16.Press the Create File button.
The audio file is created. If you have activated the “Audition” option, the resulting audio will be cued (played back rapidly) during the process. If you have activated the “Import to” options, the file will be imported into the Pool and, if you like, onto an audio Track. You can play it back to check the results immediately. Just remember to mute the original Tracks, and turn off any eq and/or effects for the audio channel(s) used by the imported Track, so that you really hear the true result (see below).
If you choose to automatically import the audio file into the Arrangement, using the “Import to Audio Track” checkbox, the segment(s) and Track will have the following properties:
• If an Audio Track is selected when you select Export Audio, the imported audio is placed in a Part on the selected Track.
The selected Audio Track must be a mono Track if the audio file is in mono, a stereo track if “Stereo Interleaved” is selected. Otherwise, a new Track is created, as described below.
P Remember to mute the original audio Tracks when auditioning an automatically imported Mixdown file! If you want to prepare a complete master audio file, you probably want to include some MIDI material in your Arrangement. Proceed as follows: