Cubase allows you to set the number of audio channels you want to use to in the program. The maximum number of audio channels is 72 (128 if you are using the Cubase VST/32 version), but most systems will be restricted to a smaller number, due to limited processor power, RAM, etc. The settings are made in the Audio System Setup dialog (reached from the Options menu) and involves several parameters:
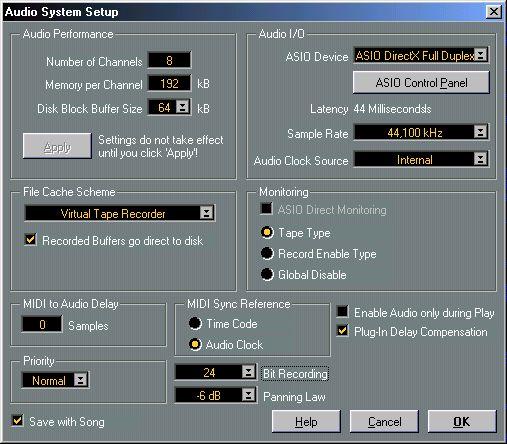
Sets the number of audio channels you would like to have access to (4 - 72, or 4 - 128 in VST/32).
• Memory per Channel.
Sets the amount of internal memory assigned to each audio channel. This value multiplied by the Number of Channels has a direct relation to the amount of RAM available to the program. The higher the value the lesser the risk of playback problems. On the other hand, raising this will probably lower the number of channels you can use at the same time, since the total amount of RAM in the computer is always limited.
• Disk Block Buffer Size.
Governs the buffer size used in Cubase VST when reading and writing data from/to the hard disk. The larger value, the smoother and faster performance.
However, each Buffer Size value has a corresponding minimum Memory per Channel setting. For example, if the Disk Block Buffer Size is 64 kB, the Memory per Channel cannot be lower than 192 kB.
As you can see, there is a quite involved relation between these three parameters. To ensure the best HD/audio performance, you would raise the Disk Block Buffer Size, but this automatically increases the Memory per Channel which in turn limits the possible Number of Channels. This means you will have to experiment with different settings to find the performance/memory/channel balance best suited for your system.
The Apply buttonClicking the Apply button applies the settings you have made. If you get a warning reading “Not enough memory for the Audio Engine”, you either have to decrease the number of audio channels or decrease the Memory per Channel figure.
Try these settings first!• If you find that the audio and hard disk performance is poor (playback stutters, system momentarily slows down), try raising the Disk Block Buffer Size to 96 kB. The Memory per Channel setting is automatically increased to 288 kB.
• If you need more channels, try lowering Disk Block Buffer Size to 48 kB.P All of the above assumes your hard disk is fast enough to handle the number of channels specified.
Here you select the ASIO driver you want to use. The options depend on which drivers are available for your audio card:
• ASIO Multimedia driver.
This is the “standard” choice, for using the Windows Multimedia System to play back and record audio.
• ASIO DirectX Full Duplex driver.
These options are available if your audio card has a native DirectX driver. To be able to use DirectX Full Duplex, it is also required that you have DirectX 6.1 or better installed. See page
542 for details.
• Dedicated ASIO drivers.
If your audio card has a dedicated ASIO driver (that is, an ASIO driver specifically written for that audio card), you should always use that driver and not the Multimedia or DirectX drivers.
If the driver supports it, this button brings up a window with settings specific to the audio card.
• For the ASIO Multimedia driver, see page 542 for more info.
• For the ASIO DirectX driver, see page 542 for more info.
• For other ASIO drivers, see the documentation that came with the card/driver.
The Latency is the delay between when audio is “sent” from the program and when you actually hear it. The latency in an audio system depends on the audio hardware and its drivers. As described in the Getting Started book, latency may be a problem if you monitor through Cubase VST, when you are playing VST Instruments “live” from a MIDI keyboard or when you mix your audio (in situations where high time precision is required). However, the recorded audio will not be affected, since VST takes the latency into account, and adjusts the timing of the recorded audio accordingly.
The Latency indication in the Audio System Setup dialog shows you the latency with your current ASIO driver and settings. Depending on the ASIO driver, you may be able to reduce the latency by adjusting the number and size of the audio buffers in the ASIO Control Panel (an example of this is the ASIO Multimedia driver - see the online help for details). Also, you should be aware that “dedicated” ASIO drivers (written specifically for the audio hardware) often give lower latency values than the ASIO Multimedia and ASIO DirectX Full Duplex drivers.
P
Audio playback and recording timing will not be affected by latency, since VST takes the latency into account, and adjusts the timing accordingly. Similarly, if you play back MIDI Parts routed to VST Instruments, the playback precision is sample accurate, regardless of the latency.
Sample Rate
This setting determines the audio quality of your recordings. The higher the value, the better the quality, but when you raise the value, each recording also uses up more disk space and computer processing power.
You should not change the Sample Rate setting if you already have files in the Pool (which you will have if you have made any audio recordings at all in this Song).Audio Clock Source
If the card and its driver supports it, this pop-up allows you to select an external source to which the audio playback can synchronize its sample rate. See the documentation that came with the card for details.
This pop-up menu allows you to select one of three methods for audio playback file caching.
Here’s the background: When the computer reads data from the hard disk, this data is first transferred to an intermediate RAM storage area, called a cache. If things are set up cleverly, using a file cache can improve computer performance. This mainly depends on whether the same data is requested repeatedly or not:
• If you use Cubase VST more or less like a tape recorder, that is, mainly with long recordings that are generally used just once in the Song, choose the Virtual Tape Recorder option.
In this mode, Cubase VST does not rely heavily on file caching.• If you use Cubase VST more as an “assembly” tool, repeating the same material over and over, choose the Audio Sequencer option.
In this mode, Cubase VST relies heavily on file caching. For this to have a positive effect on performance, the same file(s) would be repeated over and over without large gaps between, like you would with a drum loop.
This option is related to audio recording. Normally you would leave this option on.
• When this is activated, as soon as an audio buffer has been “captured” by Cubase VST, it will be saved to disk.
• When this is deactivated, “captured” audio buffers may be passed on to the Windows system cache before they are saved to disk.
You should only deactivate this option if you have problems recording, related to your disk and driver. The problem with using the system cache is that if you have a lot of memory in your computer, and you have raised the system cache settings, a considerable amount of data might be stacked up before being saved to disk. This might create playback and recording problems, since saving large amounts of data to disk might block the system too long for the other processes to get all the time they need.
There are several options for how Cubase VST will handle monitoring (listening to the signal you are recording). These options are described in the Getting Started book.
ASIO Direct MonitoringWhen the option ASIO Direct Monitoring is activated, monitoring is handled by the actual audio hardware, that is, the monitored signal does not pass through Cubase VST. Instead, the ASIO driver for the audio hardware is instructed to send the audio from the monitored input directly back to a specified output, thus providing monitoring with very low latency.
P If this feature isn’t supported by your audio hardware or its ASIO driver, the option will be greyed out in the Audio System Setup dialog.• The monitored sound is sent to the output specified for the audio channel on the VST Channel Mixer’s Output pop-up menu.
Not all ASIO drivers may support this feature. Also, some ASIO drivers may not allow Direct Monitored audio and playback audio to be sent to the same Output, in which case you need to designate a separate output for monitoring.
• You can control the volume and pan of the monitored sound using the channel fader and pan control in the VST Channel Mixer.
Again, not all ASIO drivers may support this feature.
• ASIO Direct Monitoring follows the same rules as the internal VST monitoring. That is, if Tape Type monitoring is selected, Direct Monitoring will be activated for Record Enabled Tracks in Stop and Record modes. If Record Enable Type monitoring is selected, Direct Monitoring will be activated whenever a Track is Record Enabled in the Inspector.
• VST effects or EQ will not affect the Direct Monitored sound.If you experience that MIDI playback lags behind the audio, this could be because the MIDI response in your MIDI instrument is slightly slow. If this is the case, use this parameter to compensate.
• If Time Code is selected, the MIDI playback will always be in time with any external time code coming in. However, there is a risk that MIDI playback will not be in perfect sync with the audio. This happens because the audio card is not aware of fluctuations in the incoming time code and therefore can not adjust to them.
• Audio Clock is the preferred option when you are not using any external synchronization. If Audio Clock is selected, MIDI and audio playback will always be in perfect sync. However, there’s a risk they will both drift in relation to incoming time code.
Normally, after Cubase VST has established connection to the audio hardware, it starts sending a continuous stream of audio blocks to the audio hardware - even if audio playback isn’t activated. However, some audio drivers cannot handle hours and hours of continuous audio streams. The results are occasional audio glitches, “hiccups”, etc.
To remedy this problem, there is a checkbox called “Enable Audio only during Play”, in the Audio Setup - System dialog on the Options menu. When this is activated, Cubase VST stops transmitting audio blocks to the audio hardware as soon as playback is stopped. When playback starts again, communication with the audio hardware is re-opened (actually, this is the same as activating and deactivating “Disable Audio”, only it is done automatically).
By default, this checkbox is turned off, but if you are having problems with audio playback you should try activating it.P The “Enable Audio only during Play” switch has one drawback: since all audio transfers are stopped when the playback is stopped, any trailing reverb or delay ‘tails’ will be cut off.
When you run Cubase VST there are several processes fighting for access to processor time in your computer. This parameter allows you to determine which processes should have priority. Select an option depending on the character of your recordings:
Setting: LowIn this mode, audio precedes MIDI in priority. Normally, this should not affect the MIDI timing badly, but if you have very “busy” MIDI recordings, the timing may suffer somewhat.
This mode gives maximum priority to audio, which means that the MIDI timing may suffer and the user interface may seem more sluggish. Select this mode if you use a lot of audio Effects and EQ, and not much MIDI material.
This pop-up menu determines the resolution used for recording. The implications of recording with higher resolution than 16 bit are discussed in the chapter “Recording in High Resolution and Using TrueTape™”.
• This setting is a mirror of the Record Mode pop-up menu in the Arrange window.In the Audio Setup System dialog there is an item named “Panning Law”. Clicking on the arrow opens a pop-up, where you can select one of three Pan modes. These all relate to the fact that the power of the sum of the channels will drop by about 3 dB if a signal is panned hard left or right, compared to if the same signal is panned center.
To remedy this, the Panning Law setting allows you to attenuate signals panned center, by -6 or -3 dB (default). Selecting the 0 dB option effectively turns off “constant-power panning”. Experiment with the modes to see which fits best in a given situation.
Some of the settings in the System Setup dialog are saved automatically in the Cubase VST preferences, while others are saved with the Song, according to the table below.
• To have the settings saved with your Song, activate the “Save with Song” checkbox.Which settings are saved where is listed in the table below. To make sure that you always start out with the audio settings you know work well on your system, tailor your System settings once and for all, and save your Song as the def.all Song.
Setting
Audio Performance Settings Monitoring Switch
MIDI Sync Reference
Audio I/O Settings
MIDI To Audio Delay
Priority Setting
Bit Recording
Saved in
Song or Preferences Song or Preferences Song or Preferences Preferences
Preferences
Song or Preferences Song or Preferences