1. Select a MIDI Track for which SoundFont is selected as Patchname Source, and open the Inspector.
2. Click in the Bank field (not the pop-up arrow).
A pop-up menu appears, showing any currently loaded SoundFont Banks, plus an additional item called “Manage...”.
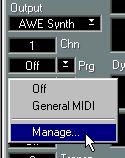 3. Select “Manage...”
The Bank Manager dialog appears.
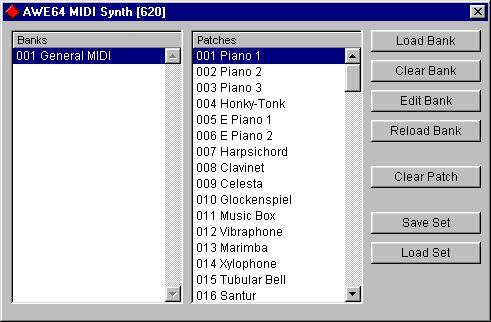
In the dialog, you will find the currently loaded Banks listed in the “Banks” column to the left. The right column shows the Patches included in the Bank selected in the “Banks” column.
The buttons to the right have the following functionality:
• Load Bank.
Click this to load a SoundFont Bank file (extension “.SF2”) into the RAM on your audio card, and make it possible to play the sounds in the Bank from Cubase VST. Note that the maximum number of SoundFont Banks that can be loaded at one time depends on the amount of RAM on your audio card.
• Clear Bank.
Removes the Bank you have selected in the “Banks” column. Use this to unload unwanted Banks from the RAM on your audio card.
• Edit Bank.
Click this button to open the selected Bank in a SoundFont editor (the application associated with .SF2 files on your computer).
Click this to reload the selected Bank, after you have edited it in another application.
• Clear Patch.
Removes the Patch selected in the “Patches” column from the SoundFont Bank.
• Save Set.
Allows you to save the current list of loaded Banks as a SoundFont Set file (extension “.SFS”).
• Load Set.
Allows you to locate and open a saved SoundFont Set file. When you load a Set, the memory on the audio card is cleared, and all currently loaded Banks are replaced by the Banks listed in the Set file.