It is possible to record Mutes and Solo, just like any regular MIDI data. Recording Mutes can be very handy, since it allows you to have automated Mutes happening at certain positions on playback, as an alternative to permanently deleting some music or other information on a Track. You can record Mutes in several ways:
• Record a single Mute-click in the Track list.
Instead of clicking on the Mute button, you can press [Alt]-[M] to mute the selected MIDI Track.
See the previous page.
• Record the fact that you activated the Solo function.
Solo is just a special case of Mute, where all but one Track are muted.
• Record Mutes using the MIDI Track Mixer.
With this method you can only mute MIDI and Drum Tracks. See the chapter “The MIDI Track
Mixer”.
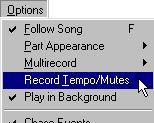
1. Activate the “Record Tempo/Mutes” option on the Options menu.
When this is ticked, recording of Mutes is possible. The option is also used for recording tempo changes, see page 554.
2. Select a MIDI Track to record the Mutes on.
You should not select a MIDI Track onto which you have recorded music. We strongly recommend you to use a separate Track for recording Mutes, to avoid confusion (see later in this chapter). You can then record all the different mute settings for any and all other Tracks on this single Track.
3. Activate recording at some point.
If you want to mute a Track from the beginning, put your Mute Events one or two ticks before the first notes, so that you are sure the first note also gets muted.
5. Keep on muting and un-muting Tracks for as long as you wish.
The Record mode switch (Overdub/Replace) applies, so that you can overwrite or add Mute and Un-mute Events as you wish.
• Muting silences all output from a Track, notes, Continuous Controllers, MIDI Mixer data, System Exclusive, everything - including the mute Events themselves! This means, that you should avoid recording mute Events for the very Track you are recording on.
An example might clarify this: Let’s say you are recording mutes on Track 1, and happen to record a mute Event followed by an un-mute Event, both for Track 1. When you play back the Track and the song position reaches the first Event, the Track will mute itself. The un-mute will never happen since the Track is muted for all output. This is why you should always record mutes on a separate mute-Track, and never record any mutes for that Track.
• A mute Track may of course be muted by another Track, which leads to the same confusion as above.• Mutes are chased (see page 122) if the Chase Events function on the Options menu is activated, but only within one Part. Make sure to end your Mute recording with the Track in the right status (muted or un-muted).
If you need to edit or delete your recorded Mute Events, this is done in List Edit. The Mute Events are shown just like any other Events, and are handled in the same way.