See Easy mode, above.
Volume
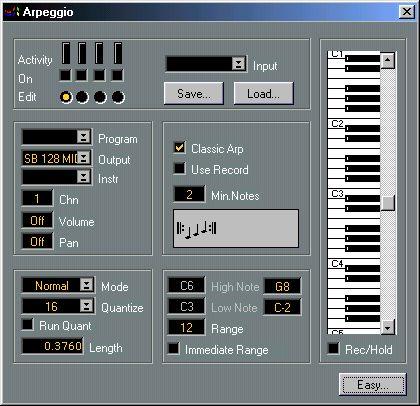
This is the volume value that will be used by the sound playing from the selected arpeggiator. This is exactly the same as setting a Volume in the Inspector.
Pan
This panning value will be used by the sound playing from the selected arpeggiator.
• When this box is checked the arpeggiator behaves as in Easy mode, which means it performs a classic arpeggio that plays the notes you press up and down repeatedly through the range set in the Range or High/Low note boxes.
• When the box is unchecked you can set the arpeggio characteristics in the “Sort Box” below.
With this function activated, the Arpeggiator uses the notes “recorded” in the Rec./ Hold section (the keyboard) as input to the arpeggiator, instead of real-time input from a MIDI keyboard or a track. To use it, follow the steps below:
1. Check the “Use Record” box.
2. Click the Rec./Hold button so that it gets highlighted.
3. Press the keys you want to record on your MIDI keyboard.
4. Click the Rec./Hold button again to deactivate it.
5. Play a key on your MIDI keyboard.
The arpeggiator will now play a transposed arpeggio based on the notes on the onscreen keyboard, beginning at the note you pressed on your MIDI keyboard.
1. Click the Rec./Hold button while you're still holding down the key on the MIDI keyboard.
2. Release the key on the MIDI keyboard and play the new chord.
3. Release the chord and click the Rec./Hold button to deactivate it.
4. Press a key on the MIDI keyboard to trigger the new chord.
When “Use Record” is unchecked, this parameter sets the minimum amount of keys that have to be pressed for the arpeggio to start.
The Sort Box
The Sort Box is a graphical description of the arpeggio. It becomes “greyed out” when Classic Arp is checked. The number of notes in the graph represent the number of different notes in the arpeggio. The pitches of the notes in the graph represent the relative pitch of each note in the arpeggio. The pitch range of the notes is C1 to A2 (treble clef), but please note that these are not absolute pitches, but relative ones. The actual pitches produced by the arpeggiator depends on which notes you play on your keyboard.
You can add, delete and move notes up/down with the mouse buttons. Clicking a note with the right mouse button will raise the pitch one “step”. The left button lowers the pitch until the lowest pitch is reached.
• Clicking with the left mouse button on a C1 (the lowest possible pitch) deletes that note and all following notes.• Clicking a note with the right mouse button while holding the [Alt] key will produce an arrow that changes the pitch one half tone. Repeated clicks will switch the arrow up/ down.
• [Alt]+left mouse button deletes the arrow.Mode
This pop-up menu sets the arpeggio mode.
Mode: Description:
Normal This is the normal up/down arpeggio.
Quantize
See Easy mode above.
Run quant
This function will quantize the arpeggio output to the song position, when Cubase is running. If you want the arpeggio to run “in sync” with Cubase, activate this.
Length
Sets the length (in ticks) of the output notes.
High/Low Note
This is only available when the Range switch is set to its lowest value – Off. It sets the maximum range of the arpeggio notes.
Range
When this is set to anything but Off, it determines the range to a number of notes starting with the lowest note you press on your MIDI keyboard. A setting of 12 gives you a range of one octave, counted upwards from the lowest note you press.
This corresponds to the Octave setting in Easy mode.Immediate Range
This function only works when Classic Arp is unchecked. When Immediate Range is checked the arpeggio immediately jumps to the nearest note inside the set range when a chord is pressed. If unchecked, the arpeggio will start at the pressed key and work itself into the set range and then stay there.
P If the arpeggio outputs are set to different MIDI channels, be sure to set the MIDI channel for the recorded track to “Any” if you want to keep the channel assignments when playing back.
1. Set the desired Tracks to output to “MROS”.
2. Set the arpeggiator Input to MROS.
3. Start Playback.