Examples
Let us show you some of the features of the IPS by going through a couple of examples that are contained in an “IPS” folder on one of your Cubase VST disks (copy the examples to your hard disk before using them).
Let us show you some of the features of the IPS by going through a couple of examples that are contained in the IPS directory in your Cubase directory.
1. Set your synths so that you have a piano sound on MIDI Channel 1, a bass sound (preferably synth type) on MIDI Channel 2 and some string or pad sound on the same MIDI Channel as the Active Track is sending out on.
This last sound is just used to directly play the notes you are pressing on your keyboard (or whatever playing device you use).
2. If you haven’t already done so, select Phrase Synth from the Panels menu. 3. Press the mouse over the word Functions at the top right corner of the window, and a pop-up menu appears. From this, select Load All Combis. 4. A file selector appears. Open the folder IPS and select “example.cmb” and click on OK.
5. Turn on the whole IPS by clicking on the Active button so that it turns dark.

The IPS activated
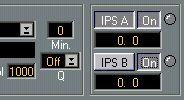
6. Make sure you see the settings of IPS A, by clicking on the IPS A button so that it too turns dark. Also make sure that the two On buttons beside the IPS A and IPS B buttons are active.
 Example 1
The IPS A settings are shown.
1. Position the Pointer over the Pop-up menu to the left of the word Combi in the Global module. Press the mouse and select “Example1” from the pop-up menu. 2. Activate Play on the Transport Bar.
3. Press one key on your keyboard. The string sound plays the note you press.
The piano sound plays a short riff, over and over again.
The interesting thing here is the bass part. It is actually also the riff, but the IPS modulates it so that it is turned into a new part, a part that is slightly different on each new lap! If you release the key and press a new one, the music will be transposed to the new key when the Phrase reaches the end of the lap.
4. Turn off the music by stopping Cubase VST (using [0] or [space bar]). Example 2
1. Select “Example2” from the Combi pop-up menu.
2. Click on the “IPS A” button so that it turns dark.
3. Activate Playback.
4. Play a key, you will hear the same piano part, but without the bass.
5. If you select the
Note Ramp Down icon in the LFO box in the Pitch module, the order of the Pitches in the Phrase will change.
 “Note Ramp Down” waveform
6. By clicking on the Freq field in the Pitch module you can set new frequency values for the “pitch order” LFO, and thereby change the output.
Values above 100 will make certain notes/chords repeat.
 The Pitch “Freq” setting
7. You have now re-arranged the order of the pitches in the original Phrase. To also rearrange the rhythm, select an LFO-type in the Rhythm module.
Experiment with different LFO types and Frequency values.
8. If you want the original settings back, just select “Example2” from the Combi menu. 9. Select different values in the Density (Dens) field in the Pitch module. Any value below 1000 (actually 100.0%) will make the IPS skip some notes altogether.
10.Switch off the Hold button in the Interpreter module.
You can now play the Phrase momentarily by playing and releasing a key, but if you hold the key, the music will keep repeating (Loop is still On). If you hold one key, and press another, this last key will be used to instantly transpose the Phrase (since the sortmode is Last Note, see an explanation of this later in the text).
11.Set the right key value in the MIDI Input module to C4.
Now, keys below C4 are used to control the IPS and keys above C4 are just sent through (Thru is On), so that you can add a solo to the IPS music.
Example 3
1. Select “Example3” from the Combi pop-up menu.
2. Activate Play on the Transport bar.
3. Play a key, you will hear a Schumann piece.
4. Adjust the tempo on the Transport bar if you like.
5. Stop the music by stopping Cubase VST, whenever you wish.
6. Select the Note Ramp Down LFO icon in the Pitch Module (see Example 1). The Freq setting of the Pitch LFO is 150% and this creates an interesting 3/4 feeling to the music by repeating some notes without actually changing the rhythm of the piece. The same goes if you set the Freq value to 75 (%) but then the effect is achieved by skipping some pitches.
7. Activate Scale correction by clicking on the Pitch button in the Pitch Module until ON is activated.
Now all notes are corrected to a blues scale in C, by transposing notes downwards to the closest note in that scale. Experiment by selecting different scale types from the pop-up menu and try different keys by setting the value in the box beside this.


