Routing Audio between VST and the DSP Factory
Audio routing with the DSP Factory is extremely flexible, allowing you to connect channels, aux sends and buses to various physical outputs and inputs. This is done in the special DSP Factory windows, as described on page 29. However, first you need to “connect” VST to the DSP Factory:
Activating Inputs
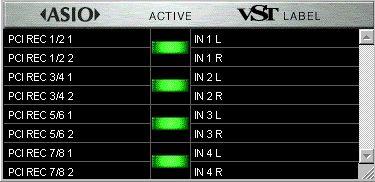
1. Pull down the Panels menu and select VST Inputs.
The VST Inputs window appears. There are four Input pairs for each installed DS2416 card.


 2. Activate the Input pairs by clicking on the green buttons in the Active column.
3. If you like, rename the eight inputs by clicking in the Label column and typing in new names.
The names you specify will be shown on the Input pop-up menus in VST.
4. Press [Return] to close the Inputs window.
You have now assigned Cubase VST to accept the digital signals from the DS2416 card as input sources.
Activating and Assigning Output Buses
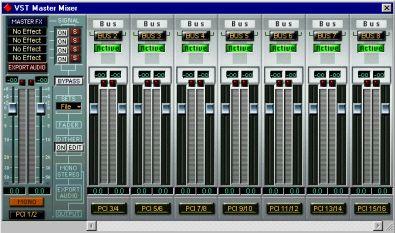
1. Pull down the Panels menu and select VST Master Mixer.
The VST Master window appears. In a single DS2416 card configuration, there are eight buses including the Master bus.
 2. Activate all buses by clicking on their Active buttons.
3. Pull down the pop-up menus at the bottom of each Bus channel strip and check that each bus is assigned to the desired DS2416 output.
To avoid confusion, we recommend that you keep the default order of the outputs, so that the Master bus is connected to the DS2416 PCI #1/2 output, the second Bus is connected to the DS2416 PCI #3/4 output, and so on.
P
These PCI outputs are not the physical outputs of the audio hardware, but rather “output lines” connecting VST to the DS2416. The actual routing to physical outputs is done in the DSP Factory windows, as described on page 31.
4. If you like, rename the buses by clicking in their name fields (above the Active buttons) and typing in new names.
These names will be shown on the Output pop-up menus in VST.
5. Press [Return] to close the Master window. Selecting Inputs and Outputs for the Audio Channels
This description assumes that you have set the number of audio channels so that it corresponds with the number of output bus channels (16 if you have one DS2416 card installed). It also assumes that you want each audio channel in VST assigned to a separate mixer channel strip in the DS2416 console. Of course, there are other possible routings (you may want to send a combination of audio channels to a Group or directly to the same DS2416 channel strip, you may want to reserve some DS2416 channels for use as effect sends, etc).
1. Open the VST Channel Mixer.
2. Select Inputs for the channels by pulling down the Input pop-up menus at the top of the channel strips.
There should be eight Inputs available for each installed DS2416 card (four stereo Input pairs). If Inputs are missing on the pop-up menu, make sure you have activated them in the VST Inputs window on the Panels menu.
3. Route each audio channel pair to a separate Output Bus, by using the pop-up menus at the bottom of the channel strips.
4. Pan the channels in each pair hard left/right, alternatingly.
Now, each audio channel is assigned to a separate channel strip in the DS2416 console.
Assigning Groups to the DS2416
You can assign the outputs of the Groups in the Group Mixer to the DS2416 buses in the same way as with the audio channels, by using the pop-up menus at the bottom of the Group Mixer strips.
• The normal setting would be to select the same Output Bus for the two sides, and then pan the sides hard left/hard right.
Assigning Effect Sends to the DS2416
By assigning VST Effect Sends to one of the Output Buses, you route the send to a channel strip in the DS2416 console. Note that this assignment is done individually for the effect sends of each audio channel (by using the pop-up menus below the send level knobs in the VST Channel Settings window). You can use this feature to address the on-board effects in the DS2416, to create several different monitor mixes during playback, etc.


