Day Two
Task one: Register your product with JVZoo
This one shouldn't take more than a couple minutes. Log into JVZoo and hit “Seller”, then scroll to “Seller's dashboard”.
![]()
Then Click “Add a product”.
![]()
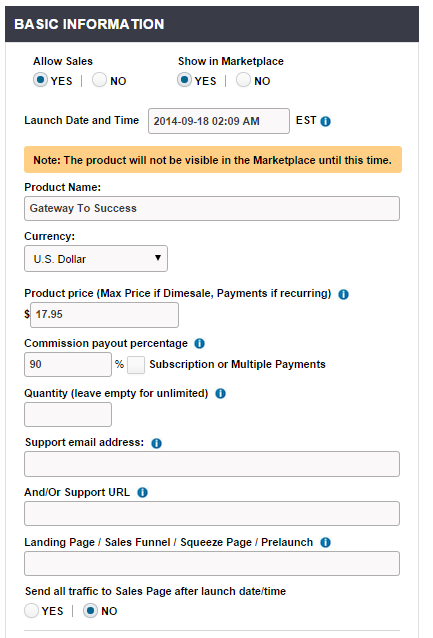
Now they will ask you for information about your product. In this case I will use the “Gateway To Success” readymade business I provided you with as an example:
-Allow Sales: Select “No”, as your sales page isn't ready yet.
-Show in Marketplace: Select “No”, as your product cannot be sold yet.
-Disregard Launch Date and Time for the time being.
-Product Name: In this case, “Gateway To Success”. If you rebranded the product, then input it's new name here.
-Currency: Always choose “US Dollars” unless you are targeting a very specific niche that doesn't have customers in the United Sates.
-Product Price: 17,95$ in this case.
-Commission: 70 percent. This is the percentage of the total price that affiliates will receive if they bring you a sale. So in this case they will earn 12,56$ per sale, and the rest will go to you. It may seems like a huge ammount to give away, but keep in mind that affiliates will bring you sales that you could not have made on your own, and that's always profit.
-Quantity: Leave empty -Support email address: Leave empty for now, as you will use an email address associated with your domain name. I'll show you how to create this email account later on.
Update: you actually need to enter an email address to save the product, so just enter whatever you want, as we will come back and edit this later on.
-Landing page/Sales Funnel/Squeeze Page/prelaunch: Disregard.
-Send all traffic to sales page after launch date/time: Doesn't matter what you choose here.
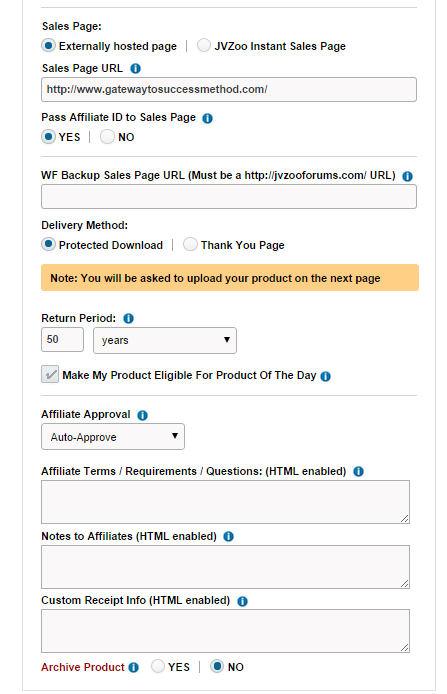
-Sales page: choose “externally hosted sales page”.This will be the website you bought hosting for.
-Under “Sales page URL” type the domain name you purchased IN FULL(including http:// and including the final /). For demonstration purposes in bought the domain name www.gatewaytosuccessmethod.com.
Don't forget to watch my video series to see me go through the whole proccess of what I'm explaining here.
-Pass affiliate ID to Sales Page: “Yes”
-WP Back Up Sales Page URL: Disregard. Keep your html files in a folder somewhere and that's the only back up you'll ever need.
-Delivery Method: Choose “Protected Download”. What this means is that whenever someone purchases your product, JVZoo will automatically send them an email containing a direct link to download your product, and you don't have to do anything.
-Return period: Basically for how long you are willing to refund unsatisfied customers. This is up to you, but most of the readymade businesses I gave you have a 60 days money back guarantee, so check the sales page. (I set 50 years because I offer lifetime refunds for this product).
-Affiliate Approval: “Auto-Approval”
-Archive this product: “No” .
On the right side, you will have to fill in more information.
-Payment Option: PayPal should be an option if you linked your PayPal account as explained previously. Click it.
-Description for Buyers: This one is not that important, as the product is already described in your sales page. You can copy what I wrote or you can come up with a short description yourselves.
-Primary Category: This ebook is about self-improvement, so I chose “Self-Improvement General”. There is a long list of options, so you shouldn't have a problem finding the option that best suits your product.
I personnaly don't bother with Optional Categories, but feel free to do as you see fit.
-Keywords: In this case I'm using keywords that appear on my sales page, and are very broad and general.
Basically, how could you describe your product in 5 words (or group of words) ?
-FB social discount: This is the ammount, in dollars, that buyers will be discounted if they share your product on Facebook. I don't exactly know how efficient this is or if it affects your sales in an important way, but I suggest you don't go over 2 dollars. I always go with one.

Then Click on “Save Product”.
![]()
Now JVZoo will ask you to upload your product. Don't get confused here, it means the ACTUAL product-so the ebook or video files-the digital product your clients pay for. In this case, I uploaded the ebook “Gateway To Success” in PDF format.
Task Two: Edit your sales page and add a JVZoo “buy now” button.
Now that the task above as been completed, you will have to edit your sales page before uploading it to the internet. The readymade sales page I provided you with don't have a button linking to your JVZoo product yet, and they don't have your name. To modify them, you can either:
-Modify the html code using your coding skills.
-If you don't know how to code you can use a visual html editor. A very good free one is PageBreeze. You can download it for free.
Once again, watch my videos for a clear understanding of the whole process and a live demonstration.
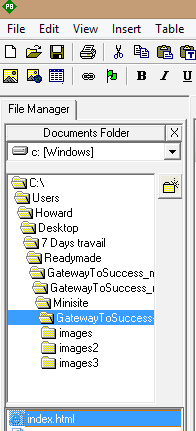
Once you have a visual html editor, open it and browse to your index.html folder that should be present in your reseller product package.
Now start making changes. Replace [FIRSTNAME LASTNAME] by your first and last name, and change the price if you want to.
Include your tesimonials in the appropriate places, and remove instructionnal text. Take your time with this, make sure you didn't miss anything, or else you will have to come back and make changes later on.
You can change whatever you want here so be creative !
Now that this is done, head to JVZoo and head to your Seller's Dashboard. Next to your product you should find a “buy buttons”option. Click it.
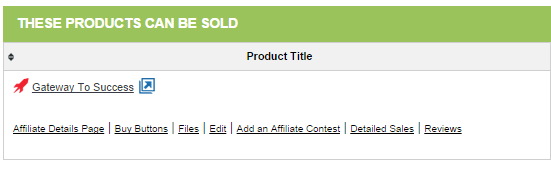
You will be taken to a page where you can find all sorts of order buttons with the price you entered for your product(so in my case 17,95$). Find one that looks nice enough and copy the code displayed below it.
Now head back to your HTML editor and head to the “HTML SOURCE” option (the html source code). Now paste the code for your new button in place of the old code for the example button. Depending on your reseller package, they may not be a code to replace.
Again, I demonstate everything in my videos so don't stress it.
Save changes to the html file and keep the name the same, it must remain “index.html”.
You're done for the day. I'm aware this last task can be a little tricky, but stick to it and you will do just fine. Good luck and see you tomorrow.