Lesson Plan
Objectives:
You will learn how to:
******************************************************************
Method:
The method I’m proposing – and one which I’ve been using myself – is to promote Pay Per Lead companies via Facebook ads.
You don’t need a blog, or website, or fan page to start doing this. All you do is send targeted prospects to the merchant’s website and once they fill out the appropriate form, you get paid. You can find these prospects most easily by using
Facebook ads.
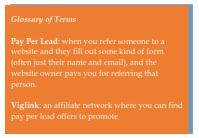
Step 1: Create your
Viglink account
Sign up at Viglink. This is the affiliate network that we’ll use because the sign-up process is quick and easy, and you don’t need a website to sign up, unlike Amazon Associates. Sign up here.
They’ll send you an email to confirm your account, so make sure you do that. After you confirm your account, you’ll need to fill in your personal info, then you’ll come to the “Install Viglink” screen. Don’t worry about this: you’ll be using “Viglink Anywhere” for this method. ( More on Viglink Anywhere in Step 3.)
Step 2: Choose a company to promote
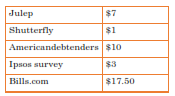
To save you time and effort, here’s a list of 10 Pay Per Lead companies that use Viglink for their referral program. You can choose to promote any one of them, or more than one if you wish. My advice is to stick to just one in the beginning until you learn the ropes.
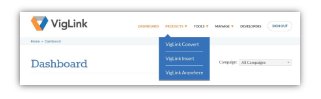
Use the Merchant Explorer ( see pic) to search for any of the following companies, then right-click and copy the website address.

I suggest starting with Wyzant or Gerber Life Insurance, but you can choose any one of them.
Step 3: Get your affiliate link
Once you’ve selected the company you want to promote, it’s time to get your affiliate link. Your affiliate link has special code that lets the merchant know that you referred the new lead, so that you get credited for your work.
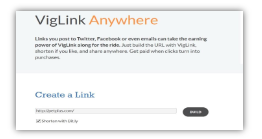
This is where Viglink Anywhere comes in. You get a link you can post practically anywhere: in a blog post, in a post on your Facebook timeline, as the destination link in your Facebook ad… Wherever you post your link and someone clicks on it and completes the required action, you get paid. Great, huh?
Open Viglink Anywhere.
Paste the website address you copied in the previous step into the ‘Create a Link’ field.
Check ‘Shorten with Bit.Ly’.
Click ‘Build’.
The resulting bit.ly link is your affiliate link.
Copy and paste your affiliate link to a Word document or Notepad. Save it because you will need it for the next step.
Step 4: Promote your link via Facebook ads
You will want to use Facebook ads to promote your link and get people to click on it. Facebook advertising is by far the quickest and cheapest way to find the people who would be interested in your offer. After all, with over 1.3 BILLION active users, who isn’t on Facebook these days?
This section will walk you through a simple Facebook ad set up which should convert well for you.
There are 10 steps to building an effective Facebook ad. These are:
1) Go to the Create Ads page;
2) Select the type of ad you want to create;
3) Select your images;
4) Add your text copy;
5) Select your ad placement;
6) Target your audience;
7) Fill out your account and campaign info;
8) Select your bidding preferences;
9) Place your order; and
10) Manage your ad
Let’s go through these steps one by one.
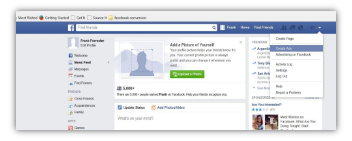
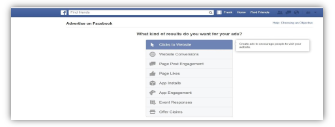
1. Go to Create Ads page: You can find this by clicking on the arrow in the top navigation menu. Select Create Ads from the dropdown menu.
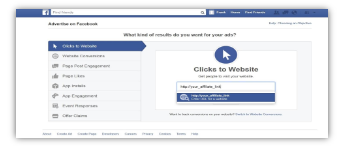
2. Select your ad type: On the Create Ad page, you will be asked to hoose from several types of ads. Since you are promoting Pay per Lead offers, you need to choose ‘Clicks to Website’ as your ad type.
You now need to add your affiliate link. Copy it from the Notepad or Word document where you saved it, and paste it in the space required.
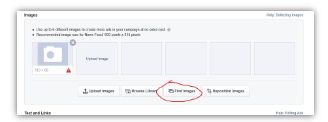
3. Choose your images: The pictures you choose are the second most important element of a successful ad. (The most important factor is your target audience.) Facebook is a very visual site: from your own experience on Facebook, I’m sure you know that pictures are hugely popular. So if you want your ad to capture your audience’s attention and make them click on it, you should choose your pictures very carefully.
Pictures that do well usually are:
Many ‘experts’ advocate using sexy ladies with big boobs to promote any ad. I will not deny that this works, but I have found that a cute picture can work just as well.
To keep things simple for the purposes of this ad, let’s just use the Find Images option on the Create Ad page.
Choose up to 6 pictures to create multiple ads. Creating several ads at once gives you a chance to test which is performing the best, and then you can ramp that one up for maximum profits.
Let’s say we choose to promote Gerber Life, we would be targeting parents of young children, so let’s choose images that relate to the joy of parenthood. The following picture is a good example:
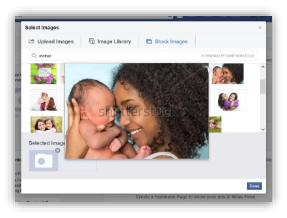
A mother holding her baby. What could be cuter?
Go ahead and pick 5 other cute pictures that you think would catch your audience’s attention.
4. Add your text copy: The words you use in your ad should briefly show your audience what you’re offering and tell them to act. A good rule of thumb is that your headline should be a question, and the rest of the ad should be the answer to the question.
For example:
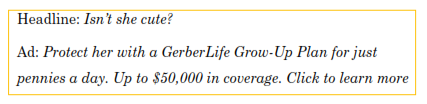
Short and to the point, and it tells the reader exactly how to respond. They have to click to learn more, which is exactly what you want them to do. When they go on to the Gerber Life page, they have to enter their contact details to get more information from the company. That’s all you want them to do, and you get your commission.
Use this example to write your own ad copy. Be sure to follow the word limit that Facebook sets, or your ad won’t be approved.
5. Select your ad placement: Where do you want your ad to show? Ads are placed in 3 places: the newsfeed or timeline on desktop computers, the newsfeed/timeline of mobile devices, and the right-hand sidebar on desktop. You can choose for your ad to appear on any one or all three areas.
Generally, newsfeed ads have higher response rates than sidebar ads. However, my best advice is to test all three.
The simplest way to do this is to create 3 versions of the same ad (same picture, copy, targeting) and then let each one run in a different place. After a day or two, you will clearly see which is performing best for your ad. At that point, turn off the other ads and let your winning ad run.
6. Target your audience: Without doubt this is the most important part of creating an ad that converts prospects into customers. You have to find the people who are most likely to take up your offer.
Luckily, Facebook makes this easy to do.
Using the Gerber example again, you have to target the United States because this offer is for US residents.
Naturally, you want parents of young children so your age selection would be 21 to about 40. Alternatively, you can target grandparents, who also are likely to buy insurance for their grandkids. Let’s stick with parents for now, though.
Open Facebook in another tab (don’t close the tab you’re using!) and use the search bar to look for pages or groups related to parenting. It’s likely that new parents would be interested in pages such as “Parents Magazine”, which has over 1 million likes.
You’re not done yet.
Now you need to use the following search terms to get a list of other pages related to parenting:
“Pages liked by people who like Parents Magazine”
Write down as many of the results as you can, at least 5.
Now go back to the Create Ad page tab and type in your results under Interests. Here’s a handy snapshot to give you some ideas:
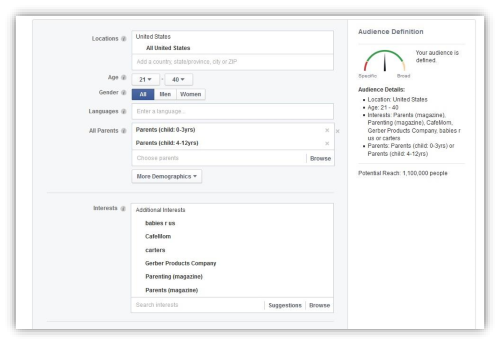
There’s a lot more to audience targeting, but this will tide you over for the time being. As you progress, you will learn more.
7. Fill out your campaign and account info: This is pretty self-explanatory. Just fill in the blanks with your details, give your ad set a name and set your daily budget.
8. Bidding preferences: At this stage, I advise you to let Facebook do its thing and automatically bid for you. See the pic below
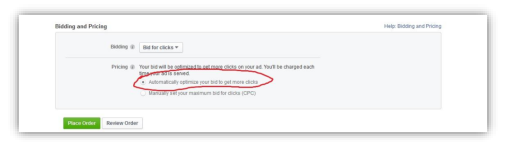
9. Place your order: Self-explanatory. Click the green button to send your ad for review and approval. This may take up to a few hours or even a day. You will receive a notification and email when your ad is approved.
The only remaining step is to:
10. Manage your ad: Once your ad is approved, let it run for about 24 hours before you make any changes. Don’t be alarmed if you see high ‘cost per click’ prices at first. This usually goes way down the more impressions and clicks your ad gets.
You can make changes to your ad simply by clicking on the pencil icon next to each item in the Ad Manager. You can also see important statistics and get full reports.
To find the Ad Manager, look on the left hand sidebar of your Facebook home page. The link is usually right in your Favorites list. If not, simply do a search for ‘Ad Manager’ and you’ll find it.
Step 5: Track your results
The best part about using Facebook ads and Viglink together is that you can see your results in real time. Your Facebook Ad Manager gives you stats about how many people saw your ad, how many clicked on your ad, and you see how much you spent per click. Your Viglink dashboard tells you how many of the people you sent to the merchant’s site took action and how much money you made as a result.
So you can see in real time what’s working in your campaign and what you need to change. If something is working, do more of it. If it’s not working, try something else.
Step 6: Optimize
If a campaign is proving successful, scale it up by increasing your daily ad budget a few dollars at a time. If on the other hand, your campaign is not making any revenue for you, please pause it and either refine your ad, or try another company if your refinements don’t make any difference.
Being successful here is a matter of testing multiple ads and then systematically dropping those that are not performing in favour of those that are doing well.
Facebook allows you to pause your ad at any time while it is active. After letting your ads run for 24 hours, you should be able to tell which ad is converting the best. The following screenshot is of an ad set that has been active for just a few hours. Already you can see that one of them is clearly outperforming the others.
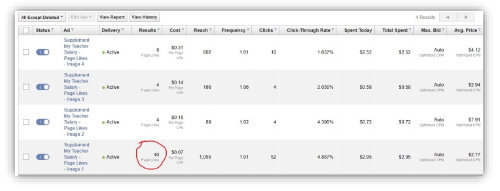
My advice is to pause the ads that are performing the worst so that your best-performing ads have more of the budget to run. To pause, toggle the button next to the ad name (under the heading ‘status’).
If you’re not getting any clicks or impressions (people are not seeing your ad) you should change your picture. If that doesn’t make a difference after 6 hours or so, change your ad copy. No difference? Increase your daily budget. No difference? Adjust your targeting.
If you make all the above edits and you’re still not getting clicks, you should abandon that campaign and choose another company to promote.
Once you get the hang of it and start making money, you can run ads for several companies at once.
Always remember: your cost per conversion (i.e. how much it cost you to get a lead who took the required action) should NEVER exceed the commission you’re receiving from the company. For example, if you’re promoting 21st Century Insurance which pays $6 per lead, your cost per conversion should be $3 max. You’re in this to make a profit, after all.
Summary
Don’t you agree that this method is quick and easy to implement?
Told you so.
Now get started, and let me know how it’s working for you.
***********************
In the course of implementing this strategy, you will have questions.
Feel free to drop me a message on the Facebook page and I will get back to you as soon as I can.
This is by no means an exhaustive study of Viglink or Facebook ads. There is much more to learn. However, you should be able to make a running start with the information I’ve provided here.
If you need one-on-one help setting up this strategy, I’m available.
Schedule a FREE 30-minute consulting call with me and I’ll walk you through set up. I can also help you tweak and optimize your ad to get the most conversions.
*******************************
If this guide has been of value to you, please share using the buttons below.

I also invite you to like my Facebook page, Supplement My Teacher Salary, where I share strategies to make extra money. If you’re serious about using the internet to supplement your income, this is the place to be.
Click here to join.