This tutorial we’ll be setting up our development environment, and creating a basic GLES3 app. It won’t do much; just open a window and clear it to black. The goal is simply to get something basic working.
To write GLES3 + SDL2 apps we need a suitable development environment (dev-environment) that allows us to write code and compile it. There are two parts to this. First, we need to install the code editor and compiler. Second, most dev-environments don’t come with GLES3 and SDL2 support out of the box. Their dev-files need to be installed before we can use them.
NOTE: This tutorial currently only covers using Visual Studio on Windows. Don’t worry about developing for mobile devices yet; just get the basics working on your desktop computers. If you’re using MacOS X or some other platform then search the internet for how you set up a compiler (e.g., here’s one for SDL2 on MacOS X: http://lazyfoo.net/tutorials/SDL/01_hello_SDL/mac/index.php).
Microsoft provide a comprehensive dev-environment called Visual Studio. So download that now from: https://www.visualstudio.com/downloads/
IMPORTANT: Download the free Visual Studio Community edition. The free version provides all that you need.
Start the Visual Studio installer, and select the “Custom,” (Figure 1).
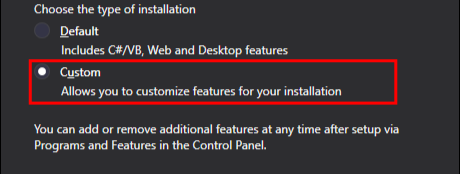
Figure 1: Choose the custom installation type.

Figure 1: Choose the custom installation type.
Click the “Next” button. Next, make sure that you’re installing Visual C++ (see Figure 2).

Figure 2: Select the features to install.

Figure 2: Select the features to install.
With this done, click “Next,” then “Install,” and wait for the installer to complete.
On Windows you need two sets of dev-files:
The setup process is currently rather tedious, so I’ve created a template that does it all for you. Download the template from: https://keasigmadelta.com/assets/GLTutorials/GLES3SDL2-Application.zip
To install the template, copy the downloaded file to: “<My Documents folder>\Visual Studio 2015\Templates\ProjectTemplates\Visual C++ Project” (see Figure 3).

Figure 3: The template is installed by copying it to the project templates folder.
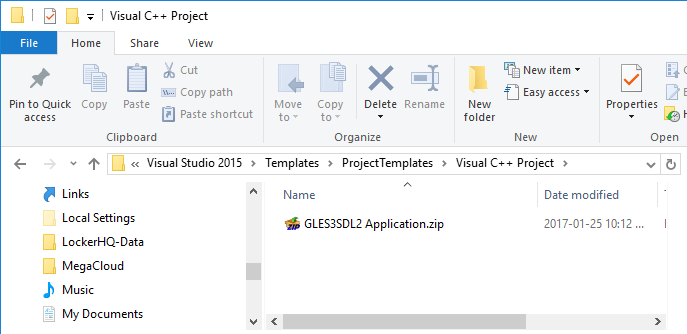
Figure 3: The template is installed by copying it to the project templates folder.
Now we can create our project. In Visual Studio, select File => New => Project from the menu. Select the “GLES3SDL2 Application” template, and call the project something like “GLTutorial1” (Figure 4). After clicking “OK” it’ll create the new project.
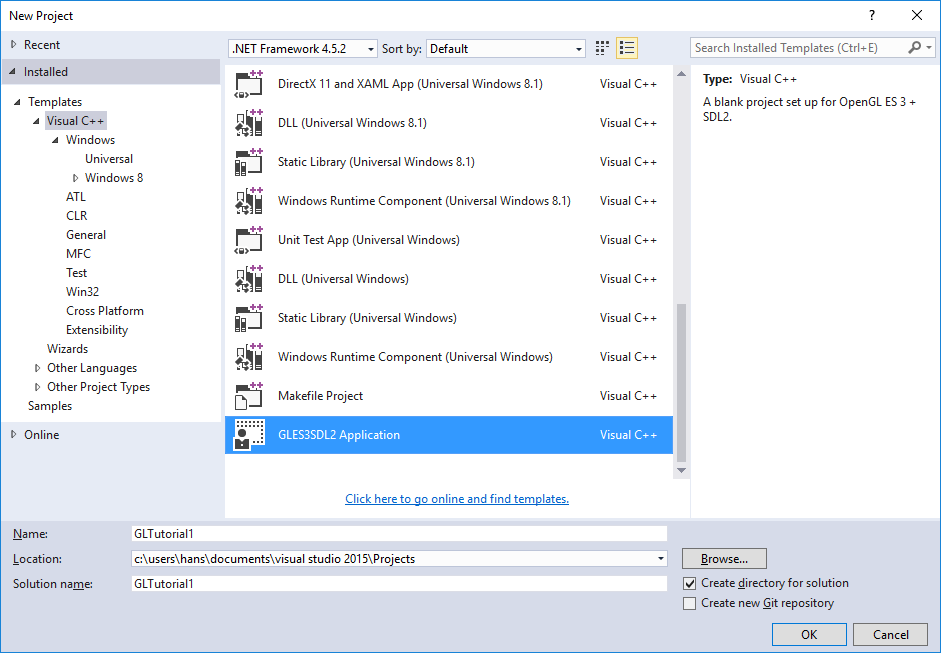
Figure 4: Create a new project using the GLES2SDL2 Application template.

Figure 4: Create a new project using the GLES2SDL2 Application template.
Next, right-click on the new “GLTutorial1” project in the Solution Explorer (on the left) and select build. With the first build it’ll set up SDL2 and Angle within the project. The Angle files are in a self-extracting archive. It’ll pop up a window asking you where to put it (Figure 5). Simply click the Extract button.

Figure 5: Click Extract to unpack the Angle files.
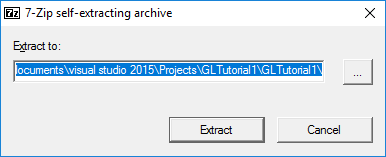
Figure 5: Click Extract to unpack the Angle files.
NOTE: Visual Studio’s editor may claim it can’t find “SDL.h” despite having installed the SDL2 package during the initial build. Simply close and reopen the project/solution (File => Close Solution, followed by File => Recent Projects and Solutions => GLTutorial1.sln).
Right! Let’s get into actual coding, and write our first GLES3 + SDL program. In the solution explorer (left column), open Main.cpp. You’ll find it under GLTutorial1 => Source Files. Delete the existing code, and start writing.
IMPORTANT: As mentioned in the How to Get the Most Out of These Tutorials section (on page 6), it’s highly recommended that you type out the code by hand instead of copying and pasting. You’ll learn/remember more if you do it that way.
We’ll start by including the header files for libraries we’re using (SDL2 & OpenGL). Here’s the code:
// Basic OpenGL ES 3 + SDL2 template code
#include <SDL.h>
#include <SDL_opengles2.h>
#include <GLES3/gl3.h>
#include <cstdio>
#include <cstdlib>
Next, comes a few constants for the window’s dimensions:
const unsigned int DISP_WIDTH = 640;
const unsigned int DISP_HEIGHT = 480;
Its time to set up SDL and create a window with an OpenGL ES 3 context. This is the start of your program. With SDL, the main entry point is SDL_main(). This is optional, but worth using because it hides the difference between main() & WinMain() (or whatever special main entry point an OS may have). Anyway, SDL is initialized as follows (put this directly below the headers and definitions):
int SDL_main(int argc, char *args[]) {
// The window
SDL_Window *window = NULL;
// The OpenGL context
SDL_GLContext context = NULL;
// Init SDL
if (SDL_Init(SDL_INIT_VIDEO) < 0) {
SDL_Log("SDL could not initialize! SDL_Error: %s\n", SDL_GetError());
return EXIT_FAILURE;
}
// Setup the exit hook
atexit(SDL_Quit);
Notice that we’re only initializing SDL’s video subsystem in the SDL_Init() call:
if (SDL_Init(SDL_INIT_VIDEO) < 0) {
SDL has other sub-systems such as audio and joystick input, but we’re not using any of them.
Next, we request OpenGL ES 3.0, and double-buffering:
// Request OpenGL ES 3.0
SDL_GL_SetAttribute(SDL_GL_CONTEXT_PROFILE_MASK, SDL_GL_CONTEXT_PROFILE_ES);
SDL_GL_SetAttribute(SDL_GL_CONTEXT_MAJOR_VERSION, 3);
SDL_GL_SetAttribute(SDL_GL_CONTEXT_MINOR_VERSION, 0);
// Want double-buffering
SDL_GL_SetAttribute(SDL_GL_DOUBLEBUFFER, 1);
Double-buffering is a technique whereby we render to an invisible back-buffer and then flip the buffers round to show it. Rendering directly to the screen runs the risk that partially rendered images are shown. We definitely don’t want that because it’s ugly.
With base initialization done, we can now open the window and set up the OpenGL context:
// Create the window
window = SDL_CreateWindow("GLES3+SDL2 Tutorial", SDL_WINDOWPOS_UNDEFINED,
SDL_WINDOWPOS_UNDEFINED, DISP_WIDTH, DISP_HEIGHT,
SDL_WINDOW_OPENGL | SDL_WINDOW_SHOWN);
if (!window) {
SDL_ShowSimpleMessageBox(SDL_MESSAGEBOX_ERROR, "Error",
"Couldn't create the main window.", NULL);
return EXIT_FAILURE;
}
context = SDL_GL_CreateContext(window);
if (!context) {
SDL_ShowSimpleMessageBox(SDL_MESSAGEBOX_ERROR, "Error",
"Couldn't create an OpenGL context.", NULL);
return EXIT_FAILURE;
}
The code above has two steps; create the window (SDL_CreateWindow()), and create the OpenGL context (SDL_GL_CreateContext()). Everything else is error handling. If you wish to use OpenGL then it’s very important to pass SDL_CreateWindow() the SDL_WINDOW_OPENGL flag. Otherwise the SDL_GL_CreateContext() call will fail.
Yes, it’s finally time to draw something! Okay, all we’re going to do this tutorial is clear the screen, but it’ll still be an OpenGL draw operation nonetheless. Clearing to black is done as follows:
// Clear to black
glClearColor(0.0f, 0.0f, 0.0f, 1.0f);
glClear(GL_COLOR_BUFFER_BIT);
// Update the window
SDL_GL_SwapWindow(window);
GL_COLOR_BUFFER_BIT tells glClear() to only clear the screen/image (a.k.a., colour buffer). A context may also have depth/z and stencil buffers, and you may wish to clear one or more of them. The clear colour is, unsurprisingly, set by glClearColor(). Finally, SDL_GL_SwapWindow() swaps the buffers so that our new image is displayed. We enabled double-buffering (by passing SDL_GL_DOUBLEBUFFER to SDL_GL_SetAttribute()) so rendering is performed on an invisible back buffer. So the front and back buffers need to be swapped.
Normally a “real” OpenGL program would have a main loop that does things like respond to events and render animated graphics. Since this is a really basic program, all that’s needed is to wait for the user to click the window’s close button. SDL makes this relatively easy with its event handling functions:
// Wait for the user to quit
bool quit = false;
while (!quit) {
SDL_Event event;
if (SDL_WaitEvent(&event) != 0) {
if (event.type == SDL_QUIT) {
// User wants to quit
quit = true;
}
}
}
return EXIT_SUCCESS;
}
SDL_WaitEvent() stops the program until an event comes in. If the incoming event is an SDL_QUIT, then the code above exits the while loop, and quits.
Putting it all together, Main.cpp is:
// Basic OpenGL ES 3 + SDL2 template code
#include <SDL.h>
#include <SDL_opengles2.h>
#include <GLES3/gl3.h>
#include <cstdio>
#include <cstdlib>
const unsigned int DISP_WIDTH = 640;
const unsigned int DISP_HEIGHT = 480;
int SDL_main(int argc, char *args[]) {
// The window
SDL_Window *window = NULL;
// The OpenGL context
SDL_GLContext context = NULL;
// Init SDL
if (SDL_Init(SDL_INIT_VIDEO) < 0) {
fprintf(stderr, "SDL could not initialize! SDL_Error: %s\n", SDL_GetError());
return 10;
}
// Setup the exit hook
atexit(SDL_Quit);
// Request OpenGL ES 3.0
SDL_GL_SetAttribute(SDL_GL_CONTEXT_PROFILE_MASK, SDL_GL_CONTEXT_PROFILE_ES);
SDL_GL_SetAttribute(SDL_GL_CONTEXT_MAJOR_VERSION, 3);
SDL_GL_SetAttribute(SDL_GL_CONTEXT_MINOR_VERSION, 0);
// Want double-buffering
SDL_GL_SetAttribute(SDL_GL_DOUBLEBUFFER, 1);
// Create the window
window = SDL_CreateWindow("GLES3+SDL2 Tutorial", SDL_WINDOWPOS_UNDEFINED,
SDL_WINDOWPOS_UNDEFINED, DISP_WIDTH, DISP_HEIGHT,
SDL_WINDOW_OPENGL | SDL_WINDOW_SHOWN);
if (!