What are Power Apps?
Power Apps is a technology from Microsoft that allows you to create apps that run in a browser on mobile devices such as a smartphone or tablet. You can also create browser-based applications for laptop and desktop devices. It is possible to create rich forms, workflows, and custom mobile apps to meet your business needs as well as streamline processes.
It was billed as a replacement for InfoPath but has now been taken up for mobile development by organisations globally. Some may find it to be an online version of Microsoft Access, but there is little similarity. That said, you can use Power Apps to replace certain Access systems.
Power Apps allows you to create apps in hours—not months—and these apps will easily connect to data sources. You will be able to use Excel-like expressions to add logic. The apps you create will run on the web, iOS, and Android devices. They are suitable for any device that has a browser such as iPhones or Android phones, tablets, etc.
Power Apps is not without its faults. There are many improvements that could be made and thankfully Microsoft are listening and continually improving the product. It would be nice if apps could be shared with the outside world for example and not just within users of the organization using Office 365. To be able to create, sell and distribute apps would be another nice feature. When you create an app in MS Access, it can be copied and passed to different users anywhere who happen to be running MS Office. Unfortunately, at the time of writing this is not the case with Power Apps. Hopefully this will be addressed at some point.
Create apps in a variety of ways
Apps can be created in a variety of ways, although it comes down to simple apps that require little to no coding or more sophisticated apps that require code to be used. The simple templates are never enough. There is always a need to go beyond the auto generated apps.
A simple forms-based app can be created very quickly. Simply connect your data source and generate the app based on this. A simple app enabling you to add, edit, delete and update data is generated by Power Apps, ready to be used on a mobile device. The controls such as text boxes, combo boxes, labels, buttons etc are automatically added to the screen along with the mechanism for saving data.
For a beginner it is a good starting point. Taking the app apart and looking under the hood at each part will teach you a lot.
You can also create a non-forms application. This is where you manually create the screens for your app. A good understanding of coding with Power Apps is needed here as you will need to do a little more than the simple save command that is used in auto generated form applications.
Data sources
Power Apps allows you to connect to many data sources. Some examples are SharePoint, SQL Server, Excel. You can even connect to DropBox, Google Drive or a variety of data sources you may never have heard of. It is possible to create your own data source also.
How can you get Power Apps?
Power Apps is part of Office 365. Microsoft offers various subscription packages and your organisation is sure to find something that meets their needs. It is possible for an individual to purchase an Office 365 subscription also. When you sign up to Office 365, you will gain access to a multitude of applications including Power Apps, SharePoint Online and Flow.
Does Power Apps work with SharePoint?
Yes, it does, brilliantly. Create lists in SharePoint to hold your data and within Power Apps you can easily connect to the list. You can then use your app on your mobile device to add, update or remove records from your SharePoint list.
If you prefer to work with a database such as SQL Server, it is possible to do this. You can easily connect to cloud-based SQL AZURE or on premises SQL Server by using what is known as a Gateway.
Excel as a data source
You can also use Excel as a data source. For many people who are getting started with Power Apps, this may be the easiest route.

How good is Power Apps performance?
From experience I can say that Power Apps is fast. Much of course depends on having access to a good internet connection. As internet speeds improve with 5G and beyond, the performance of Power Apps will get even better. Writing or amending records to a data source is generally pretty fast I find.
Some find a finished Power Apps application can be slow upon start-up. This is somewhat true, but it depends on what you find acceptable. There is an option to run commands on start-up, which can slow things down, depending on what is going on.
What kind of apps can I create with Power Apps?
Power Apps is versatile enough to allow us to create apps for a variety of uses.
For example, here are just a few possibilities
- booking room
- Inventory check
- timesheet
- event registration
- barcode scanner-based app
- booking system
You can choose to create an app for a variety of devices
Because Power Apps is internet based, there is no need to install a version of the app on each user’s device. You create the one app, which is hosted on Microsoft’s Office 365 cloud and then you grant each user access to the app.
Creating apps
When creating a Power Apps project, you can choose to have it automatically generated based on the fields in your data source. Alternatively, you can choose to build it yourself from scratch. This is my preferred option as I feel it gives me more control over things.
For example, in a SharePoint list there is an option for creating a Power Apps project.

To create an app from scratch, you would go to the Power Apps interface and select the ‘Canvas app from blank’ option.

Inside the Power Apps project, you can add new screens and add the controls such as forms, text boxes, combo boxes etc.

If you add a form to your screen, you will be able to connect the form to a data source. This will then automatically pull in the fields from your data source. A form sits on a screen and is basically a placeholder for controls such as text boxes, labels etc.

Does it remind you of Microsoft Access?
The advantage of a form is that the complexities of saving a record is taken care of behind the scenes. You only need to execute one command - SubmitForm(FormName).
The other way is to avoid using a form and to drag on the controls and then bind them to a data source by using code. This is slightly more complex, but gives you greater control. To save the data back to the data source, you would write code and use a command called ‘Patch’.
To use the Patch command, you would add in something like the following:
Patch(NameOfDataSource,
Defaults(NameOfDataSource),
{
Title:txtPreName.Text,
DateOfBirth :dtpPreDOB.SelectedDate,
Address1:txtPreAddress1.Text,
Town:txtPreTown.Text,
City:txtPreCity.Text,
As you can see, it looks a little more complex than using a single command to save, but in actual fact it is fairly easy once you get the hang of it.
Power Apps controls
If you have used Microsoft Access, you are probably familiar with the variety of controls in that application. In Power Apps it is quite similar.

The menu bar at the top of the Power Apps interface lists the controls you can expect to use when creating your application.
You have the usual array of text boxes, labels, combo boxes, date pickers etc available for adding to your screens.


You can also add grids to hold multiple records.

If charting is your thing then Power Apps has you covered here also.

Here is an example of using a Power Apps gallery control. This is essentially a grid which allows you to display multiple records. Galleries are pretty flexible and quite easy to use.

Creating a menu is easy in Power Apps.

Adding greater logic to Power Apps projects
Power Apps uses Excel like functions and as such there is no official programming language. That said, if more sophisticated logic is needed then another Office 365 product can be used – Flow or Power Automate as it is now called.
This allows you to create what looks like a flow diagram that holds logic such as setting variables, loops etc. You can pass parameters to it from Power Apps and also get the results passed back to your application.

Publishing the app
Once you have created your masterpiece, it is time to share it to others in your organisation. That’s easy enough to do in Power Apps and is as simple as clicking on the ‘Publish’ button. You will be given the option to select users that you want to share the app with.

You can then use the app on your chosen device.

Let’s create an example app
I’m going to now demonstrate how easy it is to create an app. I will be using Excel as the data source.
I’ve created a simple Excel document of employee details.

Modify the data source
In order for Power Apps to work with Excel data, the data will need to be presented in table format.
To do that you would need to go to the ‘Insert’ option and select ‘Table’.
Then highlight all the cells in the spreadsheet.

Then go to the ‘Design’ tab and under the properties section, give the table a name. Here I have taken the default name of Table1.

Put the data source online
Now close the spreadsheet and drag the file to your OneDrive.

When working with Excel files, Power Apps will access them online from OneDrive or OneDrive for Business.
Launching Power Apps
Go the Power Apps home screen.
The quickest way to create an app would be to select the ‘Excel Online’ option.

It will then ask you to select a connection. Because I saved my document on OneDrive, I will be selecting OneDrive as the connector.

The OneDrive files will be shown. I would select ‘Employees’.
It will then ask to select a table. Recall I named my table ‘Table1’.

Then click the ‘Connect’ button at the bottom right.

Power Apps will then start to create the app.

When done the screen will look as follows:

Three screens have been automatically created. You will see them on the lefthand side in the tree view.

Run the app by clicking on the preview button at the top right of the screen.


At the top there are icons for refreshing the screen, sorting the records and also to add a brand-new record.

Clicking on the arrowheads will take you to the record details. So, if I click on ‘Kathy Jones’ I will see…

At the top right there are icons for deleting a record or editing it.
As you can see, I did not have to write any code at all to delete or update a record.
Click on the pencil icon and you will be able to edit the record.
In edit mode, a tick icon will display. Click it when you have updated the record.
Here I changed the name from Kathy Jones to Kathy Mary Jones.

Now if I open the Excel document that I used as the data source; it shows that the first name has become Kathy Mary. Power Apps has saved our changes successfully back to the data source.


To add a brand-new record, simply click the plus symbol.
In this particular example the fields are in the wrong order, but that can be easily changed. Normally I would have the name at the top. For now, I have added a new record for Wendy Watson and saved it.

And as you can see from the front screen, Wendy Watson has been added.

If I check the back-end Excel data source I can see that Wendy Watson has been

By going into edit mode you can make changes to the app screens.
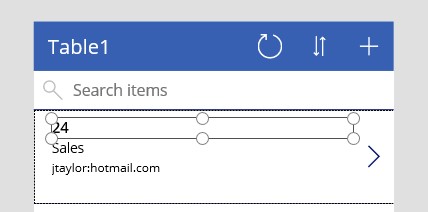
For example, I don’t like having the age showing on the home screen. Click on the item and press the delete key to remove it.

In this app, forms are used and each form contains what are known as cards. A card holds the data field.
Click on the screen so that it becomes selected around the edges.
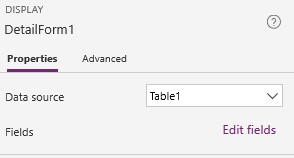
On the right-hand side, click on the properties tab and then click on the ‘Edit fields’ option.

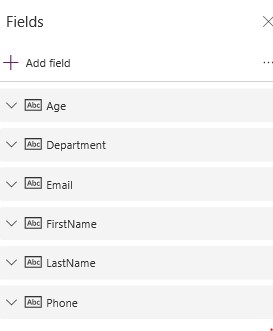
This brings up the fields used on the screen.

Using your mouse, press on a field name and hold down the mouse. Then drag the field names to where you prefer them to be. This will get reflected on the screen.
Saving the app
Click on the ‘File’ option on the menu and then select ‘Save’.
Click on the save to the cloud option and give the app a name.

At the bottom right of the screen, click the ‘Save’ button.


