Text Coding
Now, on the nitty-gritty of handling the text formatting options you have with HTML/ XHTML. While we have looked at the basic tags, let's get into more detail and see how coding text content works.
Body Section Heading Elements
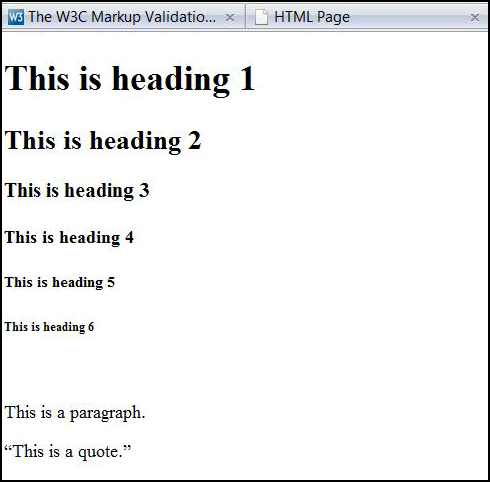
The six heading elements, H1 through H6, represent section headings. Although the order and occurrence of headings is not constrained by the HTML DTD, documents should not skip levels (for example, from H1 to H3), as converting such documents to other representations is often problematic.
The headings default to a bold version of whatever the default font of a visitor's computer is, usually Times or related serif.
H1: Bold, very-large font (approximately 24pt), centered, block-level. One or two blank lines above and below. Good for website identifier title in the banner segment.
<h1>I am Heading 1.</h1>
H2: Bold, large font (approximately 18pt), flush-left, block-level. One or two blank lines above and below. Good large subhead for web page identifier title in the body segment.
<h2>I am Heading 2.</h2>
H3: Italic, large font (approximately 14pt, slightly indented from the left margin, block- level. One or two blank lines above and below. Good smaller subhead for web page sub- section headings in the banner segment.
<h3>I am Heading 3.</h3>
H4: Bold, normal font (approximately 12pt), indented more than <h3>, block-level. One blank line above and below. Good smaller subhead for web page subsection headings in the banner segment.
<h4>I am Heading 4.</h4>
H5: Italic, normal font (approximately 10pt), indented as <h4>, block-level. One blank line above. Good for small font uses, like image captions, footer address info, etc.
<h5>I am Heading 5.</h5>
H6: Bold, small font (approximately 8pt), indented same as normal text, more than <h5>, block-level. One blank line above. Good for small font uses, like image captions, footer address info, etc.
<h6>I am Heading 6.</h6>
These headings were created to separate blocks of information – headings and subheadings in report-style formatting.
Body Section Basic Texts
Paragraph
The <p> element indicates a paragraph, block-level. The exact indentation, leading space, etc. of a paragraph is not specified in the default use and may be a function of other tags, style sheets, etc. Typically, paragraphs are surrounded by a vertical space of one line or half a line.
<p>I am a paragraph.</p>
Bold and Italics
These two inline tags allow you to add emphasis to text, and must be used inside a text element like one of the headings or paragraph. There is no longer an underline tag, so that is one form of emphasis you may not use;
<p>I am a sentence with <strong>bold</strong> and <em>italic </em> text in it.
<h2 I am an already default bold header with <em>italics</em> in it.</h2>
Blockquote
The block-level <blockquote> element is used for text quoted from another source. A typical rendering might be a slight extra left and right indent, and/or italic font. The <block- quote> typically provides space above and below the quote. A block of quoted text should normally be preceded by some introductory text that makes it clear that a quotation follows. It should be followed by an attribution of some kind, preferably with an exact citation of the source preceded by an expression like “Source:”
<blockquote>I am text that is indented on the right and left, but I am not the right tag for this purpose.</blockquote>
An accurate use of blockquote, with the proper use of the cite:
<blockquote cite=”URL”>
The actual quotation.
</blockquote>
<p>Source:<cite><a href=”URL” title=”title of information:>Title</a></ cite>.</p>
Quote
The block-level <q> element is what you want to use if you just plan to indent with plain HTML tags. Unfortunately, it has not been supported in Internet Explorer, which is why the <blockquote> started being commonly used for indenting instead.
<q>I am text that is indented on the right and left and look like a blockquote, but I can be used for this purpose.</q>
Pre
The block-level <pre> element represents a character cell block of text and is suitable for text that is being formatted for a monospaced font. The <pre> tag may be used with the optional width attribute. The width attribute specifies the maximum number of characters for a line and allows the HTML visitor agent to select a suitable font and indentation.
Within preformatted text:
• Line breaks within the text are rendered as a move to the beginning of the next line.
• Elements that define paragraph formatting (headings, address, etc.) must not be used.
<pre>I am preformatted text and pretty much look like the Courier font. </ pre>
Address
The block-level <address> element contains such information as address, signature and authorship, often at the beginning or end of the body of a document. Typically, it is rendered in an italic typeface and may appear indented.
<address>
Studiobast<br />
<a href=”mailto:us@studiobast.com”>Email us</a><br />
Address: Box 123, Seattle<br />
Phone: 1-555-1234
</address>
Text Spacing
You have simple ways you can space text, like sentences more than one space apart from each other, and paragraphs more than one line away from each other.
Single Space
There is no tag for adding space; instead, HTML allows you to add an invisible space character:
<p> I am the first sentence. I am the second sentence. </p>
Break
The inline <br /> element specifies a line break between strings of data which will drop data after it onto the next line. For example:
<p>I am a paragraph with some text on this line and <br />
Some text on the next line. However, all of me is a block element because I
am a paragraph. </p>
Horizontal Rule
The block-level <hr /> element is a divider between sections of text; typically a full width horizontal line or equivalent graphic.
Body Section Text Lists
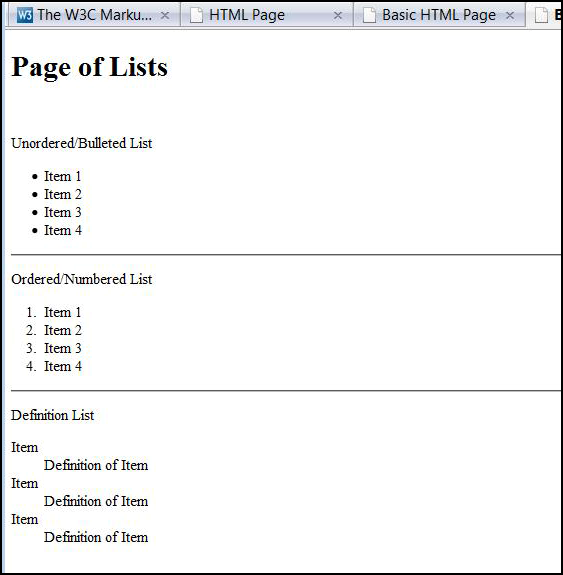
Lists, which are block-level elements, are a way of emphasizing text by indenting it with some form of bullets, like discs or numbers. All lists must contain one or more list elements. These can be great for listing resource links, steps in an activity, and providing definitions. Lists have two required tag types: the kind of list (unordered, ordered, definition) and the tag to list each separate item. Also, lists do not work with paragraph tags –you do not place a list inside any other text tags, or they will not validate correctly.
Unordered Lists
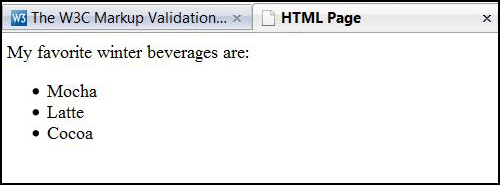
An unordered list uses the <ul></ul> tags, like a wrapper. Each list item starts with the <li> tag. The list items are marked with bullets (typically small black circles).
<p>My favorite winter beverages are:</p>
<ul>
<li>Mocha</li>
<li>Latte</li>
<li>Cocoa</li>
</ul>
How the unordered list HTML code above looks in a browser:
Ordered Lists
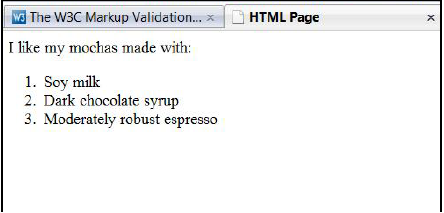
An ordered list uses the <ol></ol> tags, like a wrapper. Each list item starts with the <li> tag. The list items are marked with numbers.
<p>I like my mochas made with:</p>
<ol>
<li>Soy milk</li>
<li>Dark chocolate syrup</li>
<li>Moderately robust espresso</li>
</ol>
How the ordered list HTML code above looks in a browser:
Definition Lists
A definition list is a list of items, with a description of each item. The <dl></dl> tags de- fines a definition list, like a wrapper. The <dl> tag is used in conjunction with <dt> (de- fines the item in the list) and <dd> (describes the item in the list):
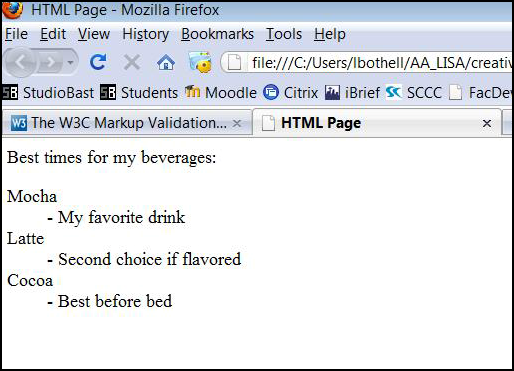
<p>Best times for my beverages:</p>
<dl>
<dt>Mocha</dt>
<dd>- My favorite drink</dd>
<dt>Latte</dt>
<dd>- Second choice if flavored</dd>
<dt>Cocoa</dt>
<dd>- Best before bed</dd>
</dl>
How the HTML code above looks in a browser:
Body Section Nesting Tags
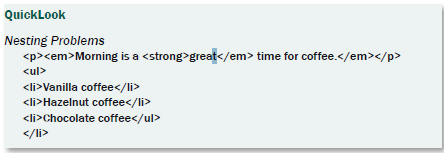
Nesting tags properly means that when using more than one pair of tags to affect code at the same time, you open and close these pairs in the right order as related to the other pairs. Whaaaaat?
The number one reason that you need to master nesting is if you're going to use cascading styles (CS), which require tags to be consistently nested within the document so that it can tell where styles begin and end. If you set up a style that would affect all bold and italic text on your page, the incorrect nesting would make it hard for the browser to know where the bold and italics ended and where the text was just italicized.
Nesting also effects accessibility and browser compatibility. If your HTML is incorrectly nested, it won't be as accessible to screen readers and older browsers – it will look bad. It also will not validate, earning head shaking from web authors of the world.
Full Nesting
The easiest way to understand nesting is to think of your HTML tags as little wrappers (or nests) holding your content (like chocolates). When you purchase chocolates, they typically come in a wrapper. Then the checker places the wrapped chocolates in a bag, and then you place that bag in your vehicle to get home.
The chocolates are your HTML content, such as text or images. And each wrapper is an tag around that content. You cannot put the chocolates halfway into the wrapper and then into the bag - this physically doesn't work. But you can write your HTML so that the tags are opened but not closed around the text.
If you have a block of text that you want bold, italic, and inside a paragraph, you'll have 3 HTML elements and the text itself.
This is my sentence about chocolates.
The sentence of text is your “chocolates”. Since you want the whole sentence to be bold, you would make that tag your “chocolate wrapper”:
<strong> This is my sentence about chocolates.</strong>
As you can see, the strong tags surround the entire block of text, so the entire sentence will be bold. Then you want the sentence to have italics too, so that tag would be the “bag” holding the wrapped chocolates:
<em><strong> This is my sentence about chocolates.</strong></em>
The em tags completely surround the strong tags and the sentence. However, for HTML, you still need the block-level text container. This final container is the paragraph or “vehicle”:
<p><em><strong> This is my sentence about chocolates.</strong></em></p>
This is my sentence about chocolates
See how we close the tags in the opposite order that we opened them? Reading from left to right, the tags are opened: p, em, strong. So when you need to close them you need to close them in reverse order: strong, em, p.
Varied Nesting
You won't always want a whole block element, like a whole sentence, to use completely the same formatting – you might, for instance, want all bold but only partly italicized. You just have to keep track of what starts when and close the right tag for the currently opened tag. Huh?
<p><strong> This is my <em>sentence</em> about chocolates.</strong></ p>
This is my sentence about chocolates.
Start simply for nesting, and learn it well, because you can nest whole paragraphs, con- tent areas, and will need to properly nest tags in building tables. Just think of chocolates.
Text Styles
Okay, now you know a few things you can do with text in terms of the basic HTML tags. BORRRRINNNNGGGG! You want color, you want size, you want fonts, you want pizzazz! You want it now!
So sorry, not just yet. We've got more basic coding to go over first. We will go over the principles of inline cascading styles in a later chapter, and if you decide to work on that chapter now, I won't slap your hands. Have fun!
What We Learned
Try it Out