After you select one or more foreign languages and layouts, switching among them is easy. If you selected Enable indicator on taskbar while you chose layouts, you see a two-letter abbreviation at the right end of the taskbar indicating which language is currently in use - for example, EN if you're working in English.
To switch to another language and keyboard layout, do either of the following:
• Click the language indicator in the taskbar and then click the language you want to use
(see Figure 15-7).
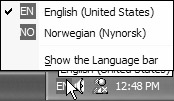
Figure 15·7: Clicking the EN indicator to switch to another language
• Press the shortcut keys you indicated (for example, Left Alt+Shift). Each time you press the shortcut key, you will cycle to the next available language. (You won't get any feedback about which language you chose unless you enabled the indicator on the taskbar.)
Now you can fire up your word processing program and type with the currently selected language and keyboard layout. In fact, you can switch to another language and layout on the spot. Anything new you type will use the language, layout, and (if applicable) font for that language. In a true multilingually aware program, you can even select existing text and change it to whatever language and font you're currently using.
Removing languages
If ever you decide to eliminate a foreign language keyboard layout, return to the Text Services dialog box. Click any language option you want to eliminate and click the Remove button. Then click the OK button to save your changes and close the dialog box.
Adding and Calibrating a Game Controller
Some computer games play better using a joystick, steering wheel, or video game-style control pad or another game controller. Game controllers are, of course, entirely optional. So if you don't feel you need one, don't bother to read this section. Also, be aware that game controllers work only with certain kinds of games, not with the Windows XP desktop. For example, many drive games support steering wheels and foot pedals. Games that involve flying might support joysticks. Some shoot-em-up games support video game-style gamepads. The only way to know for sure which input devices a particular game supports is by reading about the game in which you're interested.
Many different kinds of game controllers exist, as a quick visit to your local Comput-O-Rama superstore will prove. I should point out, however, that Windows XP has built-in support for many different types of controllers. You'll almost certainly find that whatever type you buy is supported.
Adding a game controller
Because so many different kinds of game controllers exist, I can't guarantee the simple installation instructions will work for every product on the market. But they're worth a try. (If these instructions don't work, you'll probably need to follow the installation instructions that came with your game controller.) Anyway, here are the steps you must follow to install a game controller:
Note If your game controller plugs into a USB port, there's no need to shut down the computer. Just plug in the controller and watch the Notification area for automatic detection of the device. Then skip to Step 4.
1. Close all open programs and documents and save any work in progress (to play it safe). Shut down the computer.
2 Plug the game controller into the appropriate plug on the back of your PC.
3. Restart the computer. If Windows detects the game controller at startup, follow the instructions that appear on-screen.
4 Open the Control Panel and then open the Gaming Controllers icon.
5 Select your game controller from the list and click the OK button. Alternatively, if your game controller isn't listed, click the Add button and follow the instructions on-screen.
6. If Windows successfully locates your controller, the Status column will read OK, as in Figure 15-8, where I successfully added a joystick.
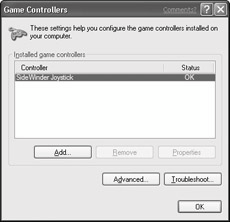
Figure 15·8: A Sidewinder joystick is successfully attached.
Calibrating and testing the controller
Once the controller is installed and you're given the OK status, you'll want to calibrate the controller. Doing this tells Windows about the buttons on your device, the range of motion it has, and so forth. Calibration is pretty easy; just follow these steps:
1. Click the name of the controller you want to calibrate and then click the Properties button. The Game Controller Properties dialog box appears.
2. Click the Settings tab and then click the Calibrate button (see Figure 15-9).
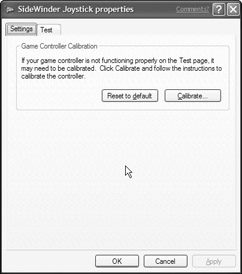
Figure 15·9: Use the Calibrate button to tune your game controller to your PC.
3. Follow the instructions on-screen to calibrate your controller.
4. When you finish the calibration, click the Test tab in the Game Controller Properties dialog box and try out your controller. The test page will provide options relevant to your controller, as in the example shown in Figure 15-10.
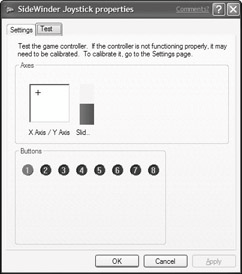
Figure 15·10: The test page for a Sidewinder joystick
5. If necessary, repeat the calibration and test until the game controller appears to work properly. Then click OK to close the Game Controller Properties dialog box and click OK again to close the Game Controllers dialog box.
The game controller won't work on the desktop. When you fire up a game that supports this kind of controller, however, the controller should work fine. If not, check the documentation or Help screens that came with the game to see whether you need to select any special options to activate the game controller.
If you experience severe problems with your game controller, you might have a hardware conflict or some other problem. Click the Troubleshoot button in the Game Controllers dialog box for help in solving the problem.
Talk, Don't Type
Movies about the future always have totally hands-free computers, to which the actors can just bark orders to get whatever they want. I think it's safe to say we're still pretty far from totally hands-free computing. But computer speech recognition has come a long way over the past few years. There now exists speech-recognition engines that can deal with normal, continuous speech (unlike earlier technologies that required you speak one word at a time, with a substantial pause in between).
Windows XP is the first version of Windows to actually provide support for speech recognition. It's pretty limited support at the moment. Windows XP doesn't come with speech recognition built in. And the Windows XP interface itself doesn't respond to speech. If you have the right hardware and software, however, you can install it all into Windows XP. You can then "train" your speech recognition to recognize your voice and use it in any and all programs on your computer that are capable of accepting voice input.
Speech recognition requirements
To use speech recognition, your computer needs the following hardware and software:
• A high-quality close-talk (headset) microphone with gain adjustment. Gain adjustment automatically adjusts the input sound level for your computer. Microsoft recommends using a headset with a USB connector, as opposed to one that plugs into your sound card.
Note I used a Telex USB headset microphone while writing this chapter. I just plugged it into the USB port, and then waited for the Notification area of the taskbar to tell me the new hardware was installed and ready for use.
• A 400 megahertz (MHz) or faster computer with 128 megabytes (MB) of memory.
Tip If you're not sure of your computer's speed or how much RAM it has, open the System icon in Control Panel. Look under the Computer heading on the General tab for the info you need.
• Microsoft Internet Explorer 5.0 or later.
• An installed speech recognition engine.
As mentioned, Windows XP doesn't come with a speech-recognition engine of its own. However, many newer computers come with a speech-recognition engine built right in. Microsoft Office XP also comes with a speech-recognition engine. So you might already have an engine installed on your system. To find out, open the Speech icon in Control Panel (Classic view). If you see a tab labeled Speech Recognition, as in Figure 15-11, you're