2. To control whether the taskbar appears on top of other windows, select or clear Keep the Taskbar on top of other windows. If you select this option, open windows never cover the taskbar. If you clear this option, open windows may cover the taskbar.
3. To control whether the taskbar hides automatically, select or clear Auto-hide the Taskbar. If you select Auto-hide the Taskbar, the taskbar shrinks to a thin line along the edge of the screen when it isn't in use. If you clear this option, the taskbar never shrinks to a thin line.
4. Click OK.
I suggest you leave the Keep the Taskbar on top of other windows option selected. No good reason exists to allow other windows to cover the taskbar. If the taskbar gets in your way, however, select the Auto-hide the Taskbar option so that it's tucked away, but within easy reach. To redisplay the shrunken taskbar, point to the thin line.
Controlling the notification area
The right side of the taskbar contains an area known as the Notification area. (In previous versions of Windows, this was called the System Tray.) The Taskbar tab of the Taskbar and Start Menu Properties dialog box contains options you can use to control the icons that display in the Notification area.
The little clock that appears at the right edge of the Notification area is entirely optional. To turn it on or off, open the Taskbar and Start Menu Properties dialog box. On the Taskbar tab, clear the check box next to Show the Clock if you want to hide the time. Otherwise, select this check box (so that it contains a check mark) to make the time visible in the taskbar.
To hide icons you haven't used in some time, select the Hide inactive icons check box. You can also click the Customize button to select the display options for each individual Notification area icon.
After you have finished making your selections, close the dialog boxes to apply your changes.
Using desktop toolbars
In Chapter 4, you learned about the Quick Launch toolbar, yet another good repository for shortcuts to your favorite programs. Windows XP also has three other special toolbars:
• Address: Displays an Address box in which you can type Internet addresses or the names of disk drives, folders, and files on your computer. After you press Enter, Internet Explorer takes you to the place you chose. See Chapters 7 and 8 for more information.
• Links: Displays shortcut buttons for visiting handy places on the Internet. Click a button to visit that place. Again, see Chapters 7 and 8 for more information on the Internet.
• Desktop: Displays a button for each item on your desktop, just as the taskbar does. This toolbar can float (be placed anywhere on-screen).
Note On some systems, a Language bar containing options such as Microphone, Handwriting, and such might also be visible. See "Using Speech Recognition" in Chapter 15 for information on that one.
To turn any of these toolbars on or off, follow these steps:
1. Right-click some neutral area of the taskbar and point to Toolbars (see Figure 13-21).
2. To display - or hide - a toolbar, click its name (checked toolbars are already on display).
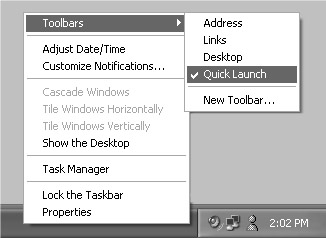
Figure 13·21: Optional toolbars are readily accessible from the toolbar's right-click menu.
Positioning and sizing toolbars
You can position and size desktop toolbars in several ways, all of them easy. When the desktop toolbars appear on the taskbar (their normal location), use these methods to position and size them:
• To resize a desktop toolbar, point to the vertical dots near the left or right edge of the toolbar and then drag left or right, or double-click to expand or contract.
• To move a toolbar out of the taskbar and onto the desktop, point to the vertical dots at the left edge of the toolbar you want to move. Then drag this toolbar out to the desktop and release the mouse button. Figure 13-22 shows an example in which I opened all four toolbars - Address, Desktop, Links, and Quick Launch - and then dragged them all out to the Windows desktop.
Figure 13·22: The four desktop toolbars appear as floating windows.
When the toolbars appear as floating windows, you can resize and position them in these ways:
• To move a floating toolbar, drag the toolbar's title bar to some new spot. You can drag the toolbar back onto the taskbar so that it again becomes part of the taskbar, or to any edge of the screen to anchor it there.
• To resize a floating toolbar, drag any corner or edge of the toolbar's window.
Other ways to customize desktop toolbars
You can choose from a host of handy options for customizing a desktop toolbar or any button on it. Just right-click any empty spot on a desktop toolbar or any desktop toolbar button and choose the option you want.
For example, when you right-click an empty spot on a toolbar, you can choose whether to display buttons as large or small icons, to show or hide text descriptions below the buttons, and to close the toolbar.
Creating new desktop toolbars
You can create a toolbar that automatically includes buttons for items within any folder on your computer or for an address on the Internet. Your custom toolbar will stick around until you close it.
To create a custom toolbar, follow these steps:
1. Right-click an empty part of the taskbar and choose Toolbars → New Toolbar.
2. When the New Toolbar dialog box appears (see Figure 13-23), click a folder in the list or type a full Internet address (see Chapter 6).
3. Click the OK button.
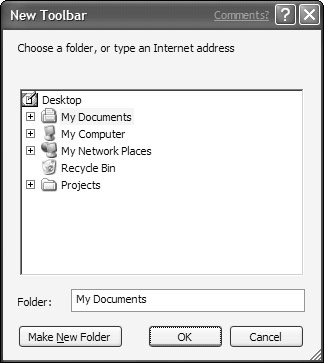
Figure 13·23: The New Toolbar dialog box enables you to create toolbar access to any folder. Your toolbar will appear on the taskbar. To get a better view, you can drag it by its little vertical bar up onto the desktop, as in the example shown in Figure 13-24. But remember one important point: When you close the toolbar, it's gone for good - so you don't want to go to a lot of trouble making it pretty. If you need more permanent toolbar access to favorite items, I suggest you use the Quick Launch toolbar rather than a new toolbar.
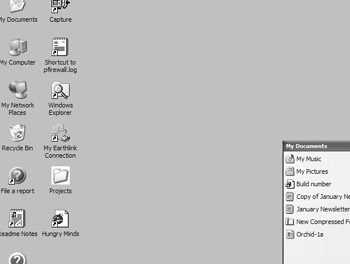
Figure 13·24: A new toolbar created from my My Documents folder
The taskbar clock
In case you ever wonder what the date is, you can rest the mouse pointer on the time. The current date
(according to your computer's clock) appears in a ToolTip, as in Figure 13-25.
Figure 13·25: Point to the taskbar's clock to view the current date.
If your taskbar clock is showing the wrong date and/or time, here's how you can set it straight:
1. Double-click the clock indicator. Or choose Start → Control Panel and open the Date and
Time icon to reveal the dialog box shown in Figure 13-26.
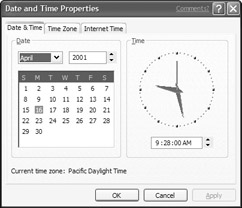
Figure 13·26: The Date/Time dialog box enables you to set the current date and time.
2. Choose the correct date and set the correct time.
3. To set your time zone, click the Time Zone tab and then choose your time zone from the list.
4. To automatically synchronize your system clock to a time server on the Internet, click the Internet Time tab and choose the Automatically synchronize with an Internet time server option. You also can choose the server to use from the drop-down list.
5. Click the OK button to save your settings and close the dialog box.
Note The Date and Time Properties dialog box sets the date and time for your entire computer system, not just for the taskbar clock. If your files keep getting stamped with wrong dates or your personal calendars keep opening with the wrong dates, changing the date in the Date and Time Properties dialog box will take care of those problems, too!
Summary
Windows XP has lots of great stuff for organizing and personalizing your folders and desktop. Here are the main points to remember:
• To create a folder, open the drive or folder in which you want to place the folder. Then ri