You'll find Removable Storage in the Computer Management console. Open the Control Panel, and in Classic view, open the Administrative Tools icon. Choose Computer Management, and then click Removable Storage, under Storage, in the console tree (left pane). For more information on using Removable Storage, press F1 or choose Help → Help Topics from the Computer Management menu bar. In the Help contents, click the Removable Storage book.
Be aware that Backup does not just copy files to the backup medium. Instead, it combines all the files and folders into one huge file that has a .bkf extension. The only way to get to specific files within that larger file is through the Restore capability that Backup offers.
Backing up with Backup
To back up files using the wizard, first prepare your backup medium. If you're using a new, blank tape, for example, you might need to format the tape by following the manufacturer's instructions or by using the Removable Storage utility described in the sidebar earlier in this chapter. Then follow these steps:
1. Choose Perform a Backup from the wizard page shown back in Figure 18-7.
2. On the next wizard page, choose one of the following options:
• Back up everything: Literally backs up everything on the computer.
• Back up selected files: Allows you to choose specific drives or folders to back up.
• Only back up the System State data: Backs up the Registry, COM+ Class
Registration files, boot files, Certificate Services database, Active Directory, SYSVOL directory, Cluster service information, IIS Metadirectory, and protected System files (for advanced users).
3. If you opted to back up selected items only, you'll be taken to the wizard page shown in Figure 18-9, where you can select specific drives and/or folders to back up. Make your selections and click the Next button.
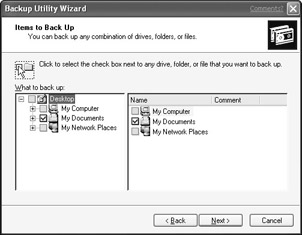
Figure 18·9: This wizard page enables you to choose specific drives and/or folders to back up.
4. On the next wizard page, choose the type of medium you're backing up to. Or, if you're backing up to a folder, use the Browse button to select the folder and type in a file name for the resulting backup file. Be sure to add the .bkf extension to whatever file name you enter, as in the example shown in Figure 18-10. Click the Next button.
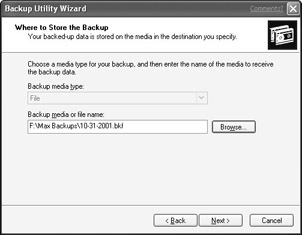
Figure 18·10: Choosing where to store the backup file
5. At this point, a Completing the Backup Wizard page appears summarizing the options you selected. If you want to perform anything other than a "normal" backup or if you're using Remote Storage to manage media libraries, click the Advanced button. You'll be taken to a wizard page that enables you to choose a type of backup and presented with an option to back up files that have migrated to Remote Storage.
What happens next depends largely on the selections you have made along the way. Just follow the instructions on each wizard page until you get to the last page. Clicking the Finish button at that point will back up the files, creating the final .bkf file. On the final wizard page, you can click the Report button to view a descriptive report of the backup in Notepad. Choose File → Print from Notepad's menu bar to create a printed record of the report.
Restoring backed up files
If disaster strikes, and you lose all or part of the contents of your hard drive, you can use the Restore side of Microsoft Backup to recover backed-up files. Assuming you've already installed Windows XP on some new replacement drive, here are the steps: You can run Microsoft Backup and choose Restore Files from a Previous Backup from the options shown back in Figure 18-7. You'll be taken to the page shown in Figure 18-11, where you can select the media from which you want to restore files. As instructed on the screen, you can double-click any item in the right column to isolate its contents and then choose specific items to restore. Or to just restore all the files from a medium, select that item's check box in the right-hand column. Click the Next button and the wizard will walk you through the steps required to restore the files.
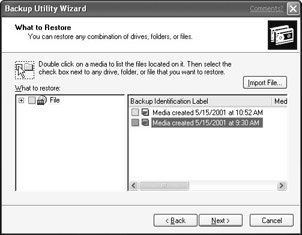
Figure 18·11: Choose items to restore from this wizard page.
More on Backup
In this chapter, I have touched on only the most basic capabilities of using Microsoft Backup to back up and restore files. The program actually offers a wide range of backup options suitable for all types of work environments. To learn more about Backup, go to its Advanced mode and choose Help → Help Topics from the menu bar. There you can use the Contents tab to learn about other capabilities or use the Index or Search tab to look up information about specific topics.
Summary
In this chapter we've looked at tools and techniques for recovering from "disasters" ranging from minor inconveniences to total hard disk crashes. Here's a quick recap of the important points covered in this chapter:
• When a system change causes your computer to misbehave, you can use System Restore to return important system files to a previous state.
• Creating a restore point in system restore just before installing new hardware or software will make it easier to recover from any problems caused by the new installation.
• When Windows freezes up (hangs), press Ctrl+Alt+Del to bring up Task Manager, which you can use to end any tasks that are not responding.
• When a problem prevents your computer from booting normally off the hard disk, Windows will start in Safe mode, where you can use a troubleshooter to solve the problem.
• You can also get to Safe mode by pressing the Fa key as the system is starting.
• You can easily back up new and recently changed documents by using the Search Explorer bar to isolate files modified within some range of dates. Then copy all the matching files to some other medium.
• The Files and Settings Transfer Wizard, designed to help you transfer your files and settings to a new computer, is also a convenient way to back up those items.
• Microsoft Backup provides an extensive set of tools and options for creating, managing, and restoring from backup media.
Chapter 19: Updates, Maintenance, and Monitoring
A sluggish computer can be a real bore, especially if you paid good money and were expecting more. Sometimes, a computer that once ran fast will start to run more slowly, leaving you wondering just what's going on. Without some knowledge of your system and the skills necessary to improve its performance, it's not easy to identify and clear the performance bottlenecks that are dragging you down. This chapter covers tools and techniques for getting the most from your computer, ranging from routine maintenance to advanced "tweaking."
Getting Information about Your System
Before we get into the "how to" aspects of this chapter, I want to introduce you to some places where you can go to get information about your system. The most basic and commonly required information about your system is in the System Properties dialog box shown in Figure 19-1.
Tip If you have a My Computer icon on your desktop, you can right-click it and choose Properties to get to the System Properties dialog box.
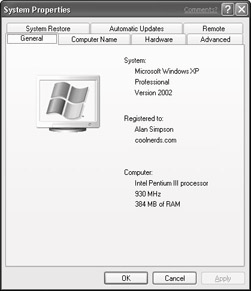
Figure 19·1: The System Properties dialog box
To access the System Properties dialog box, follow these steps:
1.Click the Start button and open Control Panel.
2.If Control Panel opens in Category view, click Performance and Maintenance.
3.Open the System icon.
The General tab displays the most basic information, including the type of microprocessor installed in this computer, its speed, and the amount of random access memory (RAM) installed. Other tabs provide additional information, as well as options for making changes to some options, as you'll learn throughout this chapter.
Know