Directory tree
The first or top-most directory in a hierarchy is the root directory (symbolized by the back slash \) The current directory is the directory in which a user is working at a given time.
Full name of a file
A full filename includes one or more of these components
Drive (e.g., C:)
Directory (or path) file
Base name of the file
Extension
An operating system includes several files, for instant, MS-DOS includes MSDOS.SYS, IO.SYS,
COMMAND.COM . . .
Some Common Operating Systems
MS-DOS
MS-DOS (short for Microsoft Disk Operating System) is an operating system commercialized by
Microsoft. It was the most commonly used member of the DOS family of operating systems and
was the dominant operating system for the PC compatible platform during the 1980s. It has
gradually been replaced on consumer desktop computers by various generations of the Windows
operating system.
MS-DOS employs a command line interface and a batch scripting facility via its command
interpreter, COMMAND.COM.
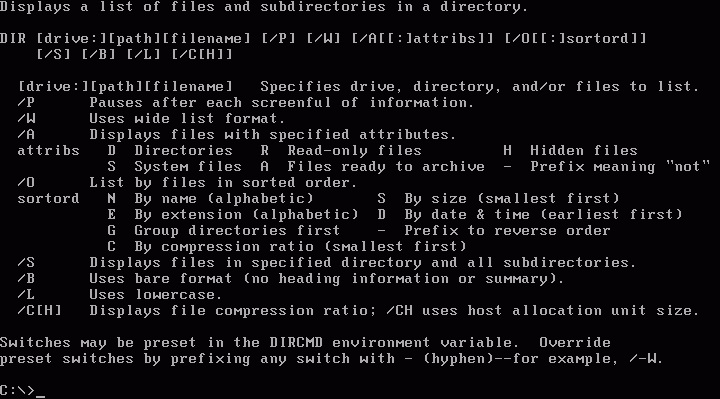
Figure 1.26.
The MS-DOS 6.22 command line interface
Microsoft Windows
Microsoft Windows is the name of several families of software operating systems by Microsoft.
Microsoft Windows interest in graphical user interfaces (GUI)
MsWindows are introduced in detail in the next section.
The Most Common Commands of an Operating Systems
Every operating system need a system of command for managing files and disks. Commonly used
types are :
File management : copy, delete, rename, type a file.
Directories management: create, remove, copy directories.
Disk management : disk copy, disk format.
Microsoft Windows
Brief History of Microsoft Windows
In 1983 Microsoft announced its development of Windows, a graphical user interface (GUI) for its
own operating system. Windows 3.0, released in 1990, was a complete overhaul of the Windows
environment with the capability to address memory beyond 640K and a much more powerful user
interface.
Windows for Workgroups 3.1 was the first integrated Windows and networking package offered
by Microsoft.Windows for Workgroups also includes two additional applications: Microsoft Mail,
a network mail package, and Schedule+, a workgroup scheduler.
Windows 95, released in August of 1995. A 32-bit system providing full pre-emptive
multitasking, advanced file systems, threading, networking and more.Also includes a completely
revised user interface.
Windows 98, released in June of 1998. Integrated Web Browsing gives your desktop a browser-
like interface.
Windows 2000 provides an impressive platform of Internet, intranet, extranet, and management
applications that integrate tightly with Active Directory.
In September 2000 Microsoft released Windows Me, short for Millennium Edition, which is
aimed at the home user. The Me operating system boasts some enhanced multimedia features,
such as an automated video editor and improved Internet plumbing.
Windows XP-Microsoft officially launches it on October 25th. 2001.XP is a whole new kind of
Windows for consumers. Under the hood, it contains the 32-bit kernel and driver set from
Windows NT and Windows 2000. Naturally it has tons of new features that no previous version of
Windows has.
Windows Vista is a line of graphical operating systems used on personal computers, including
home and business desktops, notebook computers, Tablet PCs, and media centersWindows Vista
contains hundreds of new and reworked features; some of the most significant include an updated
graphical user interface and visual style dubbed Windows Aero, improved searching features, new
multimedia creation tools such as Windows DVD Maker, and completely redesigned networking,
audio, print, and display sub-systems.
Originally developed as a part of its effort to introduce Windows NT to the workstation market,
Microsoft released Windows NT 4.0, which features the new Windows 95 interface on top of the
Windows NT kernel.
Windows NT (New Technology) is a family of operating systems produced by Microsoft, the first
version of which was released in July 1993. It was originally designed to be a powerful high-level-
language-based, processor-independent, multiprocessing, multiuser operating system with
features comparable to Unix. It was intended to complement consumer versions of Windows that
were based on MS-DOS. NT was the first fully 32-bit version of Windows, whereas its consumer-
oriented counterparts, Windows 3.1x and Windows 9x, were 16-bit/32-bit hybrids. Windows 2000,
Windows XP, Windows Server 2003, Windows Vista, Windows Server 2008 (beta), and Windows
Home Server are based upon the Windows NT system, although they are not branded as Windows
NT.
Windows XP is the most popular version of Microsoft Windows. Windows provides a graphical
interface, through which you can run programs, manage files, connect to the internet, and perform
many other task as well.
How to start and exit from Windows XP
Starting Windows XP
Windows XP starts automatically when you turn on your computer. Depending on the way your
PC is currently set up, you may be prompted to select a user account when you start up your PC.
Windows will display a welcome screen, from which you click your user name and indicate who
you are by entering your password.
Once Windows XP has initialized, the following screen will appear.
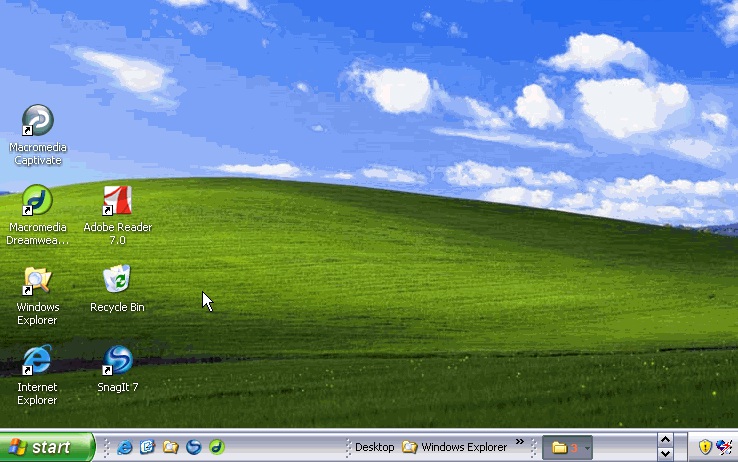
Each user has his own ideas about what constitutes attractive screen colors, important shortcut to
place on the desktop etc. This combination can be saved as user profile and Windows remembers
all the setting and preferences.
Figure 1.27.
Shutting down Windows XP
When you finished using your PC, you shouldn’t turn off the power because that could cause later
problems in Windows. Instead, you should use the Shut Down command on the Start menu (or
press Ctrl+Esc if the Start menu is invisible). This approach ensure that Windows shuts down in
an orderly way that closes all opened files and saves your work in any open program.
When shutting down, you have two options: Turn Off and Restart. If you are probably to be away
from the computer, you will probably want to turn it off. If the computer is acting strangely and
you want to start fresh, you will want to refresh.
If for some reason, the computer is not ready to shut down , the computer will remind you in
dialog boxes.
Basic Terms and Operations
The Icons


On the desktop we have icons that allow us to open the corresponding program.
For example, by clicking on the icon
Internet Explorer will open up.
The windows
All the windows have the same structure;The window above is the one that opens when you click
on My Computer. Its structure is very similar to the others.
Figure 1.28.
All the windows are formed by:
The title bar contains the name of the program you are working with and in some cases the
name of the opened document also appears. In the top right corner we can find the minimize,
maximize/restore, and close buttons.
The minimize
button shrinks the window it turns it into a button located in the WindowsXP task bar.
The maximize


The maximize
amplifies the size of the window to the whole screen.
The restore button
restores the window to its original state.
The close button
closes the window. If we have modified the document, we are asked if we want to save the
changes before closing.
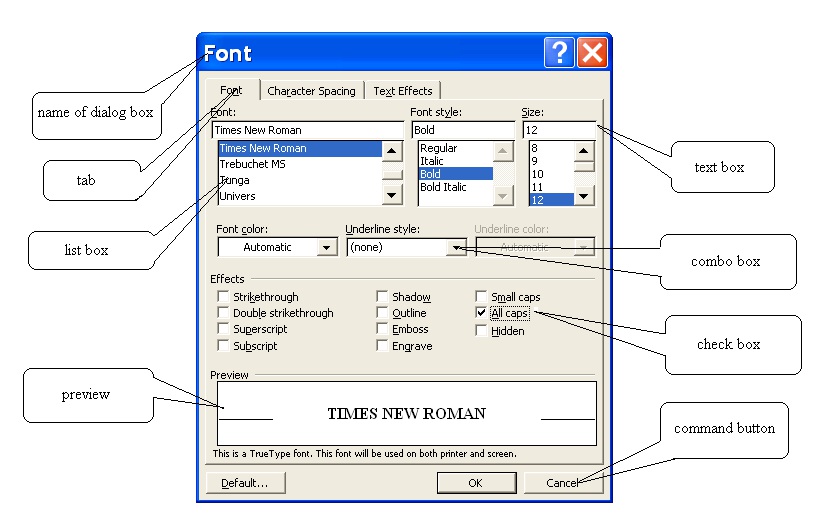
The dialog boxes
The dialog box is a small window-like box that opens after an operation has been selected. In it,
you select options and settings to tailor the operation before it proceeds.
Figure 1.29.
Text box : a control in which a user can enter texts (or numbers).
List box : a box that contains a list of selectable items. In some instances, you select an arrow button on the right of the box in order to display the selectable items.
Combo box : a combination of a drop-down list or list box and a single-line textbox, allowing the user either to type a value directly into the control or choose from the list of existing options.
Check box : a control that permits the user to make single selection or multiple selections from a number of options. Normally, check boxes are shown on the screen as a square box that can
contain white space (for false) or a tick mark or X (for true).
Command Button: A control used to initiate an action. The most common buttons are :
OK
Close
Cancel
Apply
Default
Using a computer mouse
Use the mouse to interact with items on your screen as you would use your hands to interact with
objects in the physical world. You can move objects, open them, change them, or throw them
away, among other things.
A mouse has a primary and secondary mouse button. Use the primary mouse button to select and
click items, position the cursor in a document, and drag items.
Use the secondary mouse button to display a menu of tasks or options that change depending on
where you click. This menu is useful for completing tasks quickly. Clicking the secondary mouse
button is called right-clicking.
The primary mouse button is normally the left button on the mouse. On a trackball, the primary
mouse button is normally the lower button.
You can reverse the buttons and use the right mouse button as the primary button.Most mice now
include a wheel that helps you to scroll through documents more easily.
Pointing
Pointing at items on the screen is the most basic mouse function. When instructions tell you to
point your mouse at something, move your mouse on your desk until the mouse pointer is pointing
at the object on the screen you need to select.
Clicking
After you have pointed your mouse at an item, you can click on the item to select it.
Double clicking
To double-click an item, point at the item and press your primary button twice quickly without
moving the mouse. Double-clicking allows two different actions to be associated with the same
mouse button. Often, single-clicking selects (or highlights) an object, while a double-click
executes that object, but this is not universal.
Drag and drop
to move the item from one place to another using the mouse. Point at the item you need to move,
and single click on it. Instead of releasing the mouse button after clicking, hold it down, and move your mouse to where you want to move the item. Release the mouse button to drop the item into
place.
Right clicking
Right-clicking an item usually brings up a menu of actions you can take with the item. To right-
click, point at an item and press the secondary (right) button on your mouse.
The Control Panel
Control Panel allows users to view and manipulate basic system settings and controls, such as
adding hardware, adding and removing software, controlling user accounts, and changing
accessibility options.
To start the Control Panel, from the Start menu, click on Control Panel. Here is the Control Panel
window:
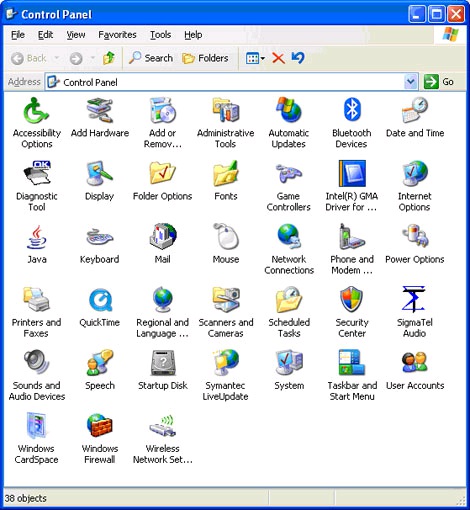
Figure 1.30.
.
Configuring the Screen
Configuring the screen is important because sometimes we spend many hours in front of the
screen, so we hope it can be the most comfortable as possible.
Open the Display Tool (or right-click somewhere that has no icons on the desktop and select the
option Properties from the shortcut menu that is displayed. The Display properties window will
appear where we can change the configuration parameters.
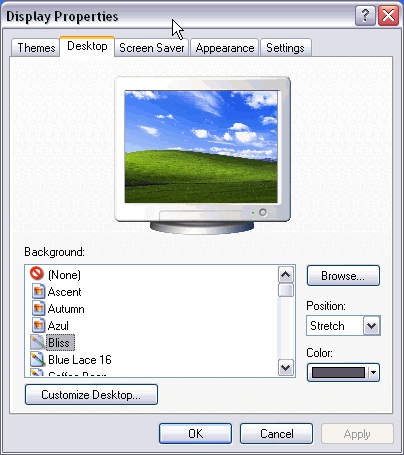
Figure 1.31.
Change the background or wallpaper,
Click on the tab labeled Desktop and choose a new background or wallpaper from the list that
appears at the bottom left corner. It is also possible to have another image that does not appear on the list as background. Click on Browse... and look for the image you want as long as the format is
compatible. For example .bmp, .jpg, .gif.Once the image and type of view have been selected
Click OK.
The screensaver
Sometimes the computer remains inactive a few minutes. It is recommended to have a screensaver
to avoid having a still image on the screen too long because this can damage the monitor.
From the list, choose the screensaver you like best; a small preview is shown above.
You can modify the time it takes for the screensaver to appear by adjusting the time on Wait.
Configuring the Mouse
The mouse is a tool that is used constantly and it is recommendable to have it set up to our needs
as well as possible. In the following page we show you how to set it up to your own needs.
The Buttons
On the Buttons tab you can adjust the set up of the mouse to suit your needs.If you are left handed.
WindowsXP allows you to change the configuration of the buttons so that the right button realizes
these functions.
We can also adjust the Double-click speed for a slower or a faster double-click.
The pointer
On the Pointers tab we can choose the type of pointer the mouse is to have when it moves, when it
is busy, when it is used, etc.
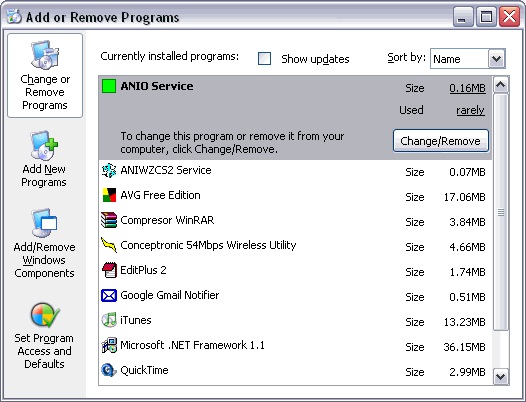
Adding or removing Programs
Click on the Start button and choose Control Panel
Click on Add or Remove Programs option, a window will display with the three basic options
shown on the left side of the picture as it appears below. Then click on Add New Programs.The
window will appear where we can change the configuration parameters.
Follow the instruction
The Add or Remove Programs window will appear where we can add, change or remove
programs following the instructions..
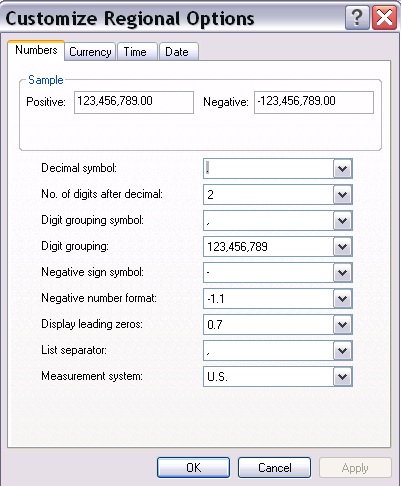
Figure 1.32.
Changing the Regional and Language Options
You can use the Regional and Language Options tool in Control Panel to customize the way
Windows handles dates, times, currency values, and numbers.
To open the Regional and Language Options tool
Click Start, and then click Control Panel.
Click Date, Time, Language, and Regional Options, and then click Regional and Language
Options.
To change one or more of the individual settings, click Customize.
Figure 1.33.
To Change the Date In the Customize Regional Options dialog box, click the Date tab to specify
any changes you want to make to the short date and the long date.
To Change the Time In the Customize Regional Options dialog box, click the Time tab to specify

any changes you want to make.
To Change the Currency Value Display
In the Customize Regional Options dialog box, click the Currency tab to specify any changes you
want to make. You can change the currency symbol, the formats used for positive or negative
amounts, and the punctuation marks.
To Change the Number Display
In the Customize Regional Options dialog box, click the Numbers tab to specify any changes you
want to make. You can change the decimal symbol and list separator, the format used for negative
numbers and leading zeros, and the measurement system (U.S. or metric).
Add a printer
Click on Printer and Faxes
Click on Add a Printer, follow the instruction of the Add Printer Wizard
Delete a printer
Click on Printer and Faxes
Click on the printer you wish to delete.
Press your Delete key to delete the printer.
The Windows Explorer
The Explorer is an indispensable tool in an operating system, since with it we can organize and
control the files and folders of the different storage systems at our disposal such as the hard drive, disk drive, etc.
The Windows Explorer is also known as the File Manager. Through it we can delete, see, copy, or
move files and folders.
Starting the Explorer
The quickest way to start up the Explorer is through the icon
on the task bar or desktop. If you
don't already have the icon created, you can open the Explorer as follows:
Click on Start Select All programs Select Accessories Select Windows Explorer
Right click on Start button and select Explore
From the Start button, choose My documents, My images or My music; the difference is that in
these cases we will go directly to those folders.
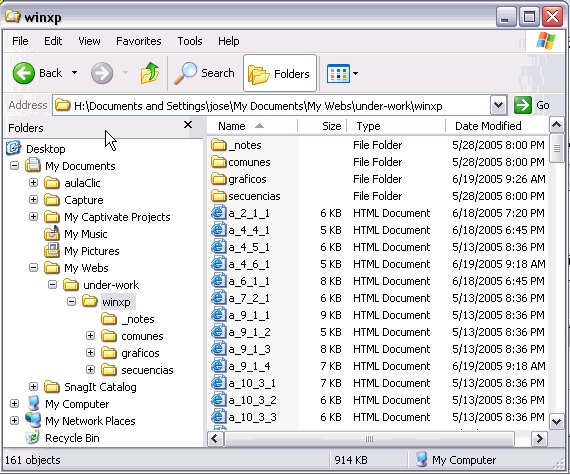
The Explorer’s window
The explorer consists basically of two sections. On the left side there is the directory tree, which is the list of units and folders that we have. Only units and folders appear, no files. On this image we can see a few folders such as My Documents, aulaclic, ... the My Computer icon, My Network
Places and the Recycle Bin.
Figure 1.34.
On the right side there is another section, which will show the content of the folder that we have
opened on the left section. This section shows its folders and files. In this case the files that are contained in the folder WinXP appear. Depending on the type of view that we have activated we
will see different type of information regarding the files.
Next we will explain the different bars that make up this window.


Figure 1.35.
The standard bar contains the buttons for the most used operations.
If this bar is not visible select from the menu View, the option Toolbars, next select the option
Standard buttons.
The Back button
will allow us to go to the last page that we have seen. The button next
to it, when activated, allows us to move one page forward.
The up button
will allow us to go up one level, which means going back to the folder that
contains the folder we are working with.
The search button
displays a window where we can search for the file we want.
The folders button
shows the folder's structure on the left side of the screen, or it can display
an area with the most frequent tasks, depending on the file we have selected. In this area we can
find, among others, the following buttons:
The last button
allows us to change the views on the folders (view details, Thumbnails,...)
We'll explain this in more detailed on the next page.
Figure 1.36.
The Address Bar is well known for Internet because it shows the address of the web we are
viewing. With Windows Explorer it functions the same way, but it shows the name of the folder
we are working with.
If we click on the black arrow it will show the structure with our computer's drives.
If we write a name in the address bar and we click on the green arrow, it will search for this name.
Windows explorer allows us to see the folder's information in different ways or views to facilitate
specific searching.
Go to the folder you wish to see:

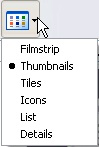
If you click on the arrow of the button
a menu with the following options will appear:
Figure 1.37.
Tiles. The files and folders are shown with large images with the name, file type and size in KB; if it is a picture file the size is shown in pixels. The elements are organized one next to the other
from left to right.
Icons. The files are represented with an icon smaller than a tile. The only information shown is the name of the file. This type of icon is used when the selected folder has an average quantity of
elements.
List. Shows small icons, one below the other, so it's easier to search by name. On this view, only the name of the file or folder appears.
Details. Icons are shown one below the other, with some of their properties. This type of display is used when we want to find an element with certain characteristics, such as size, file type, date of
modification, etc.
With this type of view we can organize the elements by size, modification date, name, etc.
For example, to organize by the modification date it is enough to click on the box Date Modified,
and it will arrange the files by date from greater to lesser. If we click on it again it will arrange it from lesser to greater. The older dates are considered lesser.
On the views List or Details the elements appear one below the other and in the case of deleting or
adding, the elements will reorganize themselves.
Thumbnails . A small representation of the content will appear with the format of the image, such as jpg., jpeg., bmp., gif., etc.
Filmstrip. This view is only available for images. On the bottom part a strip will appear with the images in thumbnail format and on the top we will see a larger representation of the image
selected on the bottom.
Opening Files
Choose one of the following ways:
Double click on the file’s icon.
Right click on the file’s icon. Select Open
Select the file and press Enter.
Selecting Files
If you wish to select a single file or folder you simply need to click on it. This way any operation you perform will only apply to the selected file or folder.
If you wish to realize an operation on several files or folders, Windows Explorer will allow you to
select several elements at the same time.
To select consecutive elements
Click on the first element and then click on the last element while keeping Shift key pressed. This
can also be done with the mouse. To do this, click on the left of the first element (but not on it)
and, without letting go, drag it. A frame should appear that shows the area that the frame
encompasses. Continue dragging until all the desired elements are within the frame, then let go of
the left mouse button..
To select several elements that are not consecutive
Select the first element and continue to select the desired elements while keeping the Ctrl key
pressed.
Creating and Deleting Folders
To create a folder we need to place the pointer where we want the folder to be.Open the folders
that we have by clicking on the + located to the left of the folders.
If we click on the plus sign of a particular folder it will display and show all of the folders