Using Interpolator
12.3 Example of Interpolator usage
12.4 Using a cubic-spline interpolator
The Interpolator class defines the functionality for an important and powerful set of behaviors that deserve extra mention. The behaviors derived from Interpolator allow an object’s current state to be interpolated between a set of defined states as a function of time.
This chapter introduces the Interpolator classes and the Alpha class, which is used to control the speed of interpolation.
java.lang.Object
|
+--javax.media.j3d.SceneGraphObject
|
+--javax.media.j3d.Node
|
+--javax.media.j3d.Leaf
|
+--javax.media.j3d.Behavior
|
+--javax.media.j3d.Interpolator
Java 3D includes a rich set of behaviors for interpolating an object between states. These behaviors are important for many animation and visualization applications and are covered in detail in this section. Interpolator behaviors can be used to interpolate an object’s:
All the Interpolation classes require an Alpha object. The Alpha class is used to convert the current time to a value between 0 and 1—this value is then used by the Interpolator to perform its specific action. The Alpha class is described in section 12.2.
java.lang.Object
|
+--javax.media.j3d.Alpha
A good understanding of the Alpha class is key to using all the Interpolator behaviors. The Alpha class defines a function that converts the current time (in milliseconds) to a value between 0 and 1 (alpha value). The alpha value can then be used by the Interpolator to produce the desired interpolation between specified end states.
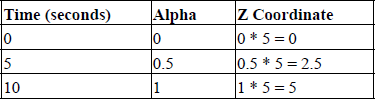
For example, a PositionInterpolator might be used to move an object between position (0,0,0) and (0,0,5) in 10 seconds. To achieve the desired result, an Alpha object must be created that returns 0 at 0 seconds and 1 at 10 seconds. The PositionInterpolator can then use the Alpha object to create the desired z coordinate (table 12.1).
Table 12.1 Coordinate calculation using Alpha
The Alpha class uses a parameterized function to convert time values to alpha values between 0 and 1.
Figure 12.1 illustrates the basic shape of the functions that can be created using the Alpha class. Nine parameters can be used to create a customized Alpha function are listed there.
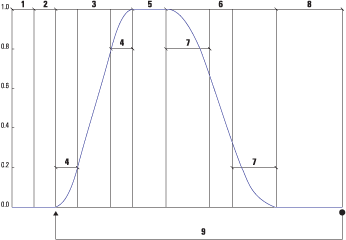
Figure 12.1 The phases of the Alpha class: triggerTime (1), phase delay (2), increasing alpha (3), increasing alpha ramp (4), at one (5), decreasing alpha (6), decreasing alpha ramp (7), at zero (8), and loopCount (9)
The increasing alpha phase (3) is composed of three potential sections, as is the decreasing alpha phase (6). The values of increasing alpha ramp (4) and decreasing alpha ramp (7) define symmetrical acceleration and deceleration of the Alpha value at the beginning and end of the phase. These quadratic sections help to smooth the transition from 0 to 1 (increasing alpha) or 1 to 0 (decreasing alpha). Note that the Alpha value varies linearly between the quadratic sections. The loopCount parameter (9) allows Alpha functions to be repeated (a fixed number of times or infinitely) by joining Alpha functions end to end.
Run the AlphaTest example and interactively modify the nine parameters to get a good feel for how to parameterize an Alpha object for your application (figure 12.2).
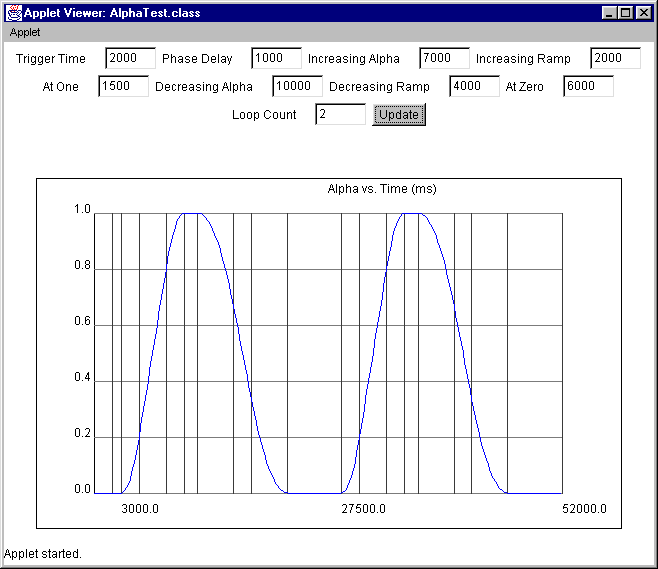
Figure 12.2 The AlphaTest example allows an Alpha object to be parameterized interactively and plots the resulting Alpha function
NOTE
While testing the AlphaTest example, I ran into an interesting bug in the Alpha class. If either the increasing alpha ramp or decreasing alpha ramp parameter is set to zero, the other will also be set to zero. You can work around this bug by setting the parameter to 1 millisecond instead of 0 milliseconds.
12.2.1 Using a custom Alpha class
You can, of course, derive your own class from Alpha to implement your own Alpha function. The FileAlpha class from the CustomAlphaTest examples loads times and alpha values from a text file and linearly interpolates between them.
From the file Values.xls from the CustomAlphaTest example
0 0
1000 0.1
3000 0.4
4000 0.2
6000 0.8
10000 0.5
12000 0.1
14000 1.0
16000 0.1
_________________________________________________________________
The text file defines an ordered series of time and alpha value pairs (figure 12.3). Times are specified in milliseconds.
The FileAlpha class overrides the following Alpha methods.
public void setStartTime(long l)
public long getStartTime()
public void setLoopCount( int i )
public int getLoopCount()
public boolean finished()
public float value( long time )
Please refer to the FileAlpha class for details.
The CustomAlphaTest is also interesting in that it interpolates the position of a ColorCube using the FileAlpha and plots the value and time of the FileAlpha on the graph shown in figure 12.3.
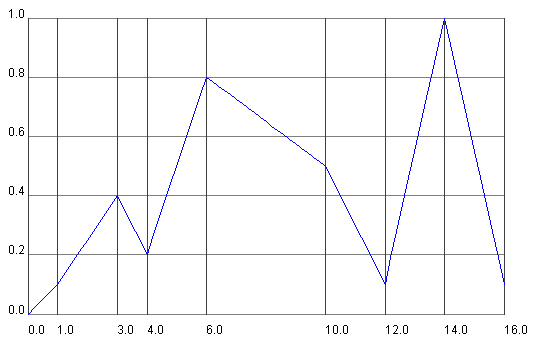
Figure 12.3 The FileAlpha class loads times and Alpha values from a file and linearly interpolates between them to provide a highly flexible Alpha function
12.2.2 Summary
An Alpha class is very simple—it converts a time value in milliseconds to a value between 0 and 1. The built-in Alpha class defines all the parameters for an Alpha function to implement a common class of onset, peak, offset activation functions.
A custom Alpha function, such as FileAlpha, is a very powerful mechanism to feed application-specific data into one of the Interpolator-derived classes. An application might define an Alpha class that samples data straight from a communications port, or reads precomputed data from a file. The output from the custom Alpha class can then be used to parameterize a wide variety of Interpolators.
Alpha classes are used in conjunction with Interpolators, but they do not do anything visible themselves. Their prime purpose in Java 3D is to provide input to the Interpolator classes. Interpolators are the subjects of section 12.3, so read on.
12.3 Example of Interpolator usage
java.lang.Object
|
+--javax.media.j3d.SceneGraphObject
|
+--javax.media.j3d.Node
|
+--javax.media.j3d.Leaf
|
+--javax.media.j3d.Behavior
|
+--javax.media.j3d.Interpolator
The Java 3D Interpolators were explored using the InterpolatorTest and the SplineInterpolatorTest examples. The InterpolatorTest example demonstrates using the following Interpolators:
SwitchValueInterpolator
The SwitchValueInterpolator is used to cycle through the children of a Switch Node based on the output from an Alpha object. The SwitchValueInterpolator maps the output from the Alpha into a current visible child Node using the following algorithm:
float f = alpha.value();
int i = firstSwitchIndex +
(int)(f * (float)(childCount - 1) + 0.5F);
target.setWhichChild(i);
Note that the Switch Node passed to the SwitchInterpolator must have the Switch.ALLOW_SWITCH_WRITE capability.
//create the Switch Node
Switch switchNode = new Switch();
//set the WRITE capability
switchNode.setCapability( Switch.ALLOW_SWITCH_WRITE );
//add children to switchNode here…
//create the Alpha for the Interpolator
Alpha alpha = new Alpha( -1,
Alpha.INCREASING_ENABLE | Alpha.DECREASING_ENABLE,
500,
100,
5000,
2000,
1000,
5000,
2000,
500 );
//create the SwitchInterpolator and pass the Alpha
//and a Switch Node
Interpolator switchInterpolator =
new SwitchValueInterpolator( alpha, switchNode );
//add the Interpolator to a parent BranchGroup
//and set Scheduling Bounds
BranchGroup bg = new BranchGroup();
bg.addChild( interpolator );
interpolator.setSchedulingBounds( getApplicationBounds() );
ColorInterpolator
The ColorInterpolator can be used to linearly interpolate the Material diffuse color of an Appearance between two extremes. Note that the Material must have the ALLOW_COMPONENT_WRITE capability bit set.
//create an Appearance
Appearance app = new Appearance();
//create a Material and assign an initial color
Color3f objColor = new Color3f(1.0f, 0.7f, 0.8f);
Color3f black = new Color3f(0.0f, 0.0f, 0.0f);
Material mat = new Material(objColor, black, objColor, black, 80.0f);
//ensure the Interpolator has WRITE access to the Material
mat.setCapability( Material.ALLOW_COMPONENT_WRITE );
//assign the Material to the Appearance
app.setMaterial( mat );
//create the Interpolator–by default interpolate
//between black and white
Interpolator interpolator =
new ColorInterpolator( alpha, app.getMaterial() );
PositionInterpolator
The PositionInterpolator can be used to linearly interpolate between two x, y, z positions. The PositionInterpolator modifies a TransformGroup, which will in turn affect the position of all its child Nodes. The TransformGroup must have the ALLOW_TRANSFORM_WRITE capability set.
//create the TransformGroup
TransformGroup tg = new TransformGroup(); tg.setCapability(TransformGroup.ALLOW_TRANSFORM_WRITE); tg.setCapability(TransformGroup.ALLOW_TRANSFORM_READ);
//create the Interpolator—by default interpolate
//between x = 0 and x = 1
Interpolator interpolator = new PositionInterpolator ( alpha, tg );
RotationInterpolator
The RotationInterpolator can be used to linearly interpolate between two sets of axis angle rotations. The RotationInterpolator modifies a TransformGroup, which will in turn affect the position of all its child Nodes. The TransformGroup must have the ALLOW_TRANSFORM_WRITE capability set.
//create the Interpolator—by default interpolate
//between Y angle = 0 and Y angle = 2p
Interpolator interpolator = new RotationInterpolator ( alpha, tg );
ScaleInterpolator
The ScaleInterpolator can be used to linearly interpolate between two scale values for an axis. The ScaleInterpolator modifies a TransformGroup, which will in turn affect the position of all its child Nodes. The TransformGroup must have the ALLOW_TRANSFORM_WRITE capability set.
//create the Interpolator—by default interpolate
//between a uniform scale of 0 and 1
Interpolator interpolator = new ScaleInterpolator ( alpha, tg );
TransparencyInterpolator
The TransparencyInterpolator can be used to linearly interpolate between two transparency values. The TransparencyInterpolator modifies an Appearance’s TransparencyAttributes. The TransparencyAttributes must have the ALLOW_VALUE_WRITE capability set.
//create the TransparencyAttributes
TransparencyAttributes transparency = new TransparencyAttributes();
//set the required capability bit
transparency.setCapability(
TransparencyAttributes.ALLOW_VALUE_WRITE );
//set the transparency mode
transparency.setTransparencyMode( TransparencyAttributes.NICEST );
//assign the transparency to an Appearance
app.setTransparencyAttributes( transparency );
//create the interpolator and interpolate
//between 0 (opaque) and 0.8.
Interpolator interpolator = new TransparencyInterpolator( alpha, app.getTransparencyAttributes(),
RotPosScalePathInterpolator
The RotPosScalePathInterpolator is the most flexible of all the PathInterpolators. As its name suggests, it allows the rotation, position, and scale of a TransformGroup to be modified.
Rotations, positions, and scales are specified at a series of Alpha values (or knots). The rotation, position, and scale defines a pose that, along with the time information, allows the Interpolator to linearly interpolate between poses based on the Alpha value and the defined knots.
As the name knots implies, a useful way to visualize the interpolator is as a string stretched taut between a number of points. Each point is called a knot, and as well as having an Alpha value (time) when the interpolator is to reach the knot it also possesses position, scale, and rotation information (a pose). The distance between knots defines the speed at which the interpolation between values must occur.
Knots are specified using float values between 0 and 1, where 0 is the knot used at Alpha value 0 and 1 is the knot used at Alpha time 1. The array of knot values defines a mapping from Alpha value to pose information. The knot values must increase from 0 to 1 in the knot array.
//define the knots array that map from Alpha to pose index
float[] knots = {0.0f, 0.1f, 0.2f, 0.3f, 0.4f,
0.6f, 0.8f, 0.9f, 1.0f};
//create array with 9 poses: containing rotation, position
//and scale values
Quat4f[] quats = new Quat4f[9];
Point3f[] positions = new Point3f[9];
float[] scales = {0.2f, 0.5f, 0.8f, 2.3f, 5.4f,
0.6f, 0.4f, 0.2f, 0.1f};
//define the rotation values for each of the 9 poses
quats[0] = new Quat4f(0.3f, 1.0f, 1.0f, 0.0f);
quats[1] = new Quat4f(1.0f, 0.0f, 0.0f, 0.3f);
quats[2] = new Quat4f(0.2f, 1.0f, 0.0f, 0.0f);
quats[3] = new Quat4f(0.0f, 0.2f, 1.0f, 0.0f);
quats[4] = new Quat4f(1.0f, 0.0f, 0.4f, 0.0f);
quats[5] = new Quat4f(0.0f, 1.0f, 1.0f, 0.2f);
quats[6] = new Quat4f(0.3f, 0.3f, 0.0f, 0.0f);
quats[7] = new Quat4f(1.0f, 0.0f, 1.0f, 1.0f);
quats[8] = quats[0];
//define the positions for each of the 9 poses
positions[0]= new Point3f(0.0f, 0.0f, -1.0f);
positions[1]= new Point3f(1.0f, -2.0f, -2.0f);
positions[2]= new Point3f(-2.0f, 2.0f, -3.0f);
positions[3]= new Point3f(1.0f, 1.0f, -4.0f);
positions[4]= new Point3f(-4.0f, -2.0f, -5.0f);
positions[5]= new Point3f(2.0f, 0.3f, -6.0f);
positions[6]= new Point3f(-4.0f, 0.5f, -7.0f);
positions[7]= new Point3f(0.0f, -1.5f, -4.0f);
positions[8]= positions[0];
//create the interpolator and pass Alpha, TransformGroup,
//knots, and pose information
RotPosScalePathInterpolator rotPosScalePathInterplator = new RotPosScalePathInterpolator(
Alpha,
tg,
new Transform3D(),
knots,
quats,
positions,
scales );
As you can see, the rotation angles are specified using the Quat4f class. The Quat4f class specifies a rotation as a quaternion. The following is a description of quaternions, taken from the excellent “Matrix and Quaternion FAQ.” The FAQ can be found online and it currently maintained by Andreas Junghanns at http://www.cs.ualberta.ca/~andreas/math/matrfaq_latest.html.
“Quaternions extend the concept of rotation in three dimensions to rotation in four dimensions. This avoids the problem of “gimbal-lock” and allows for the implementation of smooth and continuous rotation. In effect, they may be considered to add an additional rotation angle to spherical coordinates: longitude, latitude, and rotation angles. A Quaternion is defined using four floating point values |x y z w|. These are calculated from the combination of the three coordinates of the rotation axis and the rotation angle.”
Unfortunately most people do not think readily in quaternions, so the following two conversion functions are useful to help create quaternions from axis or Euler angles. The algorithms for the functions were taken from the “Matrix and Quaternion FAQ.” I encourage you to check the FAQ for updates, optimizations and corrections to this code.
From InterpolatorTest.java
//Quat4f createQuaternionFromAxisAndAngle
//( Vector3d axis, double angle )
{
double sin_a = Math.sin( angle / 2 );
double cos_a = Math.cos( angle / 2 );
//use a vector so we can call normalize
Vector4f q = new Vector4f();
q.x = (float) (axis.x * sin_a);
q.y = (float) (axis.y * sin_a);
q.z = (float) (axis.z * sin_a);
q.w = (float) cos_a;
//It is best to normalize the quaternion
//so that only rotation information is used
q.normalize();
//convert to a Quat4f and return
return new Quat4f( q );
}
//Quat4f createQuaternionFromEuler( double angleX,
//double angleY, double angleZ )
{
//simply call createQuaternionFromAxisAndAngle for each axis
//and multiply the results
Quat4f qx = createQuaternionFromAxisAndAngle(
new Vector3d(1,0,0), angleX );
Quat4f qy = createQuaternionFromAxisAndAngle(
new Vector3d(0,1,0), angleY );
Quat4f qz = createQuaternionFromAxisAndAngle(
new Vector3d(0,0,1), angleZ );
//qx = qx * qy
qx.mul( qy );
//qx = qx * qz
qx.mul( qz );
return qx;
}
_________________________________________________________________
12.3.1 Design of the InterpolatorTest example
The InterpolatorTest example creates a Switch Node and attaches a SwitchInterpolator. A custom Alpha class (RandomAlpha) is used to generate Alpha values for the SwitchInterpolator. The RandomAlpha generates a random Alpha value (between 0 and 1) every 10 seconds. This causes the SwitchInterpolator to randomly switch between child Nodes every 10 seconds.
The Switch Node has six child Nodes:
1. Group containing a ColorInterpolator: Operates on an Appearance.
2. Group containing a PositionInterpolator: Operates on a TransformGroup.
3. Group containing a RotationInterpolator: Operates on a TransformGroup.
4. Group containing a ScaleInterpolator: Operates on a TransformGroup.
5. Group containing a TransparencyInterpolator: Operates on an Appearance.
6. Group containing a RotPosScaleInterpolator: Operates on a TransformGroup.
Each Group also contains a Link Node to a common SharedGroup. The SharedGroup contains a TransformGroup with a child Shape3D. The parent TransformGroup is passed to each Interpolator that requires a TransformGroup, while the Shape3D’s Appearance is passed to each Interpolator that requires an Appearance. A Text2D is also created with the name of the Interpolator as text so that the current active Interpolator can be seen. See figure 12.4.