Behaviors—navigation, alignment, and LOD
11.3 Anatomy of a typical behavior
11.4 Overview of the built-in behaviors
11.5 Overview of Wakeup criteria
Java 3D includes a rich set of built-in behaviors that can be used for everything from automatically modifying the transparency of objects to keyboard navigation and collision detection.
Some behaviors automatically execute complex code to modify objects within the scenegraph, so take care to ensure that behavior processing does not bog down application performance. With prudent design and knowledge of some of the limitations, behaviors can be a powerful asset in quickly developing or prototyping application logic.
By the time you finish this chapter, you should have a broad knowledge of the behaviors built into Java 3D and a good sense of how to develop your own behaviors. By mixing and matching your own behaviors and built-in behaviors, you should be able to design your application logic within Java 3D’s behavior model.
We should start by taking a look at the general Java 3D behavior architecture. What is a behavior anyway?
Just as you can add geometry (Shape3D), transformations (TransformGroup), or lights (Light) to the scenegraph, Java 3D also allows you to add blocks of executable code to the scenegraph. This code is packaged within a class derived from Behavior and is automatically executed by Java 3D in response to a set of criteria. In Java 3D, the criteria for a Behavior being executed are called wake up criteria and are defined using classes derived from WakeUpCondition.
The behavior architecture is based on the following series of events and notifications:
1. Create a Behavior and register its WakeUpCondition.
2. Java 3D enters its Behavior processing loop.
3. Java 3D checks whether the WakeUpCondition for the current Behavior is satisfied.
4. Java 3D calls Behavior.processStimulus if the WakeUpCondition is met.
5. Behavior code executes within processStimulus call.
6. Behavior sets its next WakeUpCondition.
7. The next Behavior is processed by the Behavior processing loop.
The behavior architecture facilitates good application design and code reuse because a scenegraph branch can contain not only the complex geometry for a hierarchical scenegraph element but also the code to control the scenegraph element. For example, an application might define a car that drives around a race-circuit (figure 11.1). The application allows the user to replay a prerecorded racing sequence. Just as the car itself has been decomposed into a hierarchical model, behaviors can also be modeled hierarchically. A Behavior attached to each wheel of the car will rotate the wheel and its child nodes (spokes, etc.), while a Behavior attached to the top-level node of the car allows the entire car to be moved through a prerecorded trajectory using a Behavior to interpolate between positions.
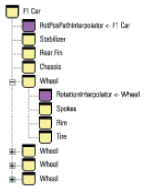
Figure 11.1 A scenegraph branch for the Formula 1 racing car. The branch contains five Behaviors, the first (RotPosPathInterpolator) to replay the car through a recorded trajectory, and four RotationInterpolator Behaviors—one to rotate each wheel
Good, reusable, class design results. Every wheel has the ability to be rotated, while every car on the track can be replayed through a trajectory. The higher level elements in the scenegraph need have no knowledge of these properties of the car object—indeed they can be added and refined as the application is developed.
At least, that’s the goal. As with everything in computers, things are never that simple and some careful design must go into ensuring that your application’s Behaviors can be executed efficiently. Imagine your application with 50 cars, each with four wheels; that comes out to 200 Behaviors to be scheduled, their WakeUp criteria checked, and their processStimulus methods to be called—potentially on every frame. Not a very efficient way to rotate the wheels on the cars! Perhaps a better way would be to create a single Behavior that could rotate every car’s wheels on the circuit—not as architecturally clean a design but a lot more efficient and scaleable.
Section 11.2 on the Behavior class will describe the capabilities of all general Behaviors and show you with the basics of writing your own Behaviors.
java.lang.Object
|
+--javax.media.j3d.SceneGraphObject
|
+--javax.media.j3d.Node
|
+--javax.media.j3d.Leaf
|
+--javax.media.j3d.Behavior
The Behavior class defines the following basic components of the behavior architecture:
Scheduling bounds
The behavior processor executes a Behavior only if the scheduling Bounds for the Behavior intersect the ViewPlatform’s activation region. That is, you define the 3D volume within which the Behavior is to be activated. For the racing car example, you might define that a car’s wheels are to be rotated only if the car is within 20 meters of the viewer.
The scheduling Bounds for a Behavior are specified using the setSchedulingBounds or setSchedulingBoundingLeaf methods. If a BoundingLeaf is specified, it takes precedence over Bounds set using setSchedulingBounds.
The Bounds for the ViewPlatform are set using the ViewPlatform.setActivationRadius method. When the Bounds for a Behavior and the ViewPlatform’s activation radius intersect, the Behavior is scheduled for processing.
Enable State
Behaviors can be manually switched on or off by modifying their enable states using the setEnable method.
WakeUp Condition
The Java 3D behavior processor calls the processStimulus method when the WakeUp condition for the behavior has been met. The WakeUp condition for a Behavior is set using the wakeupOn method. There are two opportunities to register or update a Behavior’s WakeUp condition: at the end of the initialize method and at the end of the processStimulus method. The different types of WakeUpCondition classes are described in the coming sections.
processStimulus method
A Behavior does all of its application- or behavior-specific work within the processStimulus method. Because a Behavior could have been activated by a variety of WakeUp criteria, an Enumeration is passed to the processStimulus method to allow the Behavior to evaluate exactly why it was activated and take appropriate action.
After executing its behavior-specific code, the Behavior must call the wakeupOn method to register continued interest in its WakeUp condition. If the Behavior does not call wakeupOn, it will not be activated again.
initialize method
The Java 3D behavior processor calls the initialize method to allow each Behavior in the scenegraph to set its initial WakeUpCondition.
When do Behaviors run?
A Behavior’s processStimulus methods will be called if all the following conditions are met:
11.3 Anatomy of a typical behavior
A typical Behavior implements the following three methods: constructor, initialize, and processStimulus.
Constructor
The Behavior constructor typically receives references to the scenegraph elements that will be affected by the Behavior. For example, a Behavior to move an object would receive a reference to the object’s parent TransformGroup. These external references will be stored in member variables so that they can be accessed within the processStimulus method when the Behavior is activated.
initialize method
The initialize method must be overridden to register the initial WakeUp conditions for the Behavior. The WakeupCondition object for the Behavior will typically be stored in a member variable so that the WakeupCondition can be reapplied at the end of the processStimulus method.
The last line of the initialize method will call the wakeupOn method to register the WakeupCondition object for the Behavior.
processStimulus method
A simple Behavior can ignore the Enumeration passed to the processStimulus method—the Behavior knows why it was activated and can proceed to the application-specific code. A more complex or composite Behavior will have to query the Enumeration and first determine what mode it was activated in before it can execute the appropriate Behavior code.
Within the Behavior’s processStimulus code, the Behavior will call methods on the member variables it stored in the constructor. For example, the Behavior might call Transform3D methods and then call TransformGroup.setTransform to update the position or orientation of an object.
At the end of the processStimulus method, the Behavior will almost certainly call the wakeupOn method, with a previously stored WakeupCondition, to ensure that it receives continued notifications and is rescheduled for processing.
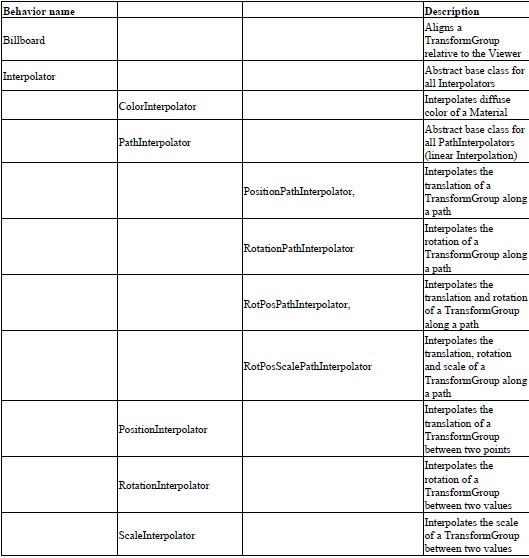
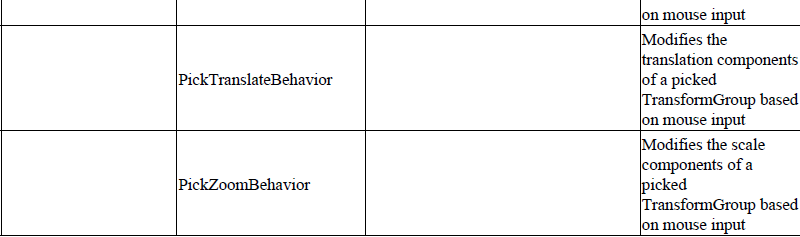
11.4 Overview of the built-in behaviors
There are 26 classes derived from Behavior in Java 3D. To describe each in detail is beyond the scope of this chapter. Please refer to the Sun API documentation for a description of each Behavior’s methods. Interpolator, mouse, and keyboard Behaviors are described in more detail in subsequent sections.
See table 11.1 for help in selecting an appropriate built-in Behavior for your application.
Table 11.1 Built-in behaviors

11.5 Overview of Wakeup criteria
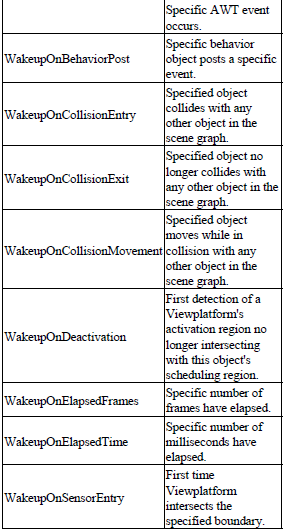
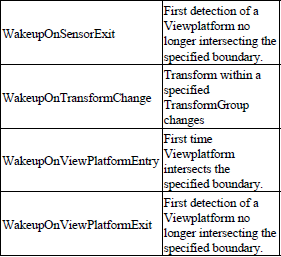
Java 3D includes 14 Wakeup criteria (or triggers) for Behaviors. These simple criteria are specified and derived from the WakeupCriterion class. In addition, Boolean combinations of simple criteria can be specified using the classes derived from WakeupCondition.
For example, you can either define a Behavior that is activated every time an object is moved (i.e., WakeupOnTransformChange, which is a WakeupCriterion):
wakeupOn( new WakeupOnTransformChange( tg ) );
Or define a Behavior that is activated every time an object is moved and a specified number of frames have elapsed (i.e., WakeupAnd, which is a WakeupCondition):
WakeupCriterion criterionArray[] = new WakeupCriterion[2];
criterionArray[0] = new WakeupOnTransformChange( tg );
criterionArray[1] = new WakeupOnElapsedFrames( 20 );
WakeupCondition wakeUpCondition = new WakeupAnd( criterionArray );
wakeupOn( wakeUpCondition );
WakeupCriterion
java.lang.Object
|
+--javax.media.j3d.WakeupCondition
|
+--javax.media.j3d.WakeupCriterion
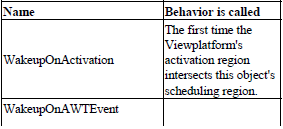
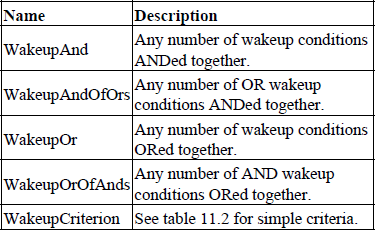
The WakeupCriterion derived classes (table 11.2) define the atomic events that can be used on their own or combined using the WakeupCondition (table 11.3).
Table 11.2 WakeupCriterion for triggering behaviors
WakeupCondition
java.lang.Object
|
+--javax.media.j3d.WakeupCondition
The WakeupCondition-derived classes are used to specify Boolean combinations of WakeupCriterion classes (table 11.3). In this way composite Wakeup conditions can be specified.
Table 11.3 WakeupConditions for combining WakeupCriterion instances
A composite Wakeup condition can be created by the following code:
From StretchBehavior.java
protected WakeupCondition m_WakeupCondition = null;
//create the WakeupCriterion for the behavior
WakeupCriterion criterionArray[] = new WakeupCriterion[2]; criterionArray[0] = new WakeupOnAWTEvent( KeyEvent.KEY_PRESSED );
criterionArray[1] = new WakeupOnElapsedFrames( 1 );
//save the WakeupCriterion for the behavior
m_WakeupCondition = new WakeupOr( criterionArray );
_________________________________________________________________
Summary
The behavior model provides a powerful mechanism to enable application code to be called in a demand-driven manner. Events that occur within the scenegraph can trigger code to be executed, analogous to event processing for GUI elements.
Behaviors can be very useful, but they hinge upon Java 3D’s behavior processor to call them when their WakeUp criteria has been met. Your Behaviors can only be as functionally rich as combinations of WakeUp criteria will allow—there is no point writing a Behavior that should be invoked when the user scratches his head, because Java 3D will never invoke it.
Java 3D provides a relatively complete set of WakeupCondition-derived classes; however, not all eventualities have been covered, and there may be occasions where there is not a suitable WakeupCondition-derived class. For example, there is currently no equivalent to VRML’s VisibilitySensor Node. Chapter 13 builds upon these concepts and illustrates how to write your own custom Behaviors.
The next sections will describe some of the most useful built-in behaviors: keyboard and mouse navigation, aligning objects relative to the viewer, and choosing different object models based on the distance from the viewer.
The Java 3D keyboard behavior responds to AWT key-press events (KeyEvent.KEY_ PRESSED and KeyEvent.KEY_RELEASED) and modifies the 4x4 transformation matrix within a TransformGroup. The changes to the TransformGroup can affect the size, position, and rotation of the TranformGroup’s child Nodes.
Keyboard navigation is typically used to simulate moving the viewer of a 3D scene, as opposed to manipulating individual objects within a scene. Mouse behaviors, described in section 11.7, are usually used for object manipulation, although there is considerable overlap between the two areas.
In terms of visual effect, there is no difference between moving the viewer (by attaching the keyboard behavior to a TransformGroup on the view side of the scenegraph) and moving the scene itself (by attaching the keyboard behavior to a root TransformGroup on the scene side of the scenegraph). Figure 11.2 shows a diagram of the typical scenegraph structure that illustrates these two approaches.
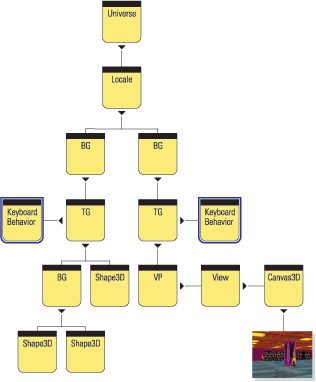
Figure 11.2 A Java 3D scenegraph. A keyboard behavior can be added either to the scene side of the scenegraph (left) or to the view side of the scenegraph (right)
There are advantages and disadvantages to both approaches. If the keyboard behavior is added on the scene side of the scenegraph, you really are moving the scene. For a single view and with a single ViewPlatform, this will not be noticeable; however, once there are multiple views of the scene or predefined views have been set up using numerous ViewPlatforms, the effects of moving the scene will be noticeable.
The advantage of attaching the behavior to the scene side of the scenegraph is that most keyboard behaviors expect this to be the case (including the built-in behavior). Remember that the inverse of the multiplication of the Transform3Ds above the ViewPlatform is used to set the view projection matrix. If the keyboard behavior is added on the view side of the scenegraph, the motion and rotation keys are reversed.
If you need to support multiple views, add the keyboard behavior to the view side of the scenegraph and modify the behavior to account for the reversal in movement direction. Otherwise, it will probably be easier to add the behavior to a root TransformGroup on the scene side of the scenegraph.
KeyNavigatorBehavior
java.lang.Object
|
+--javax.media.j3d.SceneGraphObject
|
+--javax.media.j3d.Node
|
+--javax.media.j3d.Leaf
|
+--javax.media.j3d.Behavior
|
+--com.sun.j3d.utils.behaviors.keyboard.
KeyNavigatorBehavior
The KeyNavigatorBehavior is the built-in Java 3D keyboard navigation behavior—part of the utilities package. The KeyNavigatorBehavior is very easy to use and it typically consists of: creating a KeyNavigatorBehavior object and passing it the TransformGroup that the Behavior should modify, setting the scheduling Bounds for the Behavior, ensuring the ALLOW_TRANSFORM_WRITE capability bit is set on the TransformGroup, and adding the KeyNavigatorBehavior to the scenegraph.
From AppearanceTest.java
//create the TransformGroup that the Key behavior will affect
TransformGroup zoomTg = new TransformGroup();
zoomTg.setCapability( TransformGroup.ALLOW_TRANSFORM_WRITE );
zoomTg.setCapability( TransformGroup.ALLOW_TRANSFORM_READ );
//create the Key behavior and add to the scenegraph
KeyNavigatorBehavior key = new KeyNavigatorBehavior( zoomTg );
key.setSchedulingBounds( createApplicationBounds() );
key.setEnable( true );
objRoot.addChild( key );
_________________________________________________________________
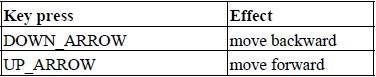
The keyboard controls for the KeyNavigatorBehavior are implemented in the KeyNavigator class, which performs the matrix modifications based on key presses. The KeyNavigator class has a fairly sophisticated implementation that includes a large number of movement key combinations and acceleration of movement. The key events that the KeyNavigator class handles are shown in table 11.4.
Table 11.4 KeyNavigatorBehavior keyboard controls
Writing a simple keyboard behavior
Simple keyboard processing is easy to accomplish; for example, the following class simply modifies a TransformGroup in response to presses of the left and right arrow keys.
From the AvatarTest example, CarSteering.java
public class CarSteering extends Behavior
{
private WakeupOnAWTEvent wakeupOne = null;
private WakeupCriterion[] wakeupArray = new
WakeupCriterion[1];
private WakeupCondition wakeupCondition = null;
private final float TRANSLATE_LEFT = -0.05f;
private final float TRANSLATE_RIGHT = 0.05f;
TransformGroup m_TransformGroup = null;
public CarSteering( TransformGroup tg )
{
m_TransformGroup = tg;
wakeupOne = new WakeupOnAWTEvent(KeyEvent.KEY_PRESSED);
wakeupArray[0] = wakeupOne;
wakeupCondition = new WakeupOr(wakeupArray);
}
//Override Behavior's initialize method to set up wakeup
criteria public void initialize()
{
//Establish initial wakeup criteria
wakeupOn(wakeupCondition);
}
//Override Behavior's stimulus method to handle the event.
public void processStimulus(Enumeration criteria)
{
WakeupOnAWTEvent ev;
WakeupCriterion genericEvt;
AWTEvent[] events;
while (criteria.hasMoreElements())
{
genericEvt = (WakeupCriterion) criteria.nextElement();
if (genericEvt instanceof WakeupOnAWTEvent)
{
ev = (WakeupOnAWTEvent) genericEvt;
events = ev.getAWTEvent();
processAWTEvent(events);
}
}
//Set wakeup criteria for next time
wakeupOn(wakeupCondition);
}
//Process a keyboard event
private void processAWTEvent(AWTEvent[] events)
{
for( int n = 0; n <events.length; n++)
{
if( events[n] instanceof KeyEvent)
{
KeyEvent eventKey = (KeyEvent) events[n];
if( eventKey.getID() == KeyEvent.KEY_PRESSED )
{
int keyCode = eventKey.getKeyCode();
int keyChar = eventKey.getKeyChar();
Vector3f translate = new Vector3f();
Transfo