CHAPTER 9
Revocation certificate
A revocation certificate is a certificate to revocate (invalidate) your key and warn others that they must not trust in your key anymore. It should only be used if your key gets compromised (e.g.: lost, forgotten, erased, destroyed, robbed or violated). Since you are not able to use your key anymore, you have to warn other people about it.
9.1. How a revocation certificate works
Below there is an analogy to help you understand the damage that could happen in case your key is gets compromised, and why a revocation certificate is necessary:
Imagine that your wallet has been robbed with all your documents inside it. The robber might use your documents to impersonate you, commit crimes, sign documents, etc., all using your name, and there is nothing you can do prevent him from doing that. All you can do is to go to a police station and make a notification that your documents have been robbed. You will then be issued new documents, probably with different numbers, codes or dates, and then you will be able to use your new documents normally.
If anything shows up in your name between the time you were robbed and the time you notified the police, you will know it was done by the criminals. In other words, you cannot prevent the criminals from using your documents, but you can minimize the damage by taking these measures. And obviously the faster you notify the police the lesser the damage will be.
A revocation certificate has a similar purpose: if your private key gets compromised and you don't have a backup copy of it, you have to revoke it, warn others that your old key is no longer valid, generate a new key and give to others your new key, valid from now on.
You should create a revocation certificate as soon as possible, preferably right after you create your key pair because it is the only guarantee you have against possible damages.
It is important to note that a revocation certificate is really useful only if you distribute your key in a key server, because there is the place where most people will look for your key and synchronize it, otherwise you would have to warn one by one of them.
9.2. Creating a revocation certificate
1 – Start GnuPG

In the above command certrevoc.asc is the name of the file that will contain your revocation certificate. Change mykey by the identifier of your key.
2 – Choosing the revocation reason
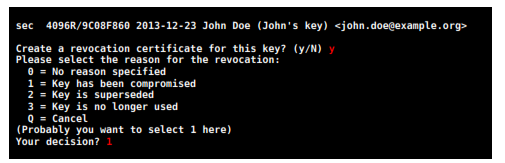
The first step to create a revocation certificate is to choose a reason for it. By default GnuPG always suggests the second option (number 1), but you can choose between any of them. When you are done press  .
.
3 – Entering a description
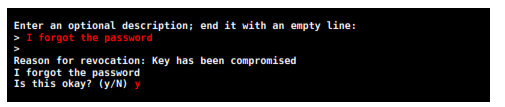
Here you can enter a description to complement the revocation reason chosen previously. This step is optional. After choosing the reason (or not), finish by leaving a blank line, confirm by entering y and press  .
.
4 – Entering your password

Enter your password to finish the process. If you are using the command line then your password does not show up while you type.
5 – Conclusion
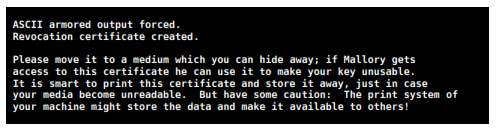
After conclusion, GnuPG shows a message suggesting how to protect your certificate (see more instructions below).
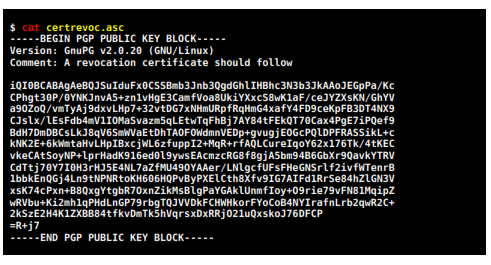
To verify your certificate just type the command below in the terminal (if you are using Windows change cat by type):
9.3. Storing your certificate
Your revocation certificate is your only guarantee in case your private key gets compromised, so it is very important that you protect it carefully.
One idea might be to print a copy of your certificate, or store it in a CD/DVDROM disc or USB drive, and store it in a safe or another safe place in your house.
9.4. Revoking your key
Revoking a key is an easy process, however it is recommended that you read chapter 17 before doing this so you may better understand the implications of using a key server.
The basic process is to revoke the key locally and then upload it to a key server.
1 – Import your revocation certificate
First you import your revocation certificate (generated in step 9.2) into your keyring:

Now your key is unusable because it has already been revoked.
2 – Send it to a key server
Send your revoked key to a key server (change key_ID by your actual key ID):

Now your key is publicly revoked. Next time someone searches for your key or refreshes their keys database they will know that your key has been revoked. It is also important to generate a new key and publish it so people can still contact you.
For more information on how to use key servers check out chapter 17.