![]()
2 Installing 2D electric-field software
In this chapter, we’ll discuss how to install and to test trial or purchased software. As a specific example, consider a trial of the Electrostatics Toolkit for two-dimensional electric fields. To request a trial, contact us a techinfo@fieldp.com. You will receive an E mail message that includes information like the following:
Name: Ernest Lawrence
Organization: LBL
Software: Electrostatics Toolkit
Date: August 20, 2014
Registration code: LAWRENCEER
Thanks for requesting a trial of Field Precision software. To download the installer, please use this link:
Package: Electrostatics Toolkit Basic
Link: www.dsite.us/download/bin16/ElectrostaticsToolkitSetupBasic.exe
User: bin16
Password: BxHv7821%
Click the link to open it in your browser and copy-and-paste the User and Password infor- mation to start the download process. Save the file ElectrostaticsToolkitSetupBasic.exe to a convenient location on your hard drive or a USB drive. If you have purchased the software, be sure to keep a copy of the file in case you need to move the software or to install it on a second computer.
When you run the installer, it sets up a directory containing programs, instruction manuals and examples. A file manager is useful to check out the new materials. Because number- crunching finite-element programs produce a lot of data, a good file manager is a critical tool for your future work. Figure 2 shows a screenshot of FP File Organizer, a free utility included with our software.
If you check the root directory of the hard drive, youll see that the installer has created the directory c:fieldp basic (or c:fieldp pro if you purchased the professional version). Figure 2 shows the directory contents (left-hand side). The file readme basic.html is a useful summary of instructions. The tricomp sub-directory (right-hand side) contains the programs, documents and examples of the 2D package:
• dielectric constants.html. Relative dielectric constants for a variety of materials, useful for setting up electrostatic solutions.
• estat.exe. The main solution program that combines information on the computational mesh and material properties to find electrostatic potential values at nodes. The program also creates graphs and plots of the solution (i.e., post-processing).
• estat.pdf. The EStat instruction manual.
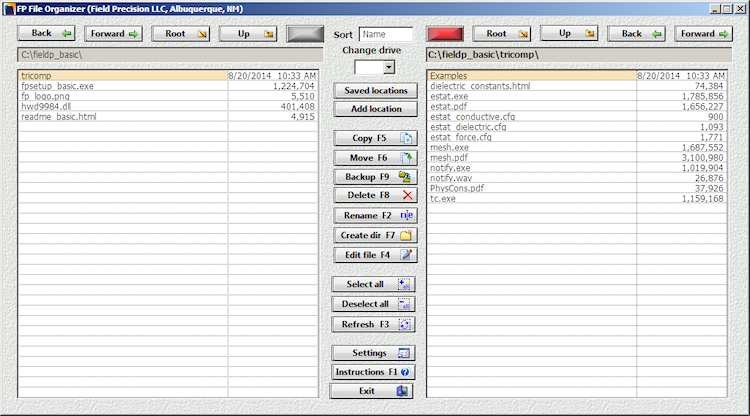
Figure 2: FP File Organizer, fp basic directory.
• estat conductive.cfg, estat dielectric.cfg and estat force.cfg. Configuration files for the EStat post-processor for different types of electrostatic solutions.
• mesh.exe. The automatic mesh generator to create 2D conformal, triangular meshes.
• mesh.pdf. The instruction manual for Mesh.
• notify.exe and notify.wav. Utility programs to signal the completion of an automatic batch run.
• PhysCons.pdf. A reference sheet of physical constants.
• tc.exe. An automatic controller for programs and resources of the 2D packages that we will discuss in detail later.
The examples sub-directory contains directories of prepared examples for both the Mesh and EStat programs (Figure 3). These examples can help you get off to a quick start. Well talk about running them later. For now, well concentrate on getting all components running.
The Basic versions of our programs use Internet license management. The installer creates a TriComp icon on your desktop (Fig. 4). Click on it to run tc.exe, the TriComp program launcher. Well discuss the functions of the buttons latter. For now, click the Activation button to launch FPSetup Basic.exe (Fig. 5, left-hand side). Click the License button, read the license and then close the text window. Click the Setup button to open the activation dialog (Fig. 5, right-hand side). Enter the registration code that we sent and pick any user name. Check that you accept the terms of the license and click the Process button to receive a unique Machine number for your computer. This number is copied to the clipboard.

Figure 3: FP File Organizer display of example directories
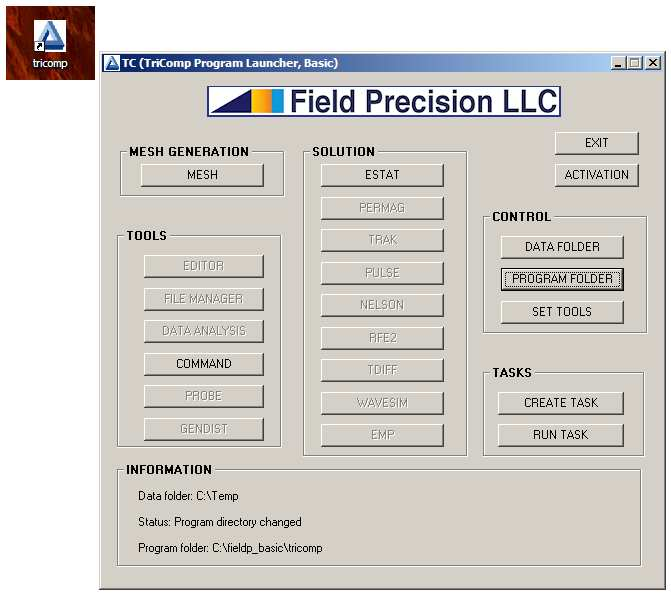
Figure 4: TriComp icon and TC program launcher.
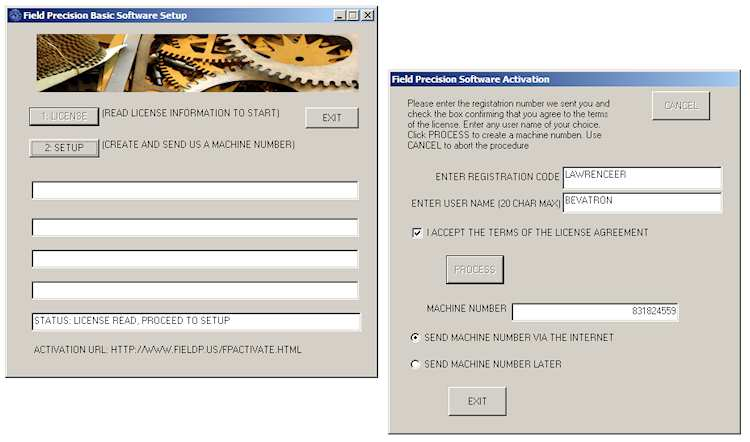
Figure 5: FPSetup Basic program and Setup dialog
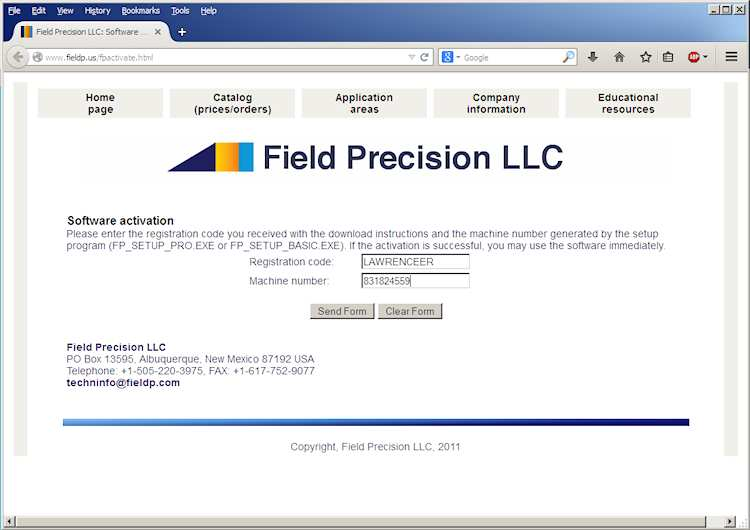
Figure 6: Internet activation page.
Check the Send machine number via Internet option and click Exit. Your default browser opens on our activation page (Fig. 6). Paste in the machine number, type your registration code and press Send form. The software is now ready to use. To check the setup, return to the program launcher (Fig. 4) and click the Mesh button. The program should open with no error message. There are two problems you may encounter.
Problem: the Mesh button is not active in tc.exe.
Solution: Click the Program folder button and navigate to c:fieldp basictricomp.
Problem: Mesh reports an Internet activation problem Solution: Either your computer is not connected to the Internet or you are connected through a proxy server. If your computer is on a company network with a proxy server, it is neces- sary to set an environmental variable to use the software. See this blog post for instructions: http://fieldp.com/myblog/2011/identifying-a-proxy-server/.
In the next chapter, well solve and analyze a real-world problem using one of the prepared EStat examples.