
Resolution
Resolution describes how much detail an image can hold. An image’s resolution is determined by the image’s pixel count and the bit depth of each pixel. A pixel is the smallest discernible element in an image. Each pixel displays one color. A pixel’s color and brightness range is determined by its bit depth. Pixels are
increases, the image’s detail becomes sharper.
confusing. But without an understanding of how resolution changes between devices, you can inadvertently compromise the quality of your images.
A camera’s resolution is calculated by the number of megapixels (millions of
Camera Resolution
pixels) its digital image sensor is capable of capturing. A display’s resolution is
A camera’s potential resolution is measured in megapixels (the number of millions of
expressed in pixels per inch (ppi) or as a maximum dimension, such as 1920 x
pixels used to record the image). The larger the number of megapixels, the more information is stored in the image. The reason a camera has a potential resolution is
1280 pixels. A printer’s maximum resolution is expressed in dots per inch (dpi)— that lens quality, the ISO setting, and the compression setting can affect the quality of
the number of dots it can place within a square inch of paper. The number of
megapixels a camera is capable of capturing can be used to roughly determine
,” on page 7.
the largest high-quality print that the camera is ultimately capable of producing.
The number of megapixels a camera is capable of capturing can be used to roughly
Megapixels
1
1
2
2.5
4
5
7
Print dimensions at 200 dpi
4" x 3"
4" x 3.5"
6" x 4"
10" x 6"
12" x 8"
14" x 9"
16" x 11"
1 MB
2 MB
3 MB
7 MB
12 MB
15 MB
21 MB
The minimum camera resolution suitable for orthodontic purposes would be around 3-4 Megapixels. Although a higher resolution would be an added advantage, it ultimately results in larger file sizes and thus requires larger capacity hard drives for storage.

Focal Length
An important attribute of a lens, besides its quality, is its focal length. Focal length is technically defined as the distance from the part of the optical path where the light rays converge to the point where the light rays passing through the lens are focused onto the image plane—or the digital image sensor. This distance is usually measured in millimeters. From a practical point of view,

focal length can be thought of as the amount of magnification of the lens. The longer the focal length, the more the lens magnifies the scene. In addition to magnification, the focal length determines the perspective and compression of the scene.
Shutter Speed
Shutter speed refers to the amount of time the shutter is open or the digital image sensor is activated. The exposure of the image is determined by the combination of shutter speed and the opening of the aperture. Shutter speeds are displayed as fractions of a second, such as 1/8 or 1/250. Shutter speed increments are similar to aperture settings, as each incremental setting either halves or doubles the time of the previous one. For example, 1/60 of a second is half as much exposure time as 1/30 of a second, but about twice as much as 1/125 of a second.
Macro Function / Lens
Macro photography refers to close-up photography; the classical definition that the image projected on the "film plane" (i.e film or a digital sensor) is the same size as the subject. Most Point-&-Shoot digital cameras have a built-in Macro function that is reasonable for dental
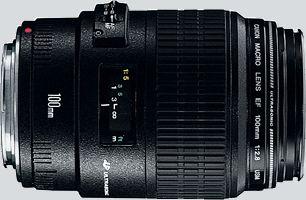

photography purposes. However, a dedicated Macro lens attached to a DSLR camera provides even better close-up photos usually with higher definition and better focus.


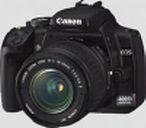
There are two types of digital cameras available; the “Point & Shoot” digital camera, and the DSLR (Digital Single Lens Reflex) cameras. The DSLRs are what professional photographers currently use, as they allow maximum flexibility and customization for the highest possible quality of digital images. There are many cameras from both spectrums that are suitable for dental/orthodontic record-taking purposes, however, this section will focus on the two most important general requirements for any camera chosen; namely the ring flash, and the macro lens.
Ring Flash Vs Point Flash
The Point Flash may sometime produce fairly good light distribution when used for clinical photographs. However, frequently, distracting shadows, which may also obstruct important details do occur. These
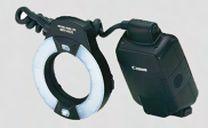

are often irreparable using image editing software, and will detract from the final quality of the image, and possibly the information gained from it.
Point Flash
 Ring Flash
In contrast, the Ring Flash eliminates such shadows by allowing a more even and thorough distribution of light during extra and intra-oral photographs (See figure on left), and thus the quality of the image is enhanced.
It is highly recommended to use a Ring Flash for orthodontic photography.Macro Lens Vs Macro Function
Many “Point & Shoot” digital cameras have a Macro function; a function that allows for taking close-up shots of objects in good focus and depth of field. However, this is not entirely satisfactory for great and consistent results every time. A dedicated macro lens that can be attached to the camera and adjusted as needed is by far the superior choice.
Based on the previous points, DSLR Cameras are highly recommended for taking orthodontic photographic records. The high level of professional customization and wide range of possible settings allow for the best professional-looking, high-quality photos possible.
There are two sets of double-ended retractors; one set with a Regular and Small size either end (Small set). These are mainly used for intra-oral occlusal shots (mirror shots). The other set has a Narrow end and a Wide end on the other (Large set). These are used for intra-oral frontal and buccal shots.
Although other types of retractors are available on the market, it is accepted by most that this selection presents the most ideal set to be used for clinical photography, as they greatly facilitate taking almost
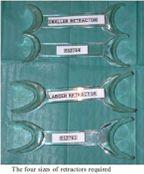
any kind of intra-oral photographs with clarity and with the largest possible field of vision. Smaller one-piece orthodontic bonding retractors are generally NOT a good choice for orthodontic purposes, especially for buccal and occlusal shots, as their retraction potential is very limited, and it can often prove to be a “painful experience” for the patient.
It is recommended to buy a good quality brand of these recommended retractors to ensure durability and reliability, with recurrent disinfection procedures.
Many types of mirrors have been used for clinical photography, ranging from front-silvered mirrors to highly-polished Stainless Steel mirrors. Front-silvered mirrors seem to offer the best image quality and light distribution over other types of mirrors. As you can see from the accompanying figure, with front-silvered mirrors, no “ghost” image, or doublelayering occurs. In contrast, with glass or rear-coated silvered mirrors, the ghost image can severely affect the quality of the image, resulting in “Haziness” or a “DoubleImage”. Also, light reflection is not on par with the front-silvered mirrors, leading to a “dimmed”, darkened image as an result.
end
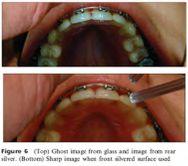 Front-coated Silvered Mirror
In addition, it is preferred to use “long-handled”
mirrors (see Image) as they allow better control and
handling by the clinician during the occlusal shots. You
can find different sizes for use with different patients
depending on age and mouth-opening size, but
generally, the “Medium” sized mirrors would be fit for
use with most patients.
Mirrors with no handles may be used successfully but
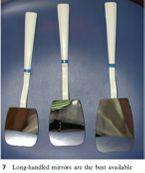
are more tricky to handle, especially when “juggling” an
“expensive” digital camera with the other hand!