Financial : Although the Connexions site makes it possible for you to download a PDF file for
this module at no charge, and also makes it possible for you to purchase a pre-printed version
of the PDF file, you should be aware that some of the HTML elements in this module may not
translate well into PDF.
I also want you to know that, I receive no financial compensation from the Connexions
website even if you purchase the PDF version of the module.
In the past, unknown individuals have copied my modules from cnx.org, converted them to
Kindle books, and placed them for sale on Amazon.com showing me as the author. I neither
receive compensation for those sales nor do I know who does receive compensation. If you
purchase such a book, please be aware that it is a copy of a module that is freely available on
cnx.org and that it was made and published without my prior knowledge.
Affiliation : I am a professor of Computer Information Technology at Austin Community
College in Austin, TX.
8.10. Complete program listing
A complete listing of the program discussed in this module is provided in Listing 5 .
/*Slick0170java
Copyright 2013, R.G.Baldwin
Cause a ladybug sprite to move inside the game window by
pressing the arrow keys or the left and right mouse
buttons. The mouse pointer must be inside the game window
for the mouse buttons to move the sprite.
Right arrow or right mouse button: move right
Left arrow or left mouse button: move left
Up arrow: move up
Down arrow: move down
The program also gets and displays the X and Y
coordinates of the mouse pointer.
Much of this program is identical to the earlier program
named Slick0150a.java.
Tested using JDK 1.7 under WinXP
*********************************************************/
import org.newdawn.slick.AppGameContainer;
import org.newdawn.slick.BasicGame;
import org.newdawn.slick.GameContainer;
import org.newdawn.slick.Graphics;
import org.newdawn.slick.Image;
import org.newdawn.slick.SlickException;
import org.newdawn.slick.Input;
public class Slick0170 extends BasicGame{
Image bug = null;
Image background = null;
float backgroundWidth;
float backgroundHeight;
float bugX = 100;
float bugY = 100;
float bugWidth;
float bugHeight;
float xStep = 4.0f;//horizontal step size
float yStep = 3.0f;//vertical step size
float bugScale = 0.75f;//drawing scale factor
//Frame rate we would like to see and maximum frame
// rate we will allow.
int targetFPS = 60;
//This is new code relative to Slick0150a.java
int mouseX = 0;
int mouseY = 0;
//----------------------------------------------------//
public Slick0170(){//constructor
//Set the title
super("Slick0170, baldwin");
}//end constructor
//----------------------------------------------------//
public static void main(String[] args)
throws SlickException{
AppGameContainer app = new AppGameContainer(
new Slick0170(),414,307,false);
app.start();
}//end main
//----------------------------------------------------//
@Override
public void init(GameContainer gc)
throws SlickException {
bug = new Image("ladybug.png");
background = new Image("background.jpg");
backgroundWidth = background.getWidth();
backgroundHeight = background.getHeight();
bugWidth = bug.getWidth()*bugScale;
bugHeight = bug.getHeight()*bugScale;
System.out.println(
"backgroundWidth: " + backgroundWidth);
System.out.println(
"backgroundHeight: " + backgroundHeight);
System.out.println("bugWidth: " + bugWidth);
System.out.println("bugHeight: " + bugHeight);
gc.setTargetFrameRate(targetFPS);//set frame rate
}//end init
//----------------------------------------------------//
@Override
public void update(GameContainer gc, int delta)
throws SlickException{
//Most of the code in this method is different from
// the code in Slick0150a.java.
//Get a reference to the Input object.
Input input = gc.getInput();
//Control horizontal bug position by pressing the
// arrow keys or pressing the left and right mouse
// buttons.
if(input.isKeyDown(Input.KEY_RIGHT) ||
input.isMouseButtonDown(Input.MOUSE_RIGHT_BUTTON)){
bugX += xStep;
}//end if
if(input.isKeyDown(Input.KEY_LEFT) ||
input.isMouseButtonDown(Input.MOUSE_LEFT_BUTTON)){
bugX -= xStep;
}//end if
//Control vertical bug position by pressing the arrow
// keys. Vertical bug position cannot be controlled by
// pressing mouse buttons.
if(input.isKeyDown(Input.KEY_UP)){
bugY -= yStep;
}//end if
if(input.isKeyDown(Input.KEY_DOWN)){
bugY += yStep;
}//end if
//Test for collisions with the sides of the game
// window and stop moving the bug when a collision
// occurs.
if(bugX + bugWidth >= backgroundWidth){
//Set the position to the right edge less the width
// of the sprite.
bugX = backgroundWidth - bugWidth;
}//end if
//Continue testing for collisions with the edges.
if(bugX <= 0){
bugX = 0;
}//end if
if(bugY + bugHeight >= backgroundHeight){
bugY = backgroundHeight - bugHeight;
}//end if
if(bugY <= 0){
bugY = 0;
}//end if
//Get and save the X and Y coordinates of the mouse
// pointer.
mouseX = input.getMouseX();
mouseY = input.getMouseY();
}//end update
//----------------------------------------------------//
public void render(GameContainer gc, Graphics g)
throws SlickException{
//set the drawing mode to honor transparent pixels
g.setDrawMode(g.MODE_NORMAL);
//Draw the background to erase the previous picture.
background.draw(0,0);
//Draw the bug in its new location.
bug.draw(bugX,bugY,bugScale);
//Display the location of the mouse pointer. This is
// new code relative to Slick0150a.java
g.drawString(
"X: " + mouseX + " Y: " + mouseY,100f,10f);
}//end render
}//end class Slick0170
//======================================================//
Figure 8.6. Listing 5. Source code for the program named Slick0170.
Listing 5. Source code for the program named Slick0170.
-end-
Solutions
Chapter 9. Slick0180: Sprite sheet animation, part 1*
It is licensed under the Creative Commons Attribution License:
http://creativecommons.org/licenses/by/3.0/
2013/02/05 19:16:54 -0600
Summary
Learn to use objects of the Slick2D SpriteSheet class and the Animation class to perform simple
spritesheet animation.
9.1. Table of Contents
General background information
9.2. Preface
This module is one in a collection of modules designed to teach you about the anatomy of a game
engine.
Although the modules in this collection will concentrate on the Java game library named Slick2D,
the concepts involved and the knowledge that you will gain is applicable to different game engines
written in different programming languages as well.
The purpose of this module is to teach you how to use objects of the SpriteSheet class and the
Animation class to perform simple sprite sheet animation.
Viewing tip
I recommend that you open another copy of this module in a separate browser window and use the
following links to easily find and view the images and listings while you are reading about them.
Images
Image 1 . The sprite sheet.
Image 2 . Random screen shot of the animation in action.
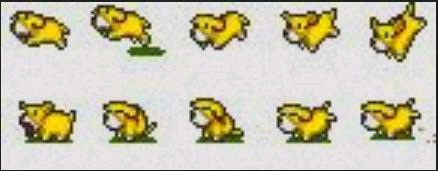
Image 3 . Random screen shot of the animation in action.
Image 4 . Random screen shot of the animation in action.
Listings
Listing 1 . Beginning of the class named Slick0180.
Listing 2 . Beginning of the init method.
Listing 3 . Create a SpriteSheet object.
Listing 4 . Create a new Animation object.
Listing 5 . Set frame rate and display location.
Listing 6 . The update method.
Listing 7 . The render method.
Listing 8 . Source code for Slick0180 .
9.3. Preview
I will present a program that uses the top row of sprites from the sprite sheet shown in Image 1
along with a SpriteSheet object and an Animation object to produce an animation of a dog
playing. (Note that the overall sprite sheet image is quite small, and the image shown in Image 1
was enlarged for this presentation.)
Figure 9.1. Image 1. The sprite sheet.
Image 1. The sprite sheet.

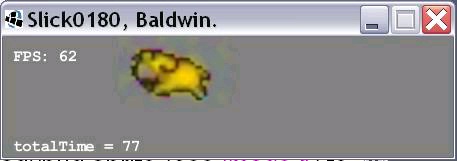

Image 2 , Image 3 , and Image 4 show random screen shots taken while the animation was running.
Figure 9.2. Image 2. Random screen shot of the animation in action.
Image 2. Random screen shot of the animation in action.
.
Figure 9.3. Image 3. Random screen shot of the animation in action.
Image 3. Random screen shot of the animation in action.
.
Figure 9.4. Image 4. Random screen shot of the animation in action.
Image 4. Random screen shot of the animation in action.
Operating characteristics
The program uses only the five sprites in the top row of Image 1 . The five sprites in the bottom row are ignored. (A program that uses all ten sprites in both rows will be presented in the next
module.)
By default, the program displays one cycle of five sprites each second. (Each sprite is displayed
for 200 milliseconds, or 0.2 seconds.)
Clock time
As you can see in Image 4 , clock time in seconds is displayed below the animation. That makes it easy to visually correlate the repetition rate with the clock.
Repetition rate is independent of the frame rate
The time that each image of the dog is displayed is independent of the frame rate. This can be
demonstrated by changing the value of a variable named targetDelta and observing the
relationship between the repetition rate and the clock. However, best results are achieved by
keeping targetDelta less than the display time for each sprite ( duration ) .
What you have learned
In the previous module, you learned how to use the following methods of the Input class to get user input:
isKeyDown
isMouseButtonDown
getMouseX
getMouseY
What you will learn
In this module, you will learn how to use objects of the SpriteSheet class and the Animation
class to perform simple sprite sheet animation. In the next module, you will learn how to perform
more complex animation.
9.4. General background information
The SpriteSheet class
Sprite sheets are individual sprites (or images) combined into a single image as shown in Image 1
. Slick2D provides the SpriteSheet class that makes it relatively easy for you to access each of the
sub-images of the sheet as separate images in your program.
The SpriteSheet class assumes that all the images are evenly spaced. It splits the source image
into an even grid of cells and allows you to access the image in each cell as a separate image.
(Slick2D also provides the capability to work with packed sprite sheets with fewer restrictions on
the organization of the sprite sheet.)
The Animation class
A series of images
Since well before the first Disney movies, animations have been created by displaying a series of
images one after the other.
Each image (or frame) is typically displayed for the same amount of time, but that is not always
the case, as will be demonstrated by the program in the next module.
Slick2D provides a class named Animation that does most of the heavy lifting in the display of an
animation.
Create, populate, and configure the object
There are several different ways to create, populate, and configure an Animation object
containing a series of images, with the same or different display durations for the images.
Displaying the images
By default, calling one of several overloaded draw methods on the Animation object causes it to
display the sequence of images and to start over when the last image has been displayed. However,
that behavior can be overridden in order to provide more customized behavior.
(It is actually more complicated that that, as you will see later in the discussion of the render
method.)
Animations can be stopped, started and restarted (returning to the first frame of the animation) .
The capabilities of the Animation class go far beyond those illustrated in this module and the
next.
9.5. Discussion and sample code
The class named Slick0180
Will discuss in fragments
A complete listing of the program named Slick0180 is provided in Listing 8 . I will break the program down and discuss it in fragments.
Listing 1 shows the beginning of the class named Slick0180 down through the main method.
public class Slick0180 extends BasicGame{
Image spriteSheetImage = null;
float spriteSheetWidth;
float spriteSheetHeight;
int spritesPerRow = 5;
int spritesPerColumn = 2;
int targetDelta = 16;//msec
int duration = 200;//time to display each sprite
long totalTime = 0;//accumulate total time for display
SpriteSheet spriteSheet;
Animation animation;
int spriteWidth;
int spriteHeight;
float spriteX = 0;//sprite drawing location
float spriteY = 0;
//----------------------------------------------------//
public Slick0180(){
//Call to superclass constructor is required.
super("Slick0180, Baldwin.");
}//end constructor
//----------------------------------------------------//
public static void main(String[] args)
throws SlickException{
AppGameContainer app = new AppGameContainer(
new Slick0180(),450,120,false);
app.start();//this statement is required
}//end main
Figure 9.5. Listing 1. Beginning of the class named Slick0180.
Listing 1. Beginning of the class named Slick0180.
Instance variables
Listing 1 declares a number of instance variables. The purpose of these variables should become clear based on their names and their usage that I will discuss later.
The constructor and the main method
There is nothing new in the constructor and the main method in Listing 1 .
The init method
The init method begins in Listing 2 . The embedded comments should provide a sufficient explanation of the code in Listing 2 .
public void init(GameContainer gc)
throws SlickException {
spriteSheetImage = new Image("Slick0180a1.png");
//Enlarge the sprite sheet.
Image temp = spriteSheetImage.getScaledCopy(580,224);
spriteSheetImage = temp;
//Get, save, and display the width and the height
// of the sprite sheet.
spriteSheetWidth = spriteSheetImage.getWidth();
spriteSheetHeight = spriteSheetImage.getHeight();
System.out.println(
"spriteSheetWidth: " + spriteSheetWidth);
System.out.println(
"spriteSheetHeight: " + spriteSheetHeight);
//Compute the width and height of the individual
// sprite images.
spriteWidth = (int)(spriteSheetWidth/spritesPerRow);
spriteHeight =
(int)(spriteSheetHeight/spritesPerColumn);
Figure 9.6. Listing 2. Beginning of the init method.
Listing 2. Beginning of the init method.
Create a SpriteSheet object
Listing 3 creates a new SpriteSheet object based on the sprite sheet image along with the width and height of the individual sprites.
//Instantiate a new Spritesheet object based on the
// width and height of the tiles.
spriteSheet = new SpriteSheet(spriteSheetImage,
spriteWidth,
spriteHeight);
Figure 9.7. Listing 3. Create a SpriteSheet object.
Listing 3. Create a SpriteSheet object.
Create a new Animation object
Listing 4 creates a new Animation object that will process the SpriteSheet object instantiated in
//Create a new animation based on a selection of
// sprites from the sprite sheet.
animation = new Animation(spriteSheet,
0,//first column
0,//first row
4,//last column
0,//last row
true,//horizontal
duration,//display time
true//autoupdate
);
Figure 9.8. Listing 4. Create a new Animation object.
Listing 4. Create a new Animation object.
Constructor parameters
Obviously, the first parameter to the constructor for the Animation class specifies the
SpriteSheet object.
The second and third parameters specify that the first image in the sequence should be the top-left
image in Image 1 .
The fourth and fifth parameters specify that the last image in the sequence should be the top-right
image in Image 1 .
The true value for the sixth parameter specifies that the images should be scanned horizontally.
The duration value in the seventh parameter specifies that each image should be displayed for 200
milliseconds.
The true value for the last parameter specifies that the display should continue cycling through the
images until the animation is stopped.
Set frame rate and display location
The code is Listing 5 sets the frame rate and specifies the drawing location. The drawing location is the location within the game window where the sprite will be displayed.
gc.setShowFPS(true);//show FPS
////set frame rate
gc.setTargetFrameRate((int)(1000/targetDelta));
//Set drawing location. This is the location within
// the game window where the sprite will be displayed.