Chapter 11:
Generating More Sales Leads on Autopilot with a Facebook Messenger Bot in 2020 and Beyond
Using Facebook as one of your business’ main communication channels is a top complete marketing tactic. Because customer care can be time-consuming, I’ve searched and found a way to help you automate it with artificial intelligence.
In this lesson I’m going to show you how you can easily automate lead capture and nurturing on Facebook with a messenger chatbot.
Finding the Right Messenger Bot Solution for Your Business
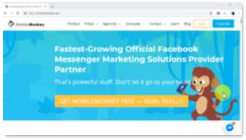
To use Messenger Chatbots, you first need to sign up to a good automation platform that offers chatbot integration. I have used and recommend “MobileMonkey,” an official Facebook Marketing provider that lets you build your own chatbots for free.
With MobileMonkey, you don’t need to know how to code to build your own chatbots.
1. Be logged in to your Facebook account
2. You just have to go to https://mobilemonkey.com/ and to click on “get MobileMonkey free”.
3. Then click on “get started for free” while logged in to your Facebook account to connect to the service.
Note: I’m only suggesting you start with this bot because it is free, and flexible for Facebook use. I’ll give you some other options for website use that will be easier and better for you over the long haul.
Building A Facebook Messenger Chatbot
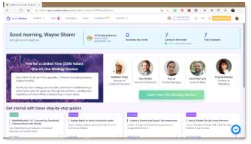
After connecting MobileMonkey to your Facebook account, you’ll be asked to connect MobileMonkey to the Facebook page where you’ll install your new messenger chatbot. Select the page or pages where you’ll install your new chatbot and click on “connect.”
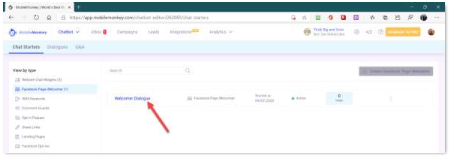
Next, you’ll select from the “chatbot” drop down menu. Choose “Chat Starters.”

You should have the “Facebook Page Welcomer” menu highlighted. There’ll be a “Welcomer Dialogue” already present in most cases. Click on that dialogue.
The “Welcomer Dialogue” is the bot your Facebook page visitor will interact with when they click to send you a message.
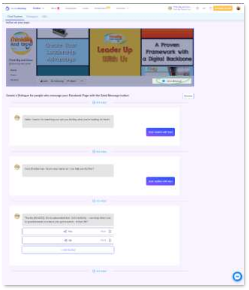
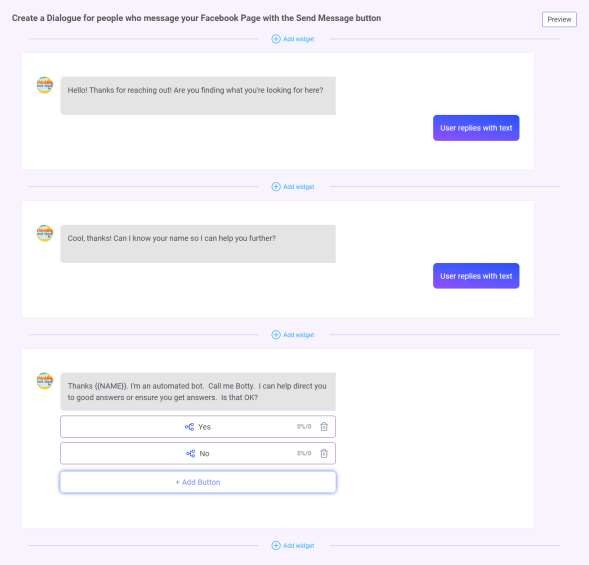
There’re 2 pre-written messages which you can change to anything you like and add more the “Add Widget” plus sign above or below each existing widget.
This “Chat Starter” section should only need a couple of items, as its purpose is to capture the attention or engage the visitor on you Facebook page. Notice I’ve added a third widget to get the visitor to ask for more.
It has 2 answers — Yes or No.
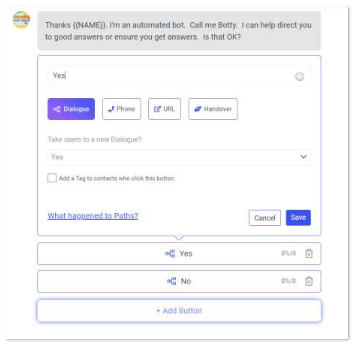
Let’s look at the Yes path.
1. I entered the name of the button as “Yes.”
2. I ensured the “Dialogue” button was selected because I want to continue the dialogue.
3. Then I needed to tell the bot which dialogue to use. I created a new one called “Yes.”
4. Then I clicked “Create.
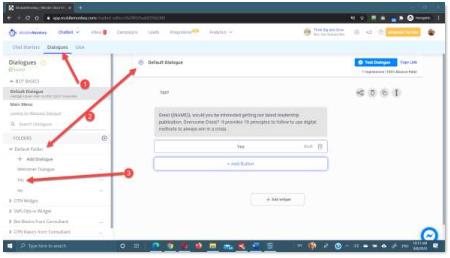
Now click on the “dialogues” tab to go to the chatbot builder dialogue section. in this section you can create chatbot dialogues. Chatbot dialogues are triggered according to what users type when they send respond to the Chat Starter messages. There are two types of chatbot dialogues that you can create here.
“Dialogues” are simple dialogues that you construct to engage users, such as welcome dialogues and dialogues designed to qualify leads.
“Q and A” dialogues are triggered when users type messages or questions that contain specific keywords. You can construct “Q and A” dialogues by picking what type of dialogues are triggered by keywords that you choose.
Start by creating a “dialogue.” Click on the “dialogues” option.
You can edit the messages in these dialogues to replace any default text with your own custom messages. in this example, we’re following the Yes dialogue.
Now add a custom dialogue to ask visitors if they’re interested in a free report.
It will have a “Yes” and “No” button which will take them to another dialogue.
Note: You can insert additional elements to your dialogues, including images, quick questions, and GIFs by selecting them from the top bar.
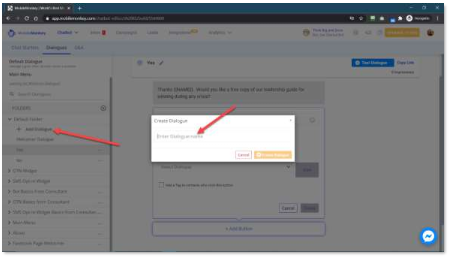
Click on “add dialogue.” Now enter the name of this dialogue in the “dialogue name” field. I’m calling my dialogue “Free Report.” Now, click on “create dialogue.”
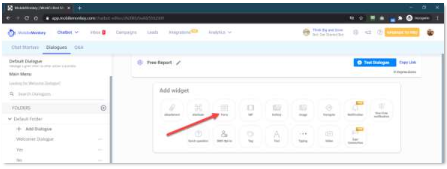
Now select with what type of widget you’ll open this dialogue. in this example we’ll select “Form” to capture their email and deliver the report.
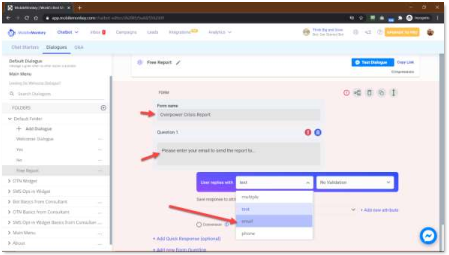
First, I’ll name the form “Overpower Crisis Report.” Then, in the “Question 1” field I’ll enter, “Please enter your email to send the report to” and change the “user replies with” box to “email.”
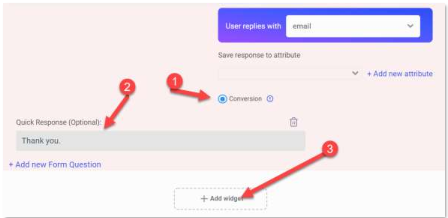
I’ll also select the “conversion” radio button because getting the email was the goal. Then I’ll add a “+Add Quick Response (optional)” to say thank you to the viewer.
Then a new widget is needed to deliver the report. So, I’ll click the “widget” button and choose to add an attachment widget.
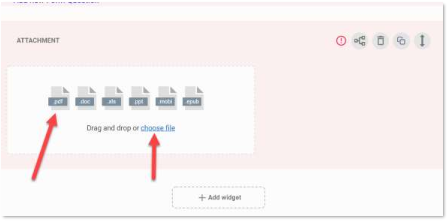
In this example, I’ll be adding a .pdf file. So, I’ll choose the “choose file” link and upload a file from my computer.
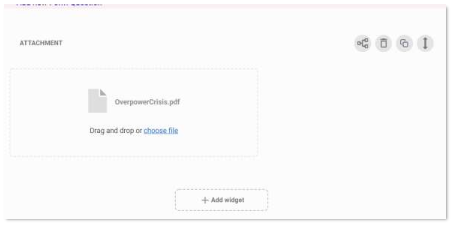
The .pdf is added, and finally, I’ll add the closing text widget.

You must also complete your “no” paths and any other branches you created. Don’t forget, you also have the option to use the “Q and A” dialogues.
The “Q and A” dialogues make it possible for your bot to answer questions based on keywords or phrases typed by you visitor. These are more in-depth. I recommend you play around with this function because you can create powerful chat responses on your Facebook page using them.
As you can see, automating customer care on Facebook as part of your complete internet marketing plan is possible, and can be done for free!
As you get more complex, you may want to upgrade. Mobile Monkey charges a monthly fee.
I’ll give you some options to get impressive chatbots working on your websites. One is for a one-time fee…
Website Chatbots
ConversioBot is a powerful website bot. It works on any type of web page. It is not for Facebook. The great part is you can get a one-time fee for the pro version as of the time of this writing.
ConversioBot has tons of templates to make it easier to get started. I don’t recommend using templates as is. You should edit them to make them ideal for your specific offers and services.
Nonetheless, I know from experience, that ConversioBot will deliver great results.

Chatterpal is another unique website bot. You can grab this with a commercial license at an incredibly low one-time investment. It is both a personal greeter and an artificial intelligence website bot.
You have your choice of animated characters to greet visitors with a special message along with a chat window to continue the conversation. It’s the only chat bot of its kind.
The bot 3D-characters have lip sync technology. This makes them look more natural when they greet your visitors. You also receive unlimited site licenses.
It’s not for Facebook. Chatterpal is for your websites. You can place different AI bots on different pages or the same bot to appear sitewide.
Chatterpal is an excellent choice for a one-time fee.
Chapter 12:
How to Funnel More Qualified Leads and Referral Traffic to All Your Marketing Channels with a Giveaway
Giveaways, sweepstakes, and competitions are all great tools that you can integrate into your complete internet marketing plan to move qualified leads deeper into your conversion funnel.
In this lesson I’m going to show you how you can funnel more qualified leads and referral traffic to all your marketing channels with a giveaway campaign in 2020 and beyond.
Setting Up A Giveaway Campaign, The Easy Way
The best way to set up giveaway campaigns is by using contest platforms. in this lesson I’m going to use “Gleam,” a contest platform that allows you to run unlimited competitions, for free.
Go to your “Gleam” account after signing up and click on the “create competition” button. Now enter the name of your new contest in the “name” field.
Here you can add an actionable phrase and include the name of your prize. This will help you encourage users to participate and share the contest. Now select the “start” and “end” dates of your giveaway campaign using the calendar functions on this screen.
Now click on the “user details” tab and paste your Facebook Page’s URL in the “Allow users to Like a Facebook Page” field.
Now click on the “how to enter” tab. On this page you’ll be able to select how contestants will earn their entries.
As you can see here, you can refer traffic to all your marketing channels as entry methods. For example, a user that reaches your contest through your website will have to visit your Facebook, Twitter, and Instagram profiles to earn additional entries. This strategy allows you to generate lots of referral traffic to all your channels.
In this example, we’ll add website visit, YouTube visit, Facebook visit, Instagram visit, and Twitter follow as entries to our campaign. Let’s start by adding the website visit entry. First, click on the “visit a page” option from the entry method menu.
Now move over the “visit a page” column to customize this entry. Start by adding a call to action inviting leads to visit your website into the “title” field. Now enter the number of valid entries participants earn into the “worth number of entries” box. Now check the “mandatory” option.
Now enter your website or landing page URL into the “link URL” field. Now enter CTA text into the “button text” field.
Now let’s add the YouTube entry. Click on the “YouTube” icon. Now click on “visit YouTube channel.” Enter your YouTube channel URL into the “channel URL” field and check the “mandatory” and “require authentication” options.
Let’s now add the Facebook entry. Click on the “Facebook” icon. Now click on the “Visit on Facebook” option. Now enter the URL of your Facebook page in the “URL” field, select the “like the page” option below, and check the “mandatory” option.
Let’s now add the Twitter entry. Click on the “Twitter” icon. Click on the “follow on Twitter” option. Enter your Twitter handle in the “username” field and check the “mandatory” box.
Let’s now add the Instagram entry. Click on the “Instagram” icon. Click on the “visit Instagram profile” option. Enter your username or Instagram profile URL in the “username or profile URL” field and check the “mandatory” box.
As you can see, there are several other marketing channels that you can add as entries, including LinkedIn, Pinterest, Snapchat, and Twitch. Other entry
methods that’ll help you to increase referral traffic and generate leads include “viral share” and “subscribe to a newsletter.”
Now click on the “prize” tab. Enter the name of your prize in the “title” field.
Select the number of winners you’ll pick and enter a description of the prize.
Now click on save to finish creating this giveaway.
And that’s it!
You can now share this contest by embedding it to a page on your website, by sharing the giveaway’s landing page URL, and by adding a Facebook tab for this giveaway on your Facebook pages!


