LESSON 03 - GETTING STARTED WITH TRAFFICWAVE
If you have signed up with Trafficwave you will have received your login details which consist of your Trafficwave username and password. If you signed up for the 30 day trial then you will be able to use all of Trafficwave’s functions except for the affiliate option which is for active members only. The first step is to log into your back office.
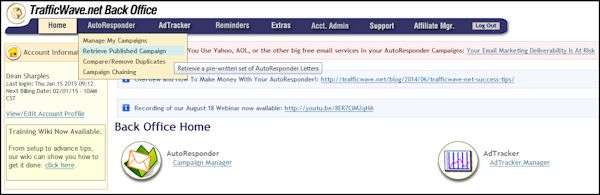
Your back office provides access to various sections via links on the home page or via the toolbar menu at the top. Moving your mouse pointer over a menu heading will reveal a drop down menu with links to various sections. There are other options you can look at but the first step you should take is to import the default Trafficwave campaign. One of the most useful features of Trafficwave is the ability to import a campaign from another member’s Trafficwave account if provided with the “Autoresponder ID number” and the “5 Digit Code” from that member. If you haven’t already done it you will need to retrieve the default set of letters for the Trafficwave campaign. To do this: select Retrieve Published Campaign from the Autoresponder menu.
As shown in the screenshot below click on the circle to select Step 01 which says Retrieve TrafficWave.net Master Autoresponder Letters. In Step 02 select DEFAULT from the drop down menu from your list of campaigns. Now click on the button at the bottom to retrieve the letters.

The screenshot above may look different to yours. This is because I have already retrieved the letters. From time to time you may get a message that a campaign has been updated with new letters and you can go here to retrieve them. If you have retrieved the letters then you will see a link that says Click Here to Review Changes. This will bring you to the Campaign Profile Page.
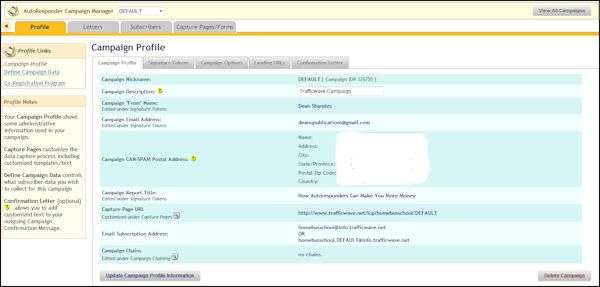
There are five tabs here which hold the settings for your campaign: Campaign Profile, Signature Tokens, Campaign Options, Landing URLs and Confirmation Letter. Trafficwave has already imported your information into the campaign but you may want to add your home address if you haven’t already done it. Also add the line “Trafficwave Campaign” into the Campaign Description box. Now click the button that says Update Campaign Profile Information. If you wish you can click the Campaign Options tab and tick the box next to Send Notification upon Confirmation.
Now you can examine the letters that will be sent out as emails once someone subscribes to this campaign. Click the tab at the top that says Letters and select Review/Edit letters (or just click the Letters tab) and the following screen will appear.
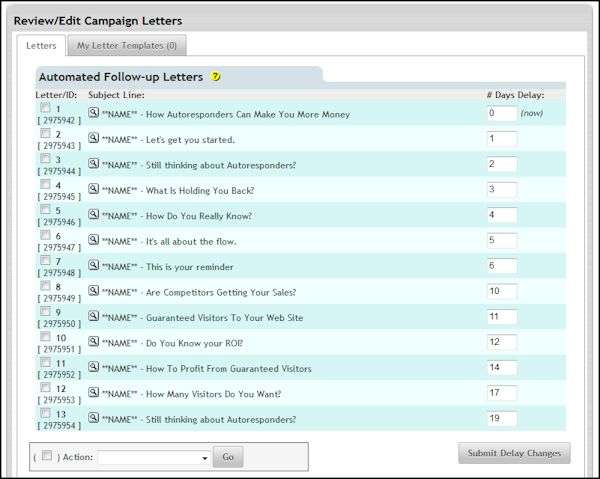
This campaign has thirteen letters displayed in the order of delivery. The subject lines are displayed so you can recognise each letter and the time delay for each one is displayed on the right. The delay value is telling Trafficwave how many days later after confirmation should it send each letter. For the first letter we usually enter a value of “0” which means to send the letter straight away. The second letter has a value of “1” which means to send it one day after the first letter. If you wanted to send one letter a week for four weeks you would enter values of 7, 14, 21 and 28.
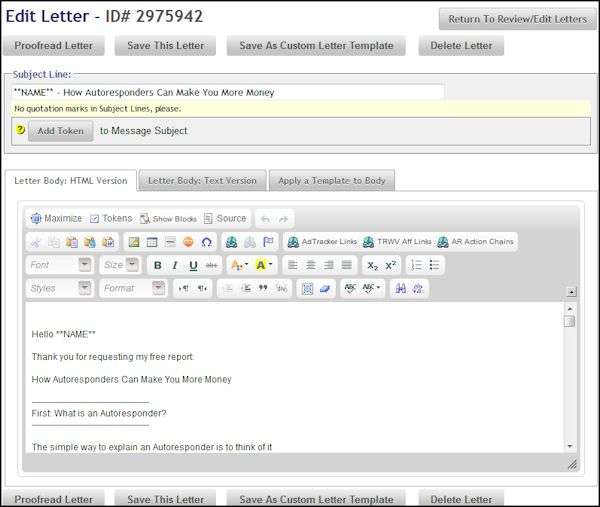
Let’s take a closer look at the first letter. Click on the subject line of the first letter and select Edit from the drop down menu. From here you can edit the letter using a variety of tools such as: add images and hyperlinks, change fonts and more. With these tools you can create professional looking letters that look like websites or you can simply create normal text letters. You can even choose a professional designed template and add your own images and text.
ACCOUNT PROFILE
If you have selected the 30 day trial then your account will become active and you will be able to access the affiliate option. If you would like to become an active member sooner you can do by going into your account profile and changing your payment option. To do this select Acct.Admin from the toolbar then select View/Edit Account Profile from the menu. On the next screen click the button under Payment Information which says Click Here to Change Payment Information.
You now have the option to upgrade straight away or wait until the end of the trial. Either way you may need to put your payment information in here. You can pay by credit card or Paypal. I recommend you use Paypal because your commissions will be paid into your Paypal account which you can directly transfer to your bank – which is better than receiving cheques and having to pay bank charges if you live in a country other than the USA.