STEP 4 - multiple your master site hundreds of times
Replication process
If 5 dollars a day enough for you, you can certainly skip step 4. Otherwise, that step is crucial! for that We'll have to buy - our third and the last purchase :-) – a very important utility called WPTWIN. This unique script can clone our master copy in under 57 seconds! No installation needed - in one operation it makes a complete clone including any themes, API's. & plugins setup.
This script suite is for unlimited Usage on multiple domains ( proper disclosure: the link is conjunction with my affiliate member) After we complete and arrange our master copy, we can clone it for all 33 subdomains (remember the 33 subdomains you have created with basic WP installation) The entire process is very simple:
1. Create an image file from our master (with wptwin software)
2. Deploy our image for all 33 subdomains
3. After the cloning process, enter each clone separately and change its Wprobot keywords campaign and blog title according to the target subject
To create the process in an accurate and easy manner we need to use WPTWIN, which completely clones any given WP installation including its plugins and configuration.
The instructions below are for easy reference and/or for those comfortable with using WordPress and ftp programs already ...
1. Upload wptwin.php file to the root folder of the WordPress blog you want to clone
2. Go to the URL where you uploaded wptwin.php
3. If you are not already logged into WordPress as an administrator, you will be asked to log in, otherwise proceed to Step 4
4. Click on the button that says "Click to Clone this Site"
5. Download the clone file (extension is .wpt) to your hard drive
6. Set up a new installation of WordPress in new location (new subdirectory and/or domain) - we did it already!
7. Upload both the clone file and the wptwindeploy.php file to the root folder of the new WordPress installation
8. Access wptwindeploy.php from a web browser (where you uploaded it)
9. Click the "Deploy Clone" button
Finally log into the freshly deployed blog using the same username and password as used on the original blog, where you created the clone file.
Download and unzip the files for WP Twin. You'll find two files you'll need to use -- wptwin.php and wptwindeploy.php.
Now follow the instructions.
Upload WP Twin File
1. Upload wptwin.php file to root folder of the WordPress blog you want to clone
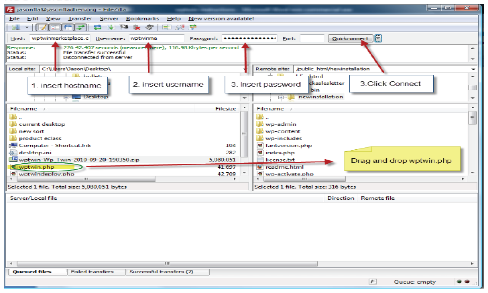
First, open up your favorite FTP program. If you don't have one, I recommend you use Filezilla, which is free and can be downloaded here
Use your FTP program to first connect to the server where the master site is located that you wish to clone.
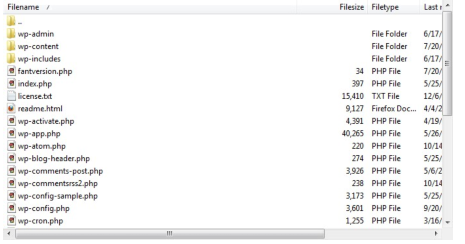
Upload the wptwin.php file in the ROOT folder of where the word press blog is installed. To upload the wptwin.php file, simply drag and drop it into the ROOT folder.
You'll know it's the right folder because it will look something like this...
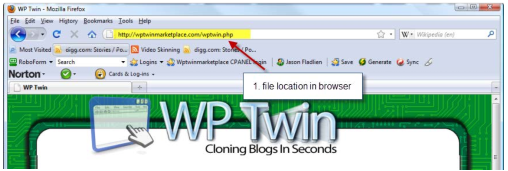
2. Go to the URL where you uploaded wptwin.php
If your master site is on www.puma-shoes.bsports.net then you'd go to www.puma-shoes.bsports.net/wptwin.php in your web browser.
If you go to the URL where you uploaded your wptwin.php and see something similar to the image below:
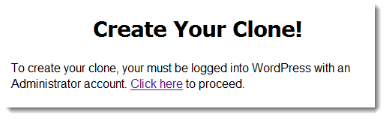
then you need to log into your master site admin panel before you can clone the site. Simply click on the "click here" link, and it will take you to the login page for the WordPress blog you wish to clone.
Once you put in your admin name and your password, it will automatically redirect you back to wptwin.php where you can now proceed to the next step.
* important notice - this process creates only once when you generate your clone image
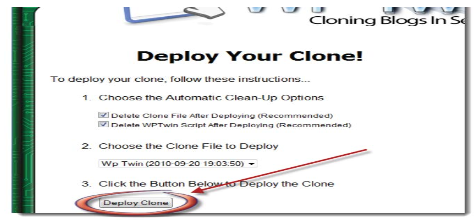
3. Click the "clone this site" button Now you'll be able to properly configure and clone your blog. Notice the options below...
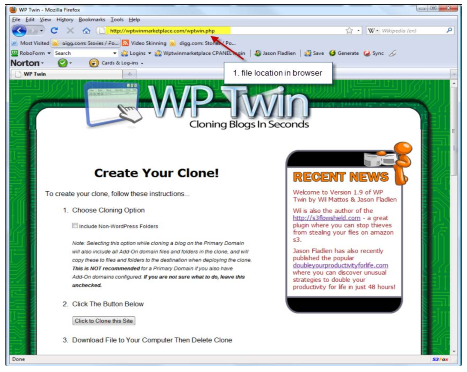
The first says "Choose Cloning Option" and it's left unchecked. This will stop you from cloning non-WordPress folders if you are on a server that has addon domains (this is the case for us!) and you are cloning the primary domain. We recommend you always keep this option unchecked, unless you know exactly what you are doing. Otherwise, you may overwrite files on your add on domains when you deploy the clone.
Now simply click on the button that says "Click to Clone this Site".
When you do this, a clone file will be automatically created for you below the "Click to Clone this Site" button on the step beneath it.
4. Download the cloned file to your hard drive. After you download it to your computer, you want to click on the "delete clone" option.
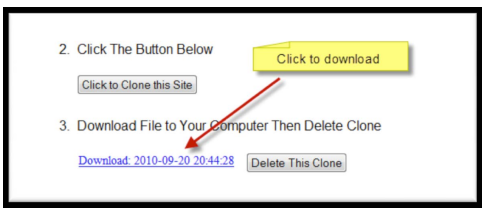
Why? Because your clone is first created in your root directory of your WordPress installation, and once you have downloaded it to your hard drive, there is no reason you should also have it on your WordPress directory (where others might be able to find it if they did some digging).
So we recommend you always click 'delete clone" after you have made your clone and saved it to your hard drive.
Congrats -you've just made a complete clone of your WordPress site.
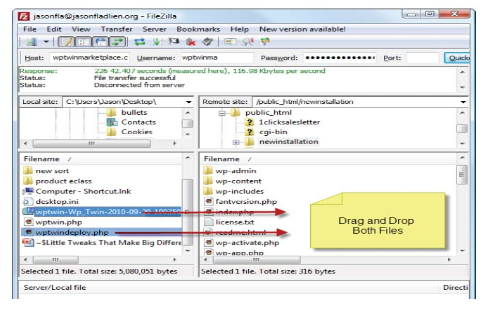
5. Upload both the cloned file and the wptwindeploy.php file to root folder of new WordPress installation (for example: adidas-shoes.bsports.net/) Take the clone file that you downloaded to your hard drive from step 4, and upload that file along with your wptwindeploy.php to the root folder of your new WordPress installation.
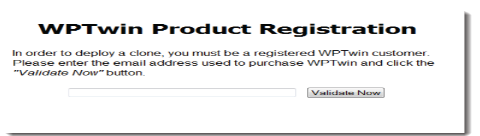
7. Go to the URL where you uploaded wptwindeploy.php Now go to the location of your wptwindeploy.php file ( adidas-shoes.bsports.net/ wptwindeploy.php). You will be asked to validate your email - use your email that you purchased WP Twin with.
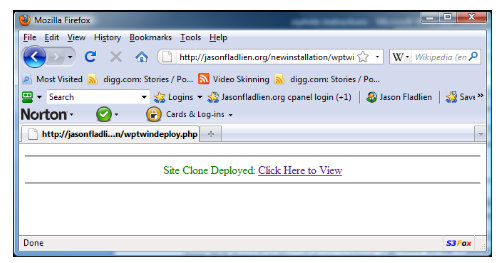
You've successfully cloned and deployed a WordPress blog!
9. Log into your freshly deployed blog. You will have to use the same name and password you used on the master copy you cloned to log into your freshly deployed blog.
Finally, you'll want to go into your admin panel where you've set up your new blog and change your blog title and campaign keyword. And you're done!
* Remember! the deploying process needs to create WP installation for each of the subdomains you have created (33 times).
At this point, your profit units should look like this: