A short tutorial on using the Whydowork Adsense Plugin
What it can be used for:
Options:
Set Code #1-10
The plugin can remember 10 different codes that you might want to insert in your blog. Paste the Adsense code in the box, then either set it up where you want to appear below, or if you want to paste a second code, scroll all the way down, click Save, then click on Code #2 and paste another code. Don’t forget to save before you click on another Code area, or the code you just inserted will be lost.
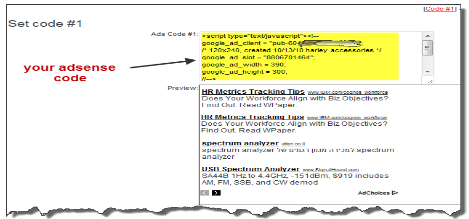
It inserts your code in the admin page to show you how it would look like.
Exclude posts and/or pages
You can choose not to display ads in certain posts or pages. Either because ads are not appropriate there (About, Contact, Advertise Here pages) or because you’re not allowed to have ads in paid reviews.
To do this, go to the Manage page in your admin area, and find the IDs of the posts or pages that you want blocked. Enter those ID’s in the Exclude box, separated by commas, and Save.
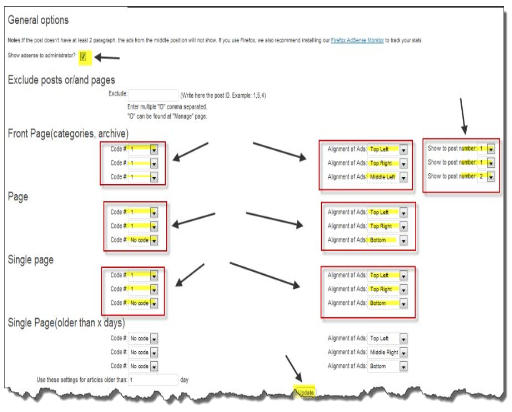
Displaying ads on the front page, categories, archive, and tag pages
You can insert a maximum of 3 ads on these pages (the maximum allowed by Adsense), and you have drop-down boxes for each of them.
Code # – click and select the code you want inserted for that particular position
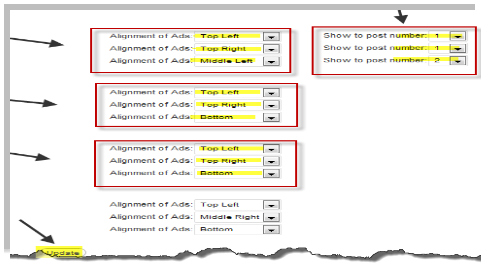
Alignment of Ads – choose where you want that particular code to be displayed (ad positions explained below)
Show to post number – choose where you want that particular code and alignment to be used in the page (posts 1-10)
Displaying ads in pages and single pages
The only difference from the front page example is that you’re missing the Post Number option. Other than that, its the same. Choose the code that you want to display and in what position.
Please take into account your typical post length and image positions when choosing the place and size of the ads, otherwise you might end up with a bad look for your article.
Single Page (older then X days)
Here you can choose to display a different ad setup for older posts, so you don’t annoy your regular visitors. Usually only search engine visitors come on a regular basis to old posts and now you can monetize those visits better by inserting more aggressive ads.
If there is any code selected in this area, then it will display this configuration to article pages once they turn the age listed in the box below. If you don’t select a configuration for this section, then all the posts use the setting you decided for the pages and single pages previously.
Top – inserts the code between the title and the content Top Left and Top Right – inserts the code in the top part of the content, surrounded by text
Middle – inserts the code in the middle of the post, between two paragraphs.
Middle means here that it sees how many paragraphs there are in a post, then divides it by two and inserts the ad there. For example, in a 12 paragraph story, it will insert it after the 6th paragraph. You need at least 2 paragraphs in a post for the middle positions to display.
Middle Left and Middle Right – inserts the code in the middle of the post, surrounded by text. It actually inserts it in the top part of the second half of the post, so it might seem closer to the bottom.
Bottom – inserts the code below the content
Random – cycles the selected code among the positions that are not occupied by other ads. In order for the random setting not to use a position assigned to a fixed ad, you will need to insert the random one to the last setting in use.
Example: if you want to have a top left ad all the time and another one in random position, select first the fixed position, then the random one

The Results :
WProbot plugin (the heart of our system!)
Short description: The WP Robot is a powerful and easy-to-use professional autoblogging plugin for Wordpress weblogs. It allows you to run your blog on complete auto-pilot and drip-feed it with fresh content in regular intervals you specify. And the best part: The posts created will be targeted to any keyword you enter and any topic you could ever think of! WP Robot is capable of adding Amazon product posts in conjunction with your affiliate id, eBay auctions, Yahoo Answers questions and answers, YouTube videos, targeted articles, Flickr images, Clickbank ads and content from 12 more sources to your weblog automatically. You have full control over which kind of posts will be created! This Plugin suite is for unlimited Usage on multiple domains
Installation : Installing WP Robot is not different from installing any other plugin on your Wordpress weblog with some minor differences. Once you have uploaded and activated WP Robot on your blog successfully, you will find a new navigation item in your Wordpress admin area called "WP Robot 3". Click on it and you will get to a screen that will prompt you to enter the Paypal email that you have bought WP Robot with. After doing that, click "Install" and the installation will be completed and the default templates set up.
Introduction: How WP Robot Works
Using Campaigns to organize your Autoblogs
WP Robot 3 uses Campaigns to organize its keywords, templates, and other details it needs for autoposting. A Campaign in WP Robot can consist of any number of keywords, post templates, categories, and RSS feeds. If more than one of any of those have been set up, WP Robot will select a random one for each post. Randomization is a key feature of WP Robot and thus it is recommended to make good use of those possibilities! Randomization ensures that your Autoblogs do not use automatic or "spammy" content and thus will perform better in search engines and be more useful to your visitors.
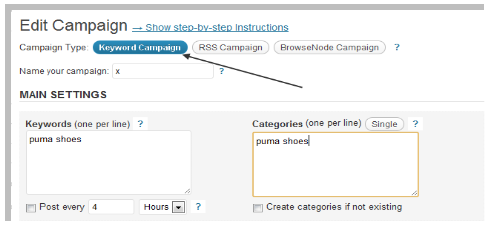
There are three different Campaign types in WP Robot:
You select a campaign type by clicking on the corresponding button. The blue button marks the type currently selected. Below the type you can specify the Campaign Name, which is used for organizational purposes only.
As mentioned before, randomization is a key feature of WP Robot and also an integral part of a successful autoblog. When autoblogging, it is extremely important that your sites look natural. Randomization helps with achieving that.
The following is a list of things that are random in WP Robot:
The "Campaigns" page lists all the campaigns you have created in WP Robot as well as information about them. To get a more detailed view of a campaign simply click on its name in the table.
For each campaign you have several actions available. You can...
With the menu at the bottom of the list you can also delete several campaigns at once or create several posts for any number of campaigns at once.
Campaigns are used to organize what WP Robot is supposed to create automatic content for. Each Campaign you create will publish posts at regular intervals you specify when creating the Campaign, unless you disable or pause the autoposting.
You can start adding a new campaign by clicking the "Create Campaign" button in your Wordpress menu sidebar.
operatively when we going to create a campaign we use one of two campaign methods:
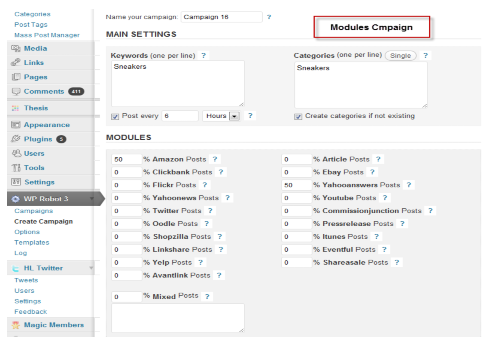
1. The Modules Campaign
In the example below, 50% of the blog post will be created from pure Amazon content (in conjunction with products including your aff ID), and the other 50% will be created from related questions and answers from yahoo answers)
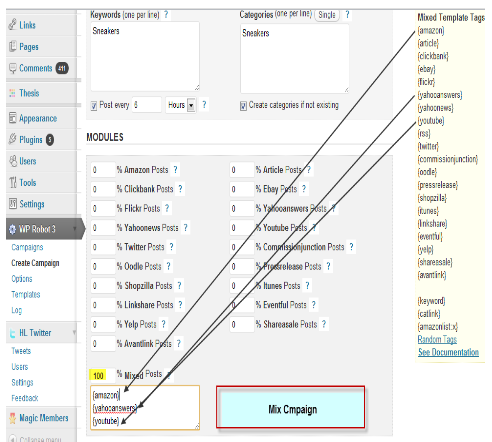
In this example, all the posts will mix 100% content from Amazon, yahoo answers, and YouTube)
The Options Page
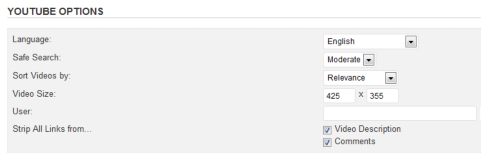
On the options page you can modify a wide range of settings WP Robot uses. In general all changes you make here will affect all WP Robot campaigns on your site, while settings in the "Create Campaign" page only affect this specific campaign. There are General Options as well as Module specific Options, which are only visible if you have the particular module installed.
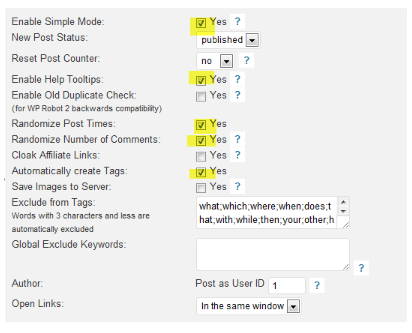
General Options
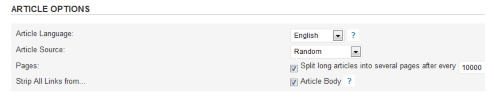
Article Options
The Error Handling Options control what WP Robot does if it encounters one or several errors for its modules. By modifying them you can control how many modules have to be successful for a post to get created or how many errors until a post gets skipped.
Warning: Only edit these options if you are sure what you are doing and what effect it will have. Entering wrong settings might stop WP Robot from creating any posts.
Disable Keywords By default WP Robot will disable a keyword if posting for it repeatedly causes errors. Disabled keywords will not get selected for posting anymore from a campaign’s keyword list but can simply be reenabled on the campaign page they belong to. By changing this setting you can have keywords get disabled after fewer or more unsuccessful posts. If the option is set to zero, keywords will never get disabled (not recommended).
Rewriting Options ( nice to have as unique content option )
WP Robot supports two external rewriting APIs which can be used to make any content produced by the plugin unique automatically and which need to be configured in this section. Supported are the TheBestSpinner.com API and the UCG Rewriter API. ( proper disclosure: the link is conjunction with my affiliate member)
Enable Rewriter: Here you can enable either of the rewriters or both of them to have one randomly selected for each post. Entering your account details is necessary for the rewriters to work! Important: You also need to enable rewriting for your campaigns individually on the Create/Edit Campaigns screen!
TheBestSpinner Email: Your API login details.
TheBestSpinner Password: Your API login details.
Quality: Better and Best means less rewriting because only synonyms classified with these categories are used when selected.
Save Text with Spin-Tags: If this is checked, WP Robot will save the rewritten text with all the spin tags intact instead of choosing a random spin for you. Beware: If selected your text will not be readable and contain tags like {synonym1|synonym2} - only use this setting if you want to create spun drafts to use in other places or scripts.
Resetting and Uninstalling
The buttons at the bottom of your "Options" screen can be used to reset certain parts of WP Robot or uninstall the plugin.
Reset Options to Defaults - Restores the default values for all options.
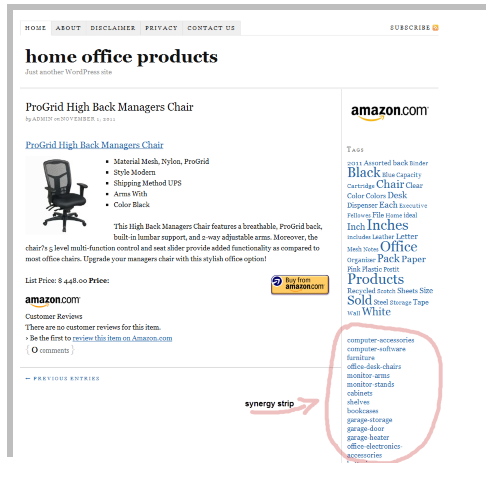
Phase 4 : create and setup your synergy strip in order to finish our master copy creation, we will need to create a synergy strip that contains links to all the parts (subdomains ) in our profit cloud. It will help Google to crawl our sites more efficiently and emphasize the synergy phenomena between all 34 parts of our profit cloud.
( 33 subdomains + domain )
The result will be similar to this screen capture :
Setup Instructions :
1. Download my strip wizard ( simple xls file I created to help you to easily generate the appropriate html code ) - Download
2. Fill columns >> B + E with your data
3. Copy your results >>> Html code from column H
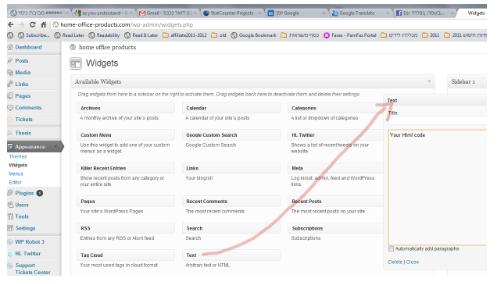
4. In your WP master panel (WP dashboard) under “Appearance,” click on widgets, choose the Text widget and drag it to the sidebar area. Then paste your Html code into his box, save, and you’re done!