Simple interrupted sutures
The most commonly used and versatile suture in cutaneous surgery is the simple interrupted suture. This suture is placed by inserting the needle perpendicular to the epidermis, traversing the epidermis and the full thickness of the dermis, and exiting perpendicular to the epidermis on the opposite side of the wound. The 2 sides of the stitch should be symmetrically placed in terms of depth and width. In general, the suture should have a flaskshaped configuration, that is, the stitch should be wider at its base (dermal side) than at its superficial portion (epidermal side). If the stitch encompasses a greater volume of tissue at the base than at its apex, the resulting compression at the base forces the tissue upward and promotes eversion of the wound edges. This maneuver decreases the likelihood of creating a depressed scar as the wound retracts during healing (see image below). Simple interrupted suture placement.
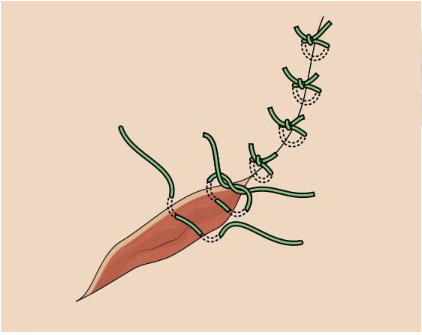
Simple interrupted suture placement. Image shows a flaskshaped stitch, which maximizes eversion.
In general, tissue bites should be evenly placed so that the wound edges meet at the same level to minimize the possibility of mismatched wound-edge heights (ie, stepping). However, the size of the bite taken from the 2 sides of the wound can be deliberately varied by modifying the distance of the needle insertion site from the wound edge, the distance of the needle exit site from the wound edge, and the depth of the bite taken. The use of differently sized needle bites on each side of the wound can correct preexisting asymmetry in edge thickness or height. Small bites can be used to precisely close wound edges. Large bites can be used to reduce wound tension. Proper tension is important to ensure precise wound approximation while preventing tissue strangulation.
Simple running sutures
The simple running suture is an uninterrupted series of simple interrupted sutures. The suture is started by placing a simple interrupted stitch, which is tied but not cut. A series of simple sutures are placed in succession without tying or cutting the suture material after each pass. Sutures should be evenly spaced, and tension should be evenly distributed along the suture line. The line of stitches is completed by tying a knot after the last pass at the end of the suture line. The knot is tied between the tail end of the suture material where it exits the wound and the loop of the last suture placed.
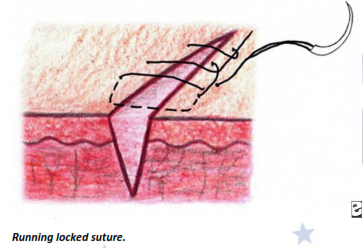
Running locked sutures
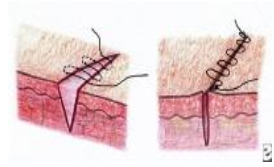
The simple running suture may be locked or left unlocked. The first knot of a running locked suture is tied as in a traditional running suture and may be locked by passing the needle through the loop preceding it as each stitch is placed. This suture is also known as the baseball stitch (see image below) because of the final appearance of the running locked suture line.
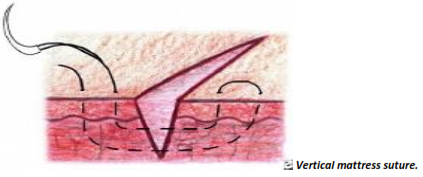
Vertical mattress sutures
The vertical mattress suture is a variation of the simple interrupted suture. It consists of a simple interrupted stitch placed wide and deep into the wound edge and a second more superficial interrupted stitch placed closer to the wound edge and in the opposite direction. The width of the stitch should be increased in proportion to the amount of tension on the wound. That is, the higher the tension, the wider the stitch (see image below).
Half-buried vertical mattress sutures
The half-buried vertical mattress suture is a modification of the vertical mattress suture and eliminates 2 of the 4 entry points, thereby reducing scarring. The half-buried vertical mattress suture is placed in the same manner as the vertical mattress suture, except that the needle penetrates the skin to the level of the deep part of the dermis on one side of the wound, takes a bite in the deep part of the dermis on the opposite side of the wound without exiting the skin, crosses back to the original side of the wound, and exits the skin. Entry and exit points therefore are kept on one side of the wound.
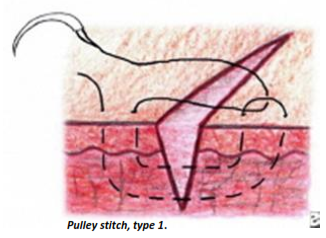
Pulley sutures
The pulley suture is a modification of the vertical mattress suture. When pulley sutures are used, a vertical mattress suture is placed, the knot is left untied, and the suture is looped through the external loop on the other side of the incision and pulled across. At this point, the knot is tied. This new loop functions as a pulley, directing tension away from the other strands (see image below). Pulley stitch, type 1.
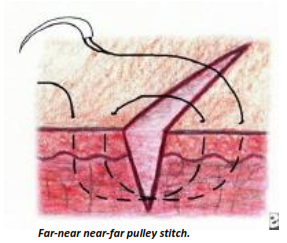
Far-near near-far modified vertical mattress sutures
Another stitch that serves the same function as the pulley suture is the far-near near-far modification of the vertical mattress suture. The first loop is placed approximately 4-6 mm from the wound edge on the far side and approximately 2 mm from the wound edge on the near side. The suture crosses the suture line and reenters the skin on the original side at 2 mm from the wound edge on the near side. The loop is completed, and the suture exits the skin on the opposite side 4-6 mm away from the wound edge on the far side. This placement creates a pulley effect (see image below).
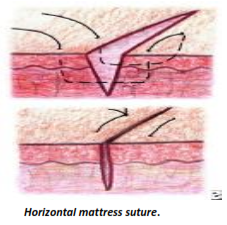
Horizontal mattress suture
The horizontal mattress suture is placed by entering the skin 5 mm to 1 cm from the wound edge. The suture is passed deep in the dermis to the opposite side of the suture line and exits the skin equidistant from the wound edge (in effect, a deep simple interrupted stitch). The needle reenters the skin on the same side of the suture line 5 mm to 1 cm lateral of the exit point. The stitch is passed deep to the opposite side of the wound where it exits the skin and the knot is tied .
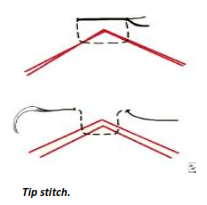
Half-buried horizontal sutures or tip stitches or 3-point corner stitches
The half-buried horizontal suture or tip stitch begins on the side of the wound on which the flap is to be attached. The suture is passed through the dermis of the wound edge to the dermis of the flap tip. The needle is passed laterally in the same dermal plane of the flap tip, exits the flap tip, and reenters the skin to which the flap is to be attached. The needle is directed perpendicularly and exits the skin; then, the knot is tied (see image below).
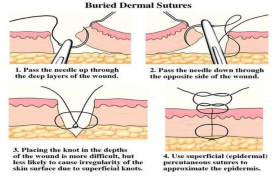
Dermal-subdermal sutures
The suture is placed by inserting the needle parallel to the epidermis at the junction of the dermis and the subcutis. The needle curves upward and exits in the papillary dermis, again parallel to the epidermis. The needle is inserted parallel to the epidermis in the papillary dermis on the opposing edge of the wound, curves down through the reticular dermis, and exits at the base of the wound at the interface between the dermis and the subcutis and parallel to the epidermis. The knot is tied at the base of the wound to minimize the possibility of tissue reaction and extrusion of the knot. If the suture is placed more superficially in the dermis at 2-4 mm from the wound edge, eversion is increased.
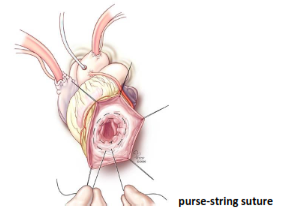
Buried horizontal mattress suture
The buried horizontal mattress suture is a purse-string suture. The suture must be placed in the mid-to-deep part of the dermis to prevent the skin from tearing. If tied too tightly, the suture may strangulate the approximated tissue.
Running horizontal mattress sutures
A simple suture is placed, and the knot is tied but not cut. A continuous series of horizontal mattress sutures is placed, with the final loop tied to the free end of the suture material.
Running subcuticular sutures
The running subcuticular suture is a buried form of the running horizontal mattress suture. It is placed by taking horizontal bites through the papillary dermis on alternating sides of the wound. No suture marks are visible, and the suture may be left in place for several weeks
Subcuticular stitch. The skin surface remains intact along the length of the suture line.
Running subcutaneous sutures
The running subcutaneous suture begins with a simple interrupted subcutaneous suture, which is tied but not cut. The suture is looped through the subcutaneous tissue by successively passing through the opposite sides of the wound. The knot is tied at the opposite end of the wound by knotting the long end of the suture material to the loop of the last pass that was placed.
Running subcutaneous corset plication stitches
Before inserting the needle, forceps are used to pull firmly on at least 1-2 cm of tissue to ensure tissue strength. The corset plication includes at least 1-2 cm of adipose tissue and fascia within each bite. After the first bite is tied, bites are taken on opposite sides of the wound in a running fashion along the defect. The free end is pulled firmly reducing the size of the defect, and the suture is then tied.
Variations of tip (corner) sutures
Modified half-buried horizontal mattress sutures
This stitch places an additional vertical mattress suture superficial to the half-buried horizontal mattress suture. A small skin hook instead of forceps is used to avoid trauma of the flap.
Deep tip stitch
The deep tip stitch is essentially a full-buried form of the 3-corner stitch. The suture is placed into the deep dermis of the wound edge to which the flap is to be attached, passed through the dermis of the flap tip, and inserted into the deep dermis of the opposite wound edge.