SUTURE REMOVAL
Sutures should be removed within 1-2 weeks of their placement, depending on the anatomic location. Prompt removal reduces the risk of suture marks, infection, and tissue reaction. The average wound usually achieves approximately 8% of its expected tensile strength 1-2 weeks after surgery. To prevent dehiscence and spread of the scar, sutures should not be removed too soon.
As a general rule, the greater the tension across a wound, the longer the sutures should remain in place. As a guide, on the face, sutures should be removed in 5-7 days; on the neck, 7 days; on the scalp, 10 days; on the trunk and upper extremities, 10-14 days; and on the lower extremities, 14-21 days. Sutures in wounds under greater tension may need to be left in place slightly longer. Buried sutures, which are placed with absorbable suture material, are left in place because they dissolve.
Proper suture removal technique is important to maintain good results after sutures are properly selected and executed. Sutures should be gently elevated with forceps, and one side of the suture should be cut. Then, the suture is gently grasped by the knot and gently pulled toward the wound or suture line until the suture material is completely removed. If the suture is pulled away from the suture line, the wound edges may separate. Steri-Strips may be applied with a tissue adhesive to provide continued supplemental wound support after the sutures are removed.
KNOTS
Of the more than 1,400 different types of knots described in THE ENCYLCOPEDIA OF KNOTS, only a few are used in modern surgery. The type of knot tied will depend upon the material used, the depth and location of the incision. The amount of stress that will be placed upon the wound postoperatively.
The suture ‘Hand’
The term is the most subtle of all suture quality aspects. It relates to the feel of the suture in the surgeon’s hands, the smoothness with which it passes through tissue and ties down. The way in which knots can be set and snugged down. And most of all, to the firmness or body of the suture.
Knot Extensibility
This relates to the way in which the suture will stretch slightly during knot tying and then recover. The stretching characteristics provide the signal that alerts the surgeon to the precise moment when the suture knot is snug.
GENERAL PRINCIPLES OF KNOT TYING
Certain general principles govern the tying of all knots and apply to all suture materials.
1. The completed knot must be firm, and so tied that slipping is virtually impossible. The simplest knot for the material is the most desirable.
2. The knot must be as small as possible to prevent an excessive amount of tissue reaction when absorbable sutures are used, or to minimize foreign body reaction to nonabsorbable sutures. Ends should be cut as short as possible.
3. In tying any knot, friction between strands (“sawing”) must be avoided as this can weaken the integrity of the suture.
4. Care should be taken to avoid damage to the suture material when handling. Avoid the crushing or crimping application of surgical instruments, such as needleholders and forceps, to the strand except when grasping the free end of the suture during an instrument tie.
5. Excessive tension applied by the surgeon will cause breaking of the suture and may cut tissue. Practice in avoiding excessive tension leads to successful use of finer gauge materials.
6. Sutures used for approximation should not be tied too tightly, because this may contribute to tissue strangulation.
7. After the first loop is tied, it is necessary to maintain traction on one end of the strand to avoid loosening of the throw if being tied under any tension.
8. Final tension on final throw should be as nearly horizontal as possible.
9. The surgeon should not hesitate to change stance or position in relation to the patient in order to place a knot securely and flat.
10. Extra ties do not add to the strength of a properly tied knot. They only contribute to its bulk. With some synthetic materials, knot security requires the standard surgical technique of flat and square ties with additional throws if indicated by surgical circumstance and the experience of the surgeon.
An important part of good suturing technique is correct method in knot tying. A seesaw motion, or the sawing of one strand down over another until the knot is formed, may materially weaken sutures to the point that they may break when the second throw is made or, even worse, in the postoperative period when the suture is further weakened by increased tension or motion.
If the two ends of the suture are pulled in opposite directions with uniform rate and tension, the knot may be tied more securely. This point is well illustrated in the knot tying techniques shown in the next section of this manual.
Square Knot
Two-Hand Technique
The two-hand square knot is the easiest and most reliable for tying most suture materials. It may be used to tie surgical gut, virgin silk, surgical cotton, and surgical stainless steel.
Standard technique of flat and square ties with the additional throws if indicated by the surgical circumstances and the experience of the operator should be used to tie BIOSYN (poliglecaprone 25) suture, Coated POLYSORB (polyglactin 910), TICTON polyester suture, SOFSILK silk suture, and SURGIPRO polypropylene suture.
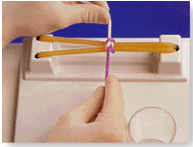
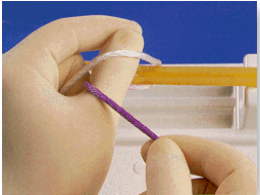
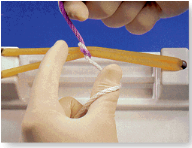
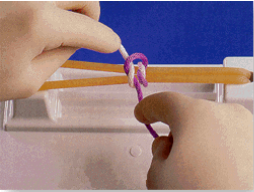
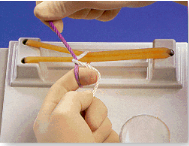
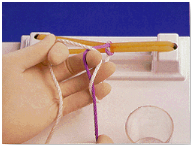
1. White strand placed over extended index finger of left hand acting as bridge, and held in palm of left hand. Purple strand held in right hand.
2. Purple strand held in right hand brought between left thumb and index finger.
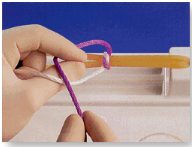
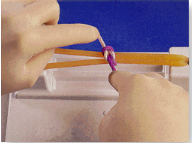
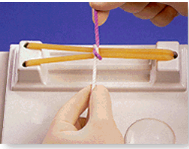
3. Left hand turned inward by pronation, and thumb swung under white strand to form the first loop.
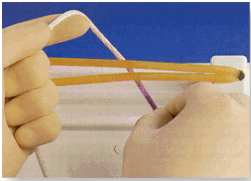
4. Purple strand crossed over white and held between thumb and index finger of left hand.
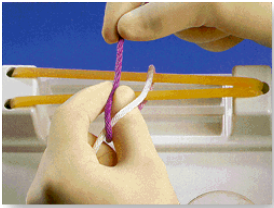
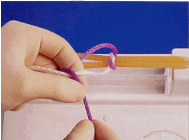
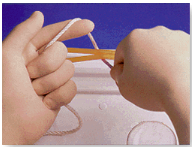
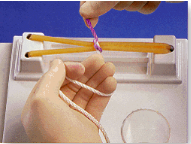
5. Right hand releases purple strand. Then left hand supinated, with thumb and index finger still grasping purple strand, to bring purple strand through the white loop. Regrasp purple strand with right hand.
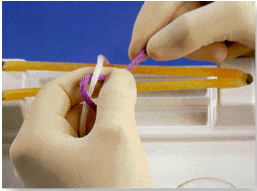
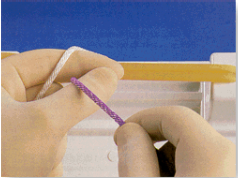
6. Purple strand released by left hand and grasped by right. Horizontal tension is applied with left hand toward and right hand away from operator. This completes first half hitch.
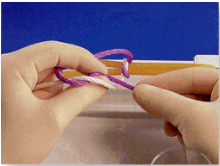
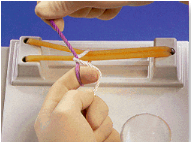
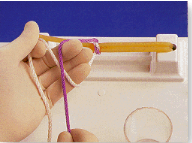
7. Left index finger released from white strand and left hand again supinated to loop white strand over left thumb. Purple strand held in right hand is angled slightly to the left.
8. Purple strand brought toward the operator with the right hand and placed between left thumb and index finger. Purple strand crosses over white strand.
9. By further supinating left hand, white strand slides onto left index finger to form a loop as purple strand is grasped between left index finger and thumb.
10. Left hand rotated inward by pronation with thumb carrying purple strand through loop of white strand. Purple strand is grasped between right thumb and index finger.
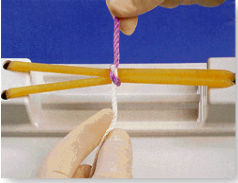
11. Horizontal tension applied with left hand away from and right hand toward the operator. This completes the second half hitch.
12. The final tension on the final throw should be as nearly horizontal as possible.
Square Knot: One-Hand Technique
Wherever possible, the square knot is tied using the two-hand technique. On some occasion it will be necessary to use one hand, either the left or right, to tie a square knot. These illustrations employ the left-handed technique.
The sequence of throws illustrated is most commonly used for tying single suture strands. The sequence may be reversed should the surgeon be holding a reel of suture material in the right hand and placing a series of ligatures. In either case, it cannot be too strongly emphasized that the directions the hands travel must be reversed proceeding from one throw to the next to ensure that the knot formed lands flat and square. Half hitches result if this precaution is not taken.
1. White strand held between thumb and index finger of left hand with loop over extended index finger. Purple strand held between thumb and index finger of right hand.
2. Purple strand brought over white strand on left index finger by moving right hand away from operator.
3. With purple strand supported in right hand, the distal phalanx of left index finger passes under the white strand to place it over tip of left index finger. Then the white strand is pulled through loop in preparation for applying tension.
4. The first half hitch is completed by advancing tension in the horizontal plane with ht left hand drawn toward and right hand away from the operator.
5. White strand looped around three fingers of left hand with distal end held between thumb and index finger.
6. Purple strand held in right hand brought toward the operator to cross over the white strand. Continue hand motion by flexing distal phalanx of left middle finger to bring it beneath white strand.
7. As the middle finger is extended and the left hand pronated, the white strand is brought beneath the purple strand.
8. Horizontal tension applied with the left hand away and right hand toward the operator. This completes the second half hitch of the square knot. Final tension should be as nearly horizontal as possible.