This is probably the most common woodworking project that people want to build. Who can’t use more storage?
The best part about this project is that you can use standard size wood (2 x 3’s) for the main framework and it can be put together without using complicated joinery.
Wood
Description Qty Thickness Length Width Main legs (2x3) 6 1 1/2" 72" 2 1/2" Front and back supports 10 1 1/2" 96" 2 1/2" Side supports 10 1 1/2" 15" 2 1/2" Shelves (plywood) 5 1/2" 18" 98"
The first step is to prepare the front, back and side supports. These pieces need to have a 1/2" deep slot routed out of them that is 1" wide (see diagram). The shelves will
fit into these slots, thus giving a nice finishes look to the shelving rather than showing the edge of the plywood.
Once you have cut out all of the slots, it is time to construct the two side frameworks. To construct a side frame, take two of the leg supports and lay them flat on the floor so that the 2 1/2" width is showing. Then, attach the side supports (with the routed groove pointing up and inwards) by gluing and screwing through the 2 1/2" width (see diagram).
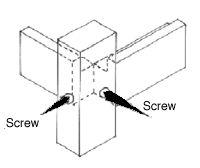
Ideally, the side supports should be attached at even intervals (every 30"), but you can modify this to suit your own requirements. Repeat for the other side, taking care to ensure that the routed groove points towards the middle of the shelving unit. Take the time to ensure that all joints are square; otherwise you may end up with a shelving unit that leans!
Once the sides are complete (and the glue has dried) it is time to attach the front and back supports. Again, these are attached using glue and screws, and should match the heights of the side pieces. Once attached, the result should be a complete frame. To strengthen this frame, take one of the two remaining leg pieces and attach it in the middle of the front frame by simply gluing and screwing into the support pieces. This will stop the unit from sagging in the middle.
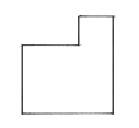
Take the shelving pieces (which should be cut to shape as mentioned in the wood list) and cut a small notch out ofthe corner of each one. This notch should be a 1" by 1" square and will allow the shelves to sit snuggly against the four corner legs. Now, place the shelves into place. To do this, slide them in from the back (the front central leg makes it impossible from the front).
Once all shelves are in place, and everything looks okay, attach the final leg to the center of the back frame (thus matching the front one). Sand the unit thoroughly and paint if so desired.