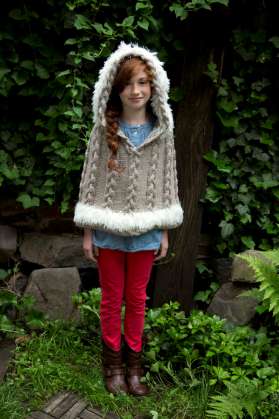
Cozy Hooded Poncho
By: Lion Brand Design Team
Sizes: S (M, L, 1X-2X)
Finished Circumference at Bust 44 (48, 52, 56) in. (112 (122, 132, 142) cm)
Note: Pattern is written for smallest size with changes for larger sizes in parentheses. When only one number is given, it applies to all sizes. To follow pattern more easily, circle al numbers pertaining to your size before beginning.
Materials:
LION BRAND HEARTLAND (Art. #136)
#122 Grand Canyon 3 (3, 4, 4) balls (A)
or color of your choice
LION BRAND ROMANCE (Art. #325)
#098 Antique Lace 2 (3, 4, 4) balls (B)
or color of your choice
LION BRAND stitch markers
LION BRAND® cable needle
LION BRAND® large-eyed blunt needle
Circular knitting needle size 8 (5 mm), 24 in. (61 cm) long
Gauges: 20 sts + 22 rows = 4 in. (10 cm) in Cable Pattern with A.
15 sts + 22 rnds = 4 in. (10 cm) in Rev St st worked in the rnd (p every rnd) with A.
12 sts + 24 rnds = 4 in. (10 cm) in Rev St st worked in the rnd with B.
BE SURE TO CHECK YOUR GAUGE.
When you match the gauge in a pattern, your project will be the size specified in the pattern and the materials specified in the pattern will be sufficient. If it takes you fewer stitches and rows to match the gauge, try using a smaller size hook or needles; if more stitches and rows, try a larger size hook or needles.
Abbreviations
beg = begin(ning)
dec = decreas(e)(s)(ing)
inc = increas(e)(s)(ing)
k = knit
k2tog = knit 2 together
pm = place marker
p = purl
p2tog = purl 2 together
rem = remain(ing)
rep = repeat
Rev St st = Reverse Stockinette stitch
RS = right side
rnd(s) = round(s)
sm = slip marker
st(s) = stitch(es)
St st = Stockinette stitch
WS = wrong side
Stitch Explanations
3/3 LC (3 over 3 left cross) Slip 3 sts to cable needle and hold in front, k3, then k3 from cable needle.
3/3 RC (3 over 3 right cross) Slip 3 sts to cable needle and hold in back, k3 then k3 from cable needle.
kfb (knit in front and back) Knit next st without removing it from left needle, then k through back of same st – 1 st increased.
Pattern Explanations
Cable Pattern I (worked in rows over 9 sts)
Row 1: Knit.
Rows 2, 4 and 6: Purl
Row 3: 3/3 RC, k3.
Row 5: Knit.
Row 7: K3, 3/3 LC.
Row 8: Purl
Rep Rows 1-8 for Cable patt I.
Cable Pattern II (worked in the rnd over 9 sts)
Rnds 1 and 2: Knit.
Rnd 3: 3/3 RC, k3.
Rnds 4, 5 and 6: Knit.
Rnd 7: K3, 3/3 LC.
Rnd 8: Knit.
Rep Rows 1-8 for Cable patt II.
NOTES
1. The Lower Band is worked as a flat strip, working back and forth in rows on the circular needle. Ends of strip are seamed to make a ring, then sts are picked up along one long edge of the Band for the Poncho.
2. A cable pattern is worked on the Lower Band, Poncho, front band and hood. If desired, stitch markers can be used to highlight those sts.
3. Poncho is worked in the round, then divided at neck and worked back and forth in rows.
4. After shaping at top of Poncho has been completed, the remaining sts are used to make the front band.
5. Sts are picked up along the edge of the front band to make the hood.
6. Some sections of the Poncho include selvedge sts. These are sts that create an edge for seaming pieces together.
PONCHO
Lower Band
Note: Lower Band is worked back and forth on a circular needle in rows, as if working on straight needles.
With A, cast on 15 sts.
Row 1: K2, p1, work Row 1 of Cable patt I over next 9 sts, p1, k2.
Row 2: K1, p1, k1, work next row of Cable patt I to next marker, k1, p1, k1.
Row 3: K2, p1, work next row of Cable patt I to next marker, p1, k2.
Rep Rows 2 and 3 until piece measures about 44 (48, 52, 56) in. (112 (122, 132, 142) cm) from beg.
Bind off.
Seam cast on end of Band to bound off end of Band to make a ring.
Poncho
Along one long edge of Band, measure about 11 (12, 13, 14) in. (28 (30.5, 33, 35.5) cm) from seam and place a marker.
Note: To work the next section, you will be picking up sts evenly spaced across the marked edge of Band. An easy way to do this is to divide the edge into halves, then quarters, etc - using pins or scraps of yarn to mark the sections. Now, simply pick up and k sts within each of the sections - for example, for the smallest size you will need to pick up and k 132 sts. If you first divide the long edge of the Band into 8 equal size sections, you should pick up and k 16 sts evenly spaced across sections 1, 3, 5 and 7 and 17 sts evenly spaced across sections 2, 4, 6 and 8 for a total of 132 sts.
From RS with B and beg at marker, pick up and k132 (144, 156, 168) sts evenly spaced along long, marked edge of Band. Place marker for beg of rnd. Join by working the first st on left hand needle with the working yarn from the right hand needle and being careful not to twist sts . Work in Rev St st worked in the rnd (p every rnd) for 7 rnds.
Change to A.
Next Rnd: With A, k11 (12, 13, 14), *kfb, k1; rep to last 11 (12, 13, 14) sts, kfb, k to end of rnd –
187 (204, 221, 238) sts at the end of this rnd.
Next Rnd: *Work Rnd 1 of Cable patt II over 9 sts, p8; rep from * around.
Next Rnd: *Work next rnd of Cable patt II over 9 sts, p8; rep from * around.
Rep last rnd until piece measures about 12 (12 1/2, 13, 13 1/2) in. (30.5 (32, 33, 34.5) cm) from pick up rnd, ending with a Rnd 4 or Rnd 8.
Note: Ending with a Rnd 4 or Rnd 8 means that the last rnd you work should be a Rnd 4 or Rnd 8.
Note: The remainder of Poncho will be worked back and forth in rows on circular needle. If you ended with a Rnd 4 above, you should beg Next Row with Row 5 of Cable patt I. If you ended with a Rnd 8 above, beg Next Row with Row 1 of Cable patt I.
Next Row (RS): K1 (selvedge st for neck), kfb, k7, *p8, work next row of Cable patt I over next 9 sts; rep from * to last 8 sts, p6, kfb, k1 (selvedge st for neck) –189 (206, 223, 241) sts. Remove beg of rnd marker.
Next Row (WS): K1 (selvedge st), pm, k8 (Rev St st worked in rows), work next row of Cable patt
I over next 9 sts, pm, * k8 (Rev St st worked in rows), work next row of Cable patt I over next 9 sts; rep from * to last st, k1 (selvedge st).
Decrease for top of Poncho
Next (Dec) Row (RS): K1, *work next row of Cable patt I over next 9 sts, p2tog, p6; rep from * to last st, k1 – 178 (194, 210, 227) sts.
Keeping first and last sts in Garter st (k every row), remaining sts in Cable patt I and Rev St st st, work even for 3 rows.
Note: When you see ‘work even’ in the instructions, this means to continue on in the pattern st you have established without changing the st count by increasing, decreasing, or binding off.
Next (Dec) Row: K1, *work next row of Cable patt I over next 9 sts, p2tog, p5; rep from * to last st, k1 –167 (182, 197, 213) sts.
Work even for 3 rows.
Next (Dec) Row: K1, *work next row of Cable patt I over next 9 sts, p2tog, p4; rep from * to last st, k1 –156 (170, 184, 199) sts.
Work even for 3 rows.
Next (Dec) Row: K1, *work next row of Cable patt I over next 9 sts, p2tog, p3; rep from * to last st, k1 –145 (158, 171, 185) sts.
Work even for 3 rows.
Next (Dec) Row: K1, *work next row of Cable patt I over next 9 sts, p2tog, p2; rep from * to last st, k1 –134 (146, 158, 171) sts.
Work even for 3 rows.
Next (Dec) Row: K1, *work next row of Cable patt I over next 9 sts, p2tog, p1; rep from * to last st, k1 –123 (134, 145, 157) sts.
Work even for 3 rows.
Next (Dec) Row: K1, *work next row of Cable patt I over next 9 sts, p2tog; rep from * to last st, k1 –112 (122, 132, 143) sts.
Work even for 3 rows.
Next (Dec) Row: K1, *work 8 sts in Cable patt I, k2tog; rep from * to last st, k1 – 101 (110, 119, 129) st.
Size S ONLY
Proceed to All Sizes, below.
Sizes M (L, 1X/2X) ONLY
Next Row (WS): P1 (1, 13), *p2tog, p8 (4, 2); rep from * to last 3 (3, 13) sts, p2tog, p to end of row – 101 sts.
Next Row: Knit.
All Sizes
Next Row (WS): Bind off 90 sts for neck, k1, work next row of Cable patt I over next 9 sts, k1 – 11 sts.
Front Band for Hood
Note: Front band is worked on rem 11 sts then sewed to the left neck edge. Sts are then picked up along the band to make the hood.
Next Row: K1, work next row of Cable patt I over next 9 sts, k1. Rep last row until piece measures about 34 1/2 in. (87.5 cm) from picked up sts, end with a WS row.
Note: End with a WS row means that the last row that you work should be a WS row. Bind off.
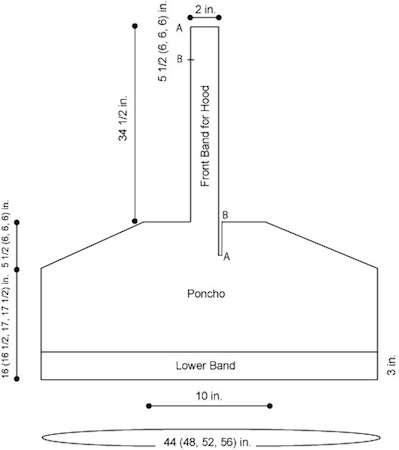
Without twisting band, sew edge of last 5 1/2 (6, 6, 6) in. (14 (15, 15, 15) cm) of band to neck, refer to schematic to match A to A and B to B. Sew bound off end of band to inside of Poncho.
Hood
Note: Hood is worked back and forth in rows.
From RS with B, pick up and k 86 sts evenly spaced along inner edge of front band.
Work in Rev St st for 7 rows.
Change to A.
Next (Inc) Row (RS): K6, *k1, kfb; rep from * to last 6 sts, k6 – 123 sts.
Next Row: K1, *work Row 2 of Cable patt I over next 9 sts, k5; rep from * to last 10 sts, work
Row 2 of Cable patt I over next 9 sts, k1.
Next Row (RS): K1, *work next row of Cable patt I over next 9 sts, p5; rep from * to last 10 sts, work next row of Cable patt I over next 9 sts, k1.
Next Row (WS): K1, *work next row of Cable patt I over next 9 sts, k5; rep from * to last 10 sts, work next row of Cable patt I over next 9 sts, k1.
Rep last 2 rows until piece measures about 8 in. (20.5 cm) from picked up sts, ending with a WS Row.
Shape Hood
Next Row (RS): Bind off 42 sts (for side of hood), *work next row of Cable patt I over next 9 sts, p5; rep from * to last 10 sts, work next row of Cable patt I over next 9 sts, k1 – 81 sts.
Next Row (WS): Bind off 42 sts (for side of hood), *work next row of Cable patt I over next 9 sts, k5; rep from * to last 10 sts, work next row of Cable patt I over next 9 sts, k1 – 39 sts rem.
Note: You will now continue on remaining sts for center panel of hood.
Next Row: K1 (selvedge st), *work next row of Cable patt I over next 9 sts, p5; rep from * to last 10 sts, work next row of Cable patt I over next 9 sts, k1 (selvedge st).
Next Row: K1, *work next row of Cable patt I over next 9 sts, k5; rep from * to last 10 sts, work next row of Cable patt I over next 9 sts, k1.
Rep last 2 rows until piece measures about 7 1/2 in. (19 cm) from bound off sts.
Bind off.
FINISHING
Sew bound off edge of sides of hood to center panel of hood. Sew lower edge of hood to Poncho neck.
Weave in ends.
Every effort has been made to produce accurate and complete instructions. We cannot be responsible for variance of individual knitters or crocheters, human error, or typographical mistakes.
©2013 Lion Brand Yarn Company, all rights reserved.