BUILDING THE MOTOR
A WELL-CONSTRUCTED glider alone makes a fascinating toy, but once the motor has been installed it seems almost alive. Your little craft will now be ready for new conquests. It will imitate the flights of the famous aviators, contending with the same problems, perhaps meeting similar accidents.
The motor is the most interesting, as it is the most important, detail of the aëroplane. Although it is possible to buy the propellers for the motor, it is advisable that every boy should work out this problem for himself. An effective motor is easy to build, and costs practically nothing. The length of your propeller-blades should be equal to about one third the width of your largest plane. For this you will need six strips of some light wood, such as pine or ash, although a cigar-box wood, if the grain be straight, will answer. Cut the strips to measure about half an inch in width and one eighth of an inch thick. (See Plate B.)
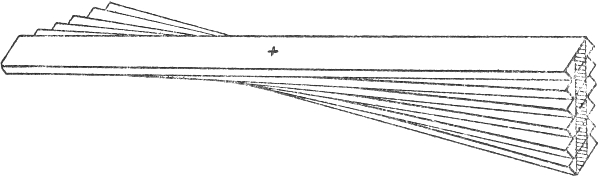
THE PROPELLER BEFORE CUTTING DOWN.
PLATE B.
The strips should be covered with a thin glue and laid one on top of another, and a very thin nail be carefully driven through the little pile at the exact center between the two ends. While the glue is still soft, turn the sticks on the axis formed by the nail, so that they make a double fan, spacing the outer edges about one quarter of an inch apart. Be certain that the fan is regular, and then give the nail a final rap to tighten its hold and keep all the glued surfaces together, and set away to dry. If you can prop up the ends it will be better to put a flat-iron or other weight on each end to make the strips glue together tighter.
The thrust or propelling power depends as much upon the curves of the propeller as upon the force with which the motor is driven. If the propeller be too flat, it will not take hold of the air, while if the pitch or angle of the curve be too sharp, it will simply bore holes in the air and create a vacuum which is useless. The pitch should be about one in twelve; that is, if the propeller-blade be twelve inches long, the curve should be one inch high.
When the glue is thoroughly dry and hard the projecting step-like edges may be cut away. A flat chisel or an ordinary pen-knife will do the work. Be careful to keep the ends uniform, since much depends upon the balance. Cut away the wood until the blades are one eighth of an inch or less in thickness, and round off the corners. The propeller should then be sandpapered perfectly smooth and varnished. You will be delighted to find how professional and shipshape the finished propeller will be.
Now carefully remove the nail fastening the pieces, and you will find, of course, that it marks the exact center and forms a perfect axis. Should you need to enlarge this hole, do not attempt to bore it, since this may split the wood, but burn it out, using a nail heated over a gas-flame. Now insert a stiff wire in this hole—a hat-pin will answer—and fasten it by clenching it at the back tight to the propeller, and fill up the hole with glue. The photographs of the propellers of various models will give you an excellent idea of the proper curve.
Aviators differ as to the proper position for the propellers in toy aëroplanes. Here is a problem you must work out for yourself. Some believe that the propeller placed in front of the planes gets a firmer grip on the air, since when the propeller is at the stern the planes make many disturbing currents, just as a steamship churns the water in its wake. Others argue that by placing this propelling force at the rear of the planes the craft is made more steady. At any rate, excellent flights may be made with either arrangement.
In connecting up your propeller with the motor it is very important that the shaft should turn freely and that the bearings offer the least possible resistance. If you have built your aëroplane from the drawing (see Plate A), now drill a hole exactly in the center of the stick which crosses the triangle at the rear of the frame. This hole will come on a line with the apex of the prism, or exactly in the center of the triangle. When the turning of the motor pulls the ends of the frame together, the strain will therefore be exactly distributed among the three sides or braces.
The propeller must be kept clear of the frame and must never touch or scrape against it. First a thin strip of metal, drilled to take the axle or hat-pin, should be nailed over the hole in the crosspiece. A sheet of aluminium such as is used for name-plates is just the thing. Now on the propeller-wire or axis string a smooth, symmetrical glass bead, and pass the axle through the metal strip and the crosspiece. This will give you an excellent substitute for ball-bearings. The end of the wire should then be turned into a hook well inside the frame. The propeller should be mounted so carefully that it will turn freely without friction and without wabbling from side to side.
The simplest and most effective motor is formed by connecting the two hooks with many turns of a long, thin strand of rubber, which can be bought by the yard or pound. The thinner strands of rubber will exert more force than the heavy bands, and red rubber is more durable than any other. The bands should be looped loosely between the two hooks, just as you would wind a skein of zephyr—over the hook on the propeller-“shaft,” then around the hook at the other end, then down over the propeller-shaft hook, and so on. If the hooks be three feet apart the combined strands should form a band one inch or more in diameter. If you cannot buy the rubber in this form, a number of two-inch rubber bands, such as you buy by the box at the stationer’s, may be lopped chain fashion together to form a continuous rope from hook to hook.
To store up energy for the flight, simply turn your propeller round and round until the rope of rubber bands is tightly knotted. You can readily tell when it is sufficiently wound and the danger-point is reached, which comes when the pull of the rubber grows too strong for your frame. The average motor should be turned about one hundred and fifty times. When the propeller is released the rubber bands in unwinding will give you back almost exactly the same number of revolutions, less perhaps one or two, which represents the loss through friction.
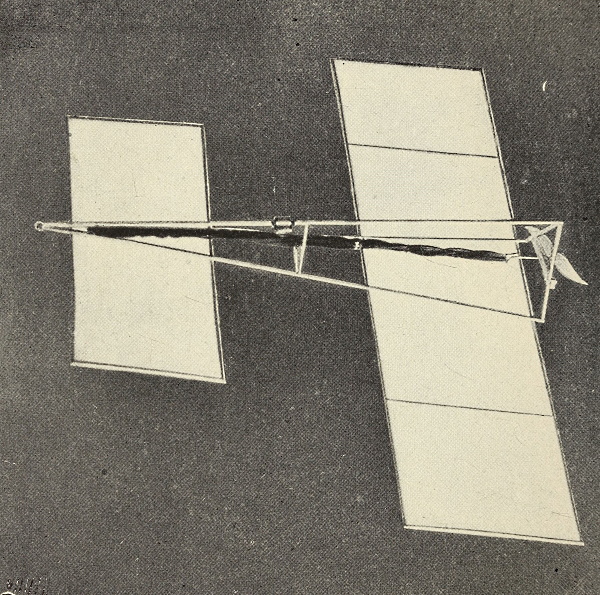
Model Constructed from Diagram, Plate A.
If the propeller simply buzzes around, coming to rest in a few seconds, without raising your aëroplane, it is probably too small for the weight of the aëroplane. When fully wound up the propeller should run for about ten seconds. On the other hand, if the propeller be too large, it will quickly twist the aëroplane out of its course and drive it to earth. It is well to try out your motor thoroughly to make sure of its running smoothly before attempting any actual flights.
Do not yield to the temptation of trying your wings, however, until the skids have been attached. Most of the regular full-size aëroplanes run on ordinary bicycle wheels, although the Wrights use runners like a sleigh. These skids or runners enable the machine to run along the ground with the least possible friction and greatly assist in rising. In the models of aëroplanes the skids serve a double purpose in protecting the machine when it alights.
A serviceable skid may be made by building a triangle of thin strips and attaching it to the frame with the broad side downward, as shown in the accompanying drawing. Skids made of reed curving down from the main body of the aëroplane will also serve to take up the shock. There are many ways of constructing these skids, and a study of the models here illustrated will give many suggestions. If you intend to have your aëroplane start from the ground, the front skids should be somewhat longer than those in the rear to give it the proper lift.
The friction of the skids is greatly reduced by mounting them on wheels. Small metal wheels may be borrowed from toy automobiles, or small disks of wood or cork will answer for the purpose. A very simple axis may be formed by running a long hat-pin through the uprights of the skids. The photographs of the best models will be found full of suggestions. You will need at least three skids to form a tripod for your aëroplane. It makes little difference if you use one leg in front, or two.
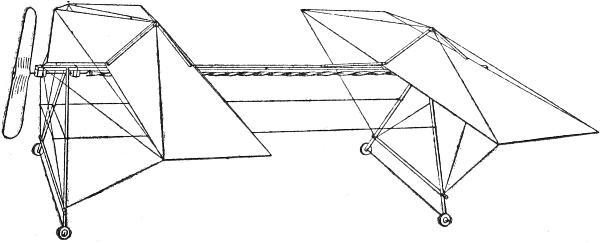
It is very important that the frame should be properly braced to withstand the strain brought upon it. In the glider this bracing is less important, but the action of the motor changes the situation. The rapid movement of the propellers wracks the entire frame, and the impact on landing is naturally greater when the weight is increased. A thin copper wire, No. 32, 34, or 36, should be used, which will be found strong and flexible, while adding little to the weight. After constructing your aëroplane go over it carefully and cut away the wood wherever it may be lightened, and then strengthen it by bracing. Wherever a joint may be strengthened or a strut or a plane be made more rigid by bracing, do not spare the wire.
The accompanying drawing, with the photographs of models, will indicate how these braces may best be applied. To begin with, braces should be run, wherever possible, from the corners of the planes to the central frame and the skids. In the monoplane forms you will find it worth while to add posts or perpendiculars to the upper side of the frame and run wire braces diagonally to the ends of the planes. The extreme ends of the planes should also be connected.
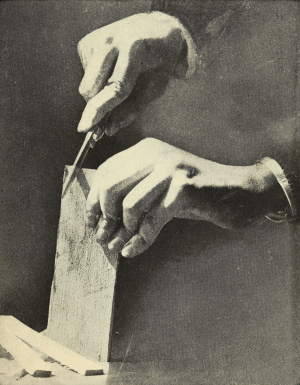
Splitting the Cigar Box Cover to Build the Propeller.
No matter how carefully you have constructed your aëroplane, you will find the planes have a tendency to sag and become wrinkled. These braces give you the opportunity to pull them taut and hold them in this position. This is commonly called “tuning up” the aëroplane. It will be found convenient to fasten small rings to the ends of the braces whenever they may be slipped over the ends of the frame to save the trouble of winding. The more perfectly your aëroplane is tuned up, the greater will be its speed and distance qualities.
THE DIAGRAM OF A MONOPLANE.
Planes measure 20 inches by 8 inches. The motor base is 36 inches in length.
PLATE C.
An excellent monoplane for the beginner is shown in drawing. (Plate C.) It is very simple and easily adjusted, and when well tuned up will fly upward of two hundred feet. The two planes are built separately in the proportion indicated. The frame consists of a central stick supported by triangular skids. An ordinary hat-pin run through the supports near the ground serves as an axle for wooden disks or wheels. The front skids are made somewhat higher to give the front planes the proper angle of elevation.
The bracing of the planes is simple but effective, and should be copied carefully, particularly the double bracing in the rear, using ordinary wire for the purpose. A double support is used for the axle of the propeller, an excellent idea, which keeps the shaft rigidly in place. It is formed by fastening two blocks drilled to hold the axle to the bottom of the main frame. The planes are held taut by wires running from the corners to a post at the middle of the plane. The front plane is hinged at its rear edge, and may be tilted by pulling back a piece of whalebone fastened at its center, which is tacked to the top of the frame. The rudder turns on a triangular frame attached to the top of the rear plane. A string passes through the rear end of the rudder to the rear edge of the plane, forming a triangle, which makes it possible to adjust the rudder-plane and fix it rigidly in position.
After you have built one or two models you will find yourself confronted by a bewildering number of schemes for constructing new forms. It will be found a very simple matter to use stiff wire for many parts of your model instead of wood or reed. In building rounded planes the wire will be a convenience. The wire may be attached to the wooden frame by embedding it in the wood and binding it fast. And, by the way, you can get a surprising effect by painting your wooden frame with silver paint, as the Wrights do. To all appearance you will have an aluminium frame.
An aëroplane to be considered shipshape must be even more perfect in every detail than the finest racing yacht. Go over your model, scrutinize every detail; if after taking every precaution, your planes do not fit like the sails of a racing yacht, cover them with a thin solution of paraffin. On hardening, this will hold the material perfectly smooth, so that the planes will offer a perfect lifting surface.
The amateur aëronaut must be prepared for disappointments. An aëroplane is one of the crankiest crafts in the world to manage. It may twist and turn, plunge in and out, up and down, apparently without the least excuse. There is always, however, a good reason somewhere for its behavior. As you learn its ways, which, after all, are very simple, the flights will be longer, swiftier, and steadier. There is no toy in the world which so quickly repays one for patience and perseverance.