This tutorial is slightly more complicated than the previous one. It is mainly intended to give an introduction to Polyphonic voicing. You might want to study the first chapters of this Scoring manual before trying this tutorial out, since it assumes you are at least vaguely familiar with how to move notes etc.
On your Cubase VST CD-ROM, you will find a folder called “Score Tutorials”. One of the files in this folder is called Tutorial 2. This is an Arrange file with a recording of three bars of piano music. To get this properly scored we need to use something called Polyphonic Voices. An introduction to this is found on page 129. Below we will concentrate on how to use Polyphonic Voices rather than how they work.
2. Set up an instrument to play a piano sound on MIDI Channel 1. Play back the piece to listen to it.
Well it isn’t really perfectly played, is it? But we won’t correct it more than necessary, simply to show you don’t need perfectly played MIDI recordings to get perfect scores.
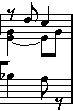
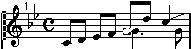
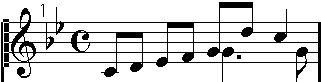
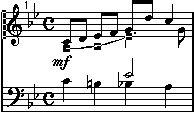
Right now it should look like this:
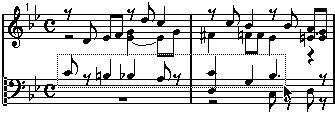
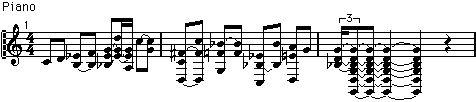 The score as recorded.
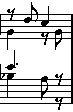
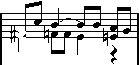
After we’re done, it will look like this:
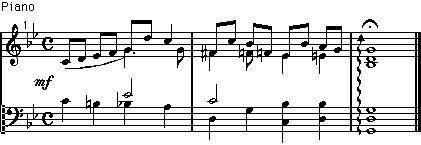 The score after formatting and editing.

The “Cut Time” time signature symbol.
2. Select Staff Settings from the Score menu.
3. Select Polyphonic from the Staff Mode pop-up menu.
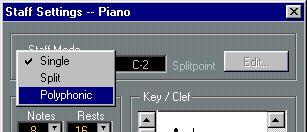 The Staff mode pop-up at the top of Staff Settings.
4. Click the Edit button.
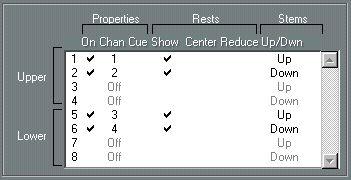
The Polyphonic Settings dialog appears.
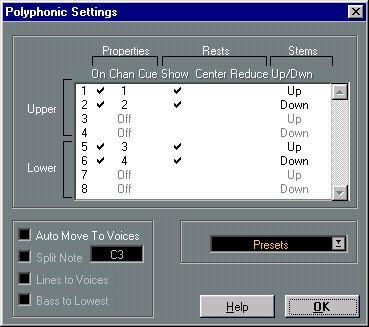 The Polyphonic Settings dialog.
We now have to specify the voices we need. Look at the picture of the finished score, above. You will see that there are at the most two notes sounding at the same time which are not part of the same chord (for example at the end of bar 1 and the beginning of bar 2, but also in many other places). To be able to score these separately and with different stem direction, we need a voice for each.
The dialog is already set up with two voices for the upper staff, one with stems up and the other with stems down, so let’s leave that as it is.Check the lower staff in the finished score above. There we have the same phenomenon, so two voices with different stems is fine there too.
Now we are going to use a feature called “Auto Move To Voices” which automatically puts notes into voices, saving a lot of time compared to performing it manually. One of the pieces of information we need to supply in this case is where we should initially split the system to create as little work as possible afterwards. The best point for this piece seems to be C#3.
5. Activate Auto Move To Voices. Activate Split Note and set it to C#3. Make sure Lines To Voices and Bass To Lowest are turned off.
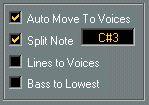
Set up Auto Move To Voices like this.
6. Click OK.
9. Make sure Auto Quantize is deactivated.
Auto Quantize is best used when you have mixed regular notes and triplets, which we don’t in this example.
In many cases you will need to use these, but you could always try with them turned off, first.
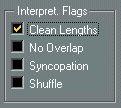
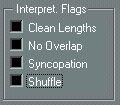 All Interpretation Flags turned off.
11.Use the right scroll bar in the Clef/Key section to set two flats.
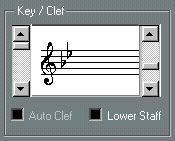 12.Activate the “Lower Staff” checkbox to check you have the right clef and key (bass clef – two flats) for the bass staff.
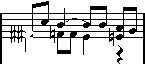
 The Auto Layout button on the Score Toolbar.
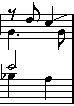
The score should look like this:
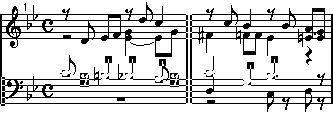
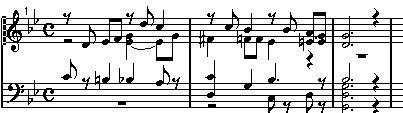 The score after using “Auto Move To Voices”.
Ok, it’s closer but we still have quite a bit of work left to do.
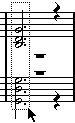
Please examine the Score. Notes on the treble clef with stems up are in Voice 1. Notes with stems down on the same clef are in Voice 2. The same goes for the bass clef, but notes with stems up are in Voice 5 and notes with stems down are in Voice 6.
Things seems to be completely wrong in the lower staff. Most notes are pointing up when we want them pointing down. Let’s move a few of them right away, to get them in the correct Voice.
1. Select notes in the lower voice by dragging a selection rectangle around them and then release the mouse.
The rectangle should look like this:
 so that the following notes get selected:
2. Pull down the Score menu and select “Move To Voice” from the “Staff Functions submenu. Yet another submenu appears - select Voice 6 from this. Click in some white space in the score to deselect.
Many of the notes at the lower staff now have the correct stem direction.
 The Score after moving the notes on the lower staff to a new voice.
There seems to be a note missing at the downbeat of the first bar. How can this be? Well, if you look in the score example, many notes occur in two voices, to make the score more legible. This first note is an example of this. It appears on the lower staff, but we need it on the upper too. We will now enter the note, but first we have to make sure it goes into the right voice.
3. To make the Voice buttons on the Score Toolbar show Voice 1 to 2, click anywhere in the upper staff.
 Voice 1 selected on the Score Toolbar.
5. Click on the eighth note symbol on the Score Toolbar and enter an eighth note C3 at the beginning of the upper staff.
Since it is in the same Voice as the next note, they get beamed automatically.
 A note added at the downbeat.
Check the notes in the middle of the first bar. The lower of the two seems to be on the wrong staff. We want it pointing upwards, on the lower staff, which means we need to move it to the Voice 5.
6. With the arrow tool, click on the note to select it.
 Before and after moving the note to a voice on the lower staff.
Check the note we just moved, it appears as a dotted quarter. We want a half note, right? So the note was played a bit too short. Of course, we could change the note’s length, but there’s a better way. Cubase knows that notes are often played shorter than scored and has a special feature for this:
1. Open Staff Settings again.
 Clean Lengths activated.
3. Click OK.
The note is now shown as a half note, but when you play back, it still has the same sounding length. Clean Lengths is yet another example of a function that only affects the display of notes.
 The same part of the score with Clean Lengths Off and On.
Let’s again examine the middle of the bar on the upper staff. There seems to be a note missing now. As you can see we want two notes with the same pitch at the same position, but with different stem directions. The one we have goes down, so we need one that goes up. This means we have to insert it into Voice 1.
1. The Voice button on the Score Toolbar may show 5 to 6. If it does, use the Arrow Tool to click in the upper Staff.
 A new note added at the same position and pitch as an existing.
Oops, it wound up just before the other one, not on top of it. This is OK for now though, and is even acceptable notation. But we will go back and make it even better later!
When we turned on Clean Lengths we fixed the dotted quarter on the bass clef. But we gave ourselves a new problem. A C4 on the last quarter on the upper staff is now displayed as too long. In fact it was played a little bit too long. Let’s shorten it.
4. Click on the quarter note on the Score Toolbar.The tie goes away.
Before and after changing the length of the note. 6. At the downbeat of bar 2, enter an eighth note F#3 into voice 1, just as you did above. Watch the pitch box on the Status Bar while entering the note so that you get the pitch right.
Again, adding a new note with the same pitch and position as an existing.
Oops, we got two notes, on top of each other, with a sharp each! Doesn’t look too good.
7. Select the new note, if it isn’t already selected. Then click on the “No” button among the accidentals in the Score Toolbar.
The accidental of the note is hidden.
8. Change the length of the Bb3 at the second beat to the eighth note it should be. This time we could try another way of changing lengths of notes: Hold down [Ctrl], point at the note with the arrow tool and press the mouse button. A “length slider” appears.
The length is displayed in sixteenth notes and ticks. Since we want an eighth note, you should drag the slider so that the length is “2.0” (two sixteenth notes and zero ticks).9. Move the second F3 in measure two, from Voice 2 to Voice 1.
This time you might try using the keyboard. You can move notes to Voices by holding down [Alt]+[Ctrl] and pressing a number key on the typewriter part of the keyboard. For example, to move a note to Voice 1, select it and press [Alt]+[Ctrl]-[1].
12.The E3 at the end of the bar seems to be in the wrong voice. Move it to Voice 2. Again, a quick way is to select it with the arrow tool, hold down [Alt]+[Ctrl] and press [2]. The Score should now look like this.
At the beginning of bar two, the notes in the lower staff are both pointing in the wrong direction. Remember that notes pointing up in the lower staff are in Voice 5 and notes pointing down are in Voice 6.
1. Select each of the two notes and move them to the other voice.Before and after shifting the voices of the notes. 2. The C3 is too short, make it a half note.
The rest after it disappears.
In the second half of the bar, the A#2 seems to have been played tied when it should have been two notes. Let’s split it up.
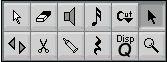
3. Select the Scissors from the Toolbox.
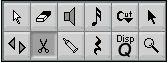 The Scissors tool in the Toolbox.
4. Click on the tied Bb2.
It is split into two notes.
Before and after splitting.
5. The Bb2 in the last bar should be on the upper staff. Move it to Voice 1.
All the notes in the last bar are too short. Let’s lengthen them all at once. 1. Drag a selection rectangle around all the notes in the last bar.
 A selection rectangle to select all the notes in the last bar.
2. Hold down [Ctrl] and click on the whole note on the Score Toolbar. All selected notes are set to the note value you clicked.
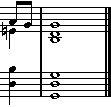
 The notes in the last bar lengthened to whole notes.
1. Open Staff Settings.
2. Click on the Edit button.
The rests will now be hidden for these two voices.
4. Make sure Auto Move To Voices is not activated, and click OK in this dialog and the one behind it.
Auto Move To Voices should be turned off since we don’t want to move any notes to new voices at this point when we’re almost done!
 Auto Move To Voices should be turned off.
There’s one measure too many at the end. This is simply because the Part we recorded into is too long! We could shorten the Part in the Arrangment, but it’s even easier to remove the last bar from within Score Edit:
5. Make sure the Arrow tool is selected, hold down [Alt] and [Shift] and click on the barline before the last bar.
This moves the Song Position to the beginning of the fourth bar - check the Transport Bar, it should show “4.1.1.0”.
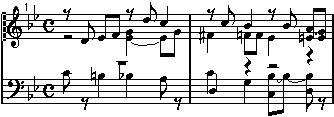
 The score as it should look at this point.
 The Auto Layout button on the Toolbar.
The program selects widths for the bars, depending on their “density” of notes. Maybe you would like the bars to be a little wider, to make the piece even easier to read? 2. If you don’t have the regular arrow pointer selected, select it.
3. Position the pointer over the last bar line, press the mouse and drag a couple of centimeters to the right.
All the bars get proportionally expanded.
4. To adjust the width of the last bar only, hold down [Ctrl] and drag the last bar line again.
Give it some space, we need room for the arpeggio.
 The last bar shortened by dragging.
We will now use the Layout Tool. This allows you to move notes graphically, without affecting their “musical” position. In other words, moving notes with the Layout Tool doesn’t affect playback.
5. Select the Layout Tool from the Toolbox.
 The Layout Tool in the Toolbox.
6. Select 200% from the Scale pop-up menu to the right of the horizontal scroll bar.
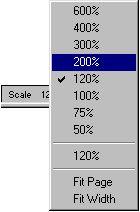 The magnification pop-up is
 7. Use the scroll bar so that you can see the upper staff and the middle of measure 1.
 The score in 200% magnification.
8. Drag the dotted quarter note to the left so that it winds up on top of the note just to the left of it.
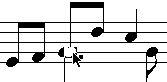
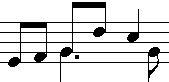 Dragging the note with the Layout Tool. The second picture shows the final result.
9. Select 100% again.
Dragging the note with the Layout Tool. The second picture shows the final result.
9. Select 100% again. 1. Pull down the Score menu, select “Symbol Palette” and from the submenu that appears, select “Dynamics”.
The Dynamics symbols palette appears.
2. Click on the mf symbol in the palette.
The Pencil tool is automatically selected. If the Pencil tool doesn’t appear, double click on the symbol instead (there is a preference for this, as described later in this manual).
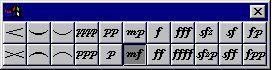 The “Dynamics” part of the Symbol Palette, with the mezzo forte symbol selected.
3. Move the pointer into the score and click where the “mf” should be.
The “Dynamics” part of the Symbol Palette, with the mezzo forte symbol selected.
3. Move the pointer into the score and click where the “mf” should be.The mezzo forte symbol appears.
4. Select the arrow tool.
5. Select the first five notes in Voice 1 in the first bar.
You can do this by dragging a rectangle, or by holding down [Shift] and
clicking.
6. Pull down the Do pop-up menu and select Insert Slur.
A slur is automatically created, spanning the selected notes. But it would look better if the slur was on the downside of the notes instead.
 The slur as it should look.
8. Click or double click on the crescendo symbol in the Dynamic symbol palette so that the Pencil tool is selected again.
9. Point at the position where you want the crescendo to start, drag to the right and release the mouse button.
Repeat this for the other crescendo symbol, according to the picture on page 26.
The Palette window switches to show the Note Symbols palette.
11.Click or double click on the fermat we need, so that the Pencil tool is selected.

A fermat selected in the Palette.
12.Make sure Voice 1 is selected on the Score Toolbar.
 Clicking on the note adds the fermat above it.
14.Select the regular arrow pointer and click on the top note on the lower staff. Move it to Voice 5, so that the other fermat that we are about to enter, will wind up above the note, not below.
Fermats are positioned after stem direction for the voice.
15.Click the fermat again in the Palette and click on the top note in the lower staff.
16.From the Palette’s pop-up, select Line/Trill.
17.Click on the “arrow up” arpeggio.
 An arpeggio with default length and handles visible.
19.To change the height and position of the arpeggio, drag the upper and lower handles. If you can’t see any handles, click on the arpeggio using the regular arrow tool.
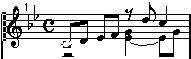
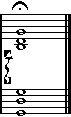
The final score.
This completes the second tutorial which has introduced you such advanced topics as Polyphonic voicing, adding Symbols of various types and using the Layout Tool. If you understood the purpose of the steps above, you’ll have no problem getting the most out of Cubase Score’s many additional features!